Quick Start
Revision History
| Version | Description |
Date |
|---|---|---|
| 1.0 | 06/27/2025 | |
This document aims to guide users in setting up the development environment for the COMAKE PI D1 development board, showcasing how to set up and use the Alkaid SDK development environment through some simple examples, including downloading the SDK, compiling, downloading firmware to the development board, and other related steps.
1. Overview
The Pcupid series SoC chip used in the COMAKE PI D1 supports the following features:
- The main chip SSD2355 uses a quad-core ARM Cortex-A35 with a maximum frequency of 1.5GHz;
- Onboard external 16bit 8Gbit DDR4-3200MHz;
- Onboard Flash: SPI Nand Flash 1G bit / SPI Nor Flash 128M bit;
- Supports 5-inch MIPI Panel (maximum interface 2560*1600@60fps);
- Supports 2lane or 1lane + 1lane MIPI RX interface;
- Supports WIFI6/BLE5.2/dual-band 2.4G&5G;
- Supports 2 USB2.0 ports (can be configured as host or device via software), with USB P1 default connected to SSW108GE USB WIFI Module;
- Supports dual Ethernet ports 100/10M auto-adaptive;
- Supports 24-channel 12-bit precision ADC and 5-channel 10-bit precision ADC;
- Supports 3-channel AMIC differential input;
- Supports maximum 8 CH DMIC input;
- Supports Lineout single-ended dual-channel output;
- Reserved 40-pin GPIO, which can be configured for other functions, such as TTL screen, FUART, etc.;
Based on the rich features of this development board, developers can customize functionalities according to their needs. For example, in the smart audio market, they can develop smart speakers, IP phones, story machines, omnidirectional microphones, and other products; in the small-screen display market, products like HMI, POS machines, and smart home central control can be developed; in the vision market, products like electronic microscopes, children's photography machines, and translation pens can be created; and in the robotics market, robotic products such as vacuum cleaners and companion robots can be developed.
Meanwhile, the Comake community provides users with comprehensive software and hardware development resources, and a detailed introduction to this development board can be referenced in the Development Board Interface Introduction.
2. Start Development
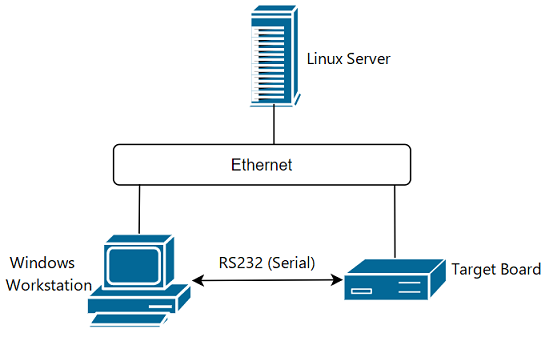
2.1. Hardware
- COMAKE PI D1 development board
- USB data cable (male to male)
- Serial port cable
- Power adapter (12V 2A)
Prepare the above-related hardware and refer to the development board's interface introduction to connect the relevant interfaces.
2.2. Software
Based on this development board, we provide the Alkaid SDK for further application development. It is a software development package based on the Linux kernel, which includes bootloader, kernel, riscv (optional), rootfs, and MI multimedia modules. Users can configure and compile software that can run on the Sigmastar platform using the makefile.
The architecture of the Alkaid SDK is shown in the diagram below. For further introduction, please refer to the SDK System Architecture Introduction.
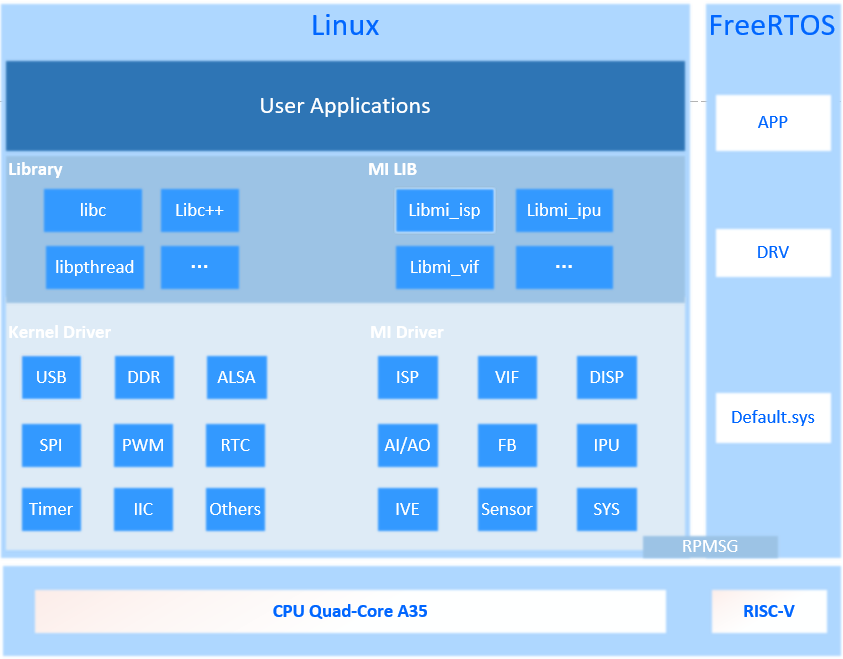
This SDK supports multi-core heterogeneous solutions, where ARM is used for general applications and RISC-V is used for real-time hardware control. Both CPUs share memory and peripheral resources, allowing for partitioned control.
2.2.1. Obtaining SDK and Images
Note
Note that this link leads to the Comake community.
2.2.2. Building the Compilation Environment
2.2.3. Compiling the First Burnable Image
Recommendation
There are several upgrading methods; it is recommended to prioritize using the UsbFactoryTool for upgrading.