Burning data in the Vendor Partition
1. USB_Write_SN_Tool
1.1. Introduction
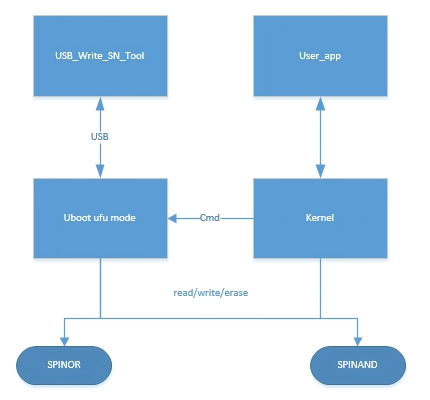
USB_Write_SN_Tool is a windows tool developed by sigmastar, which is used to burn some vendor information such as SN, KEY, MAC into the storage medium in the factory. This storage area is called vendor area, and these stored information are called vendor_id. The tool uses USB connection to let the PC communicate with the uboot on the board, and pass the command to uboot to execute, so as to read, write and erase the vendor area. At this time, uboot should be in ufu mode.
Under the kernel, the user-level app can also read, write, and erase the vendor area through the standard storage media operation interface.
You can switch to uboot ufu mode by restarting the kernel cmd, and then use USB_Write_SN_Tool to give uboot a command to exit ufu mode and restart to kernel.
1.2. uboot configuration
For uboot to communicate with USB_Write_SN_Tool, you need to enable the relevant config
Command line interface  --->
    SigmaStar common commands  --->
        [*] ufu
        ...
        [*] vendor partition
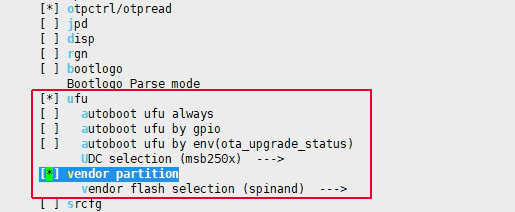
Open the config framed in the image and select the corresponding medium as type.
1.3. Storage format and related configuration
1.3.1 Storage in FLASH
All vendor_ids in the vendor area are stored in one block, and the offset address of each vendor_id is id_num * 128bytes. Uboot will determine how many blocks a partition has by the partition size, and will determine whether it is a bad block before the operation. If it is a bad block, the starting address of the operation will be moved down one block. Therefore, the production of the vendor area needs to reserve several blocks to prevent bad blocks. The storage format of each vendor_id in the flash is as follows:
typedef struct
{
    char magic[16]; //magic is the header string used for verification, the customer can modify this part of information
    int id_num; //vendor_id serial number, such as 0: SN, 1: MAC... The id_num of USB_Write_SN_Tool increases from top to bottom according to the order in the interface.
    int len; //The effective length of vendor_id
    char data[64] //vendor_id valid data
}vendor_id

Six blocks are allocated in the default partition configuration of nand. Since the space of nor is small and there are no bad blocks, only one block is allocated in the default partition configuration of nor.

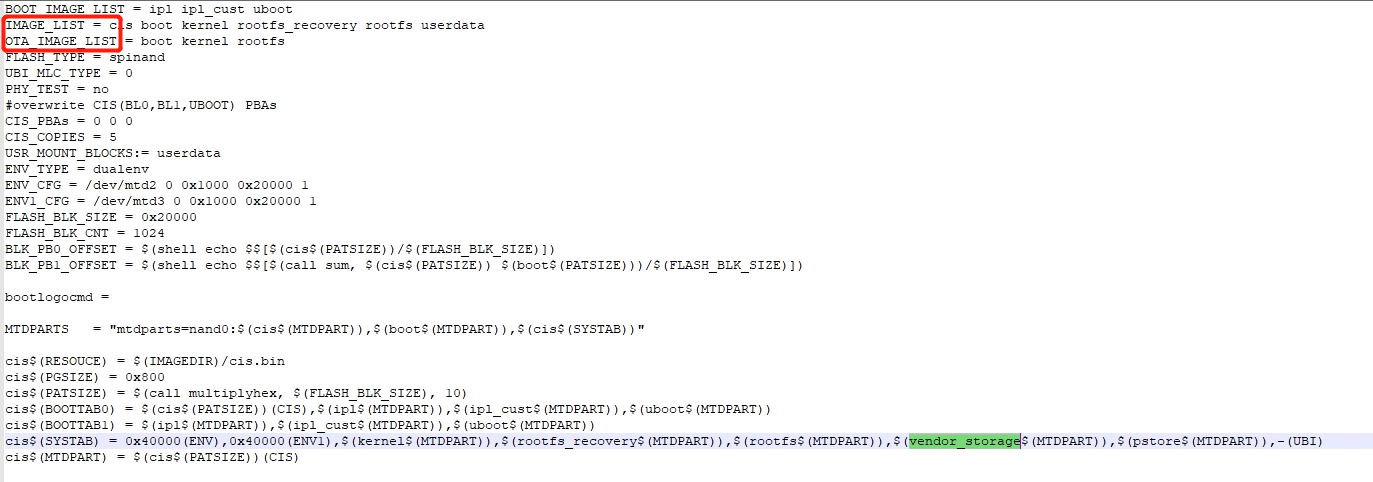
Since the vendor area is usually required not to be rewritten during flashing and upgrading, this partition will not be added to IMAGE_LIST and OTA_IMAGE_LIST.
1.3.2 Storage in EMMC
There are two ways to store emmc: store in the independent vendor_storage partition of emmc, and store in the reserved area of emmc. Because each block in emmc is only 512Bytes in size, each vendor_id in the vendor area is stored in a block. The storage format of each vendor_id is similar to that of FLASH, as follows:

1.3.2.1 Store in the independent vendor_storage partition of emmc
The public version stores data in the independent vendor_storage partition of emmc by default. If you do not want to store data in an independent vendor_storage partition, you can modify the corresponding config file in project/image/configs/general/, for example, the emmc.ext4fs.dual_sensor.riscv.partition.config file, and delete the vendor_storage partition created in it.
1.3.2.2 Store in the emmc reserved area
Currently, the 0x40 to 0x278 blks of the emmc are reserved. If stored in the reserved area, the tool will take a total of 64 blocks from 0x50 to 0x8F as the vendor area by default, which means that a maximum of 64 vendor_ids can be stored. When using this method to store vendor data, the vendor area does not need to be created and allocated by the user, and the vendor_storage partition created by default in the public version needs to be deleted.
1.4. How to enter uboot ufu mode
USB_Write_SN_Tool needs to communicate with uboot in ufu mode.
Here are several ways to enter uboot ufu mode:
- Execute
/etc/fw_setenv ota_upgrade_status 1;rebootunder kernel ; - Execute
setenv ota_upgrade_status 1;saveenv;resetin uboot ; - Execute
ufuunder uboot ;
Here are several ways to exit uboot ufu mode:
- If USB_Write_SN_Tool is successfully connected, click
Save and Restart; - After exiting with ctrl+c, execute
setenv ota_upgrade_status 0;saveenv;reset;
1.5. USB_Write_SN_Tool Usage Instructions
Tool Kit: USBWriteSNToolV1.0.0.4.zip
1.5.1 File List Description
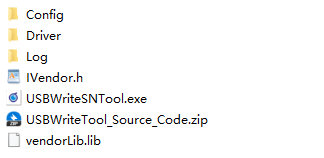
- Config folder: ini configuration file of vendor_id
- Driver folder: tool configuration file
- Log folder: diary file, one copy is saved every day
- USBWriteSNTool.exe: tool execution file
- vendorLib.lib: lib for secondary development of windows tools
- IVendor.h: lib corresponding header file
- USBWriteTool_Source_Code.zip: tool source code, reference code for secondary development
Due to different production scenarios and processes of customers, the requirements for the burning interface are also different. In order to meet the customized scenarios of customers, USB_Write_SN_Tool provides a secondary development lib, which includes an interface for communicating with uboot. Source Code provides customers with calling references.
1.5.2 Upgrade interface
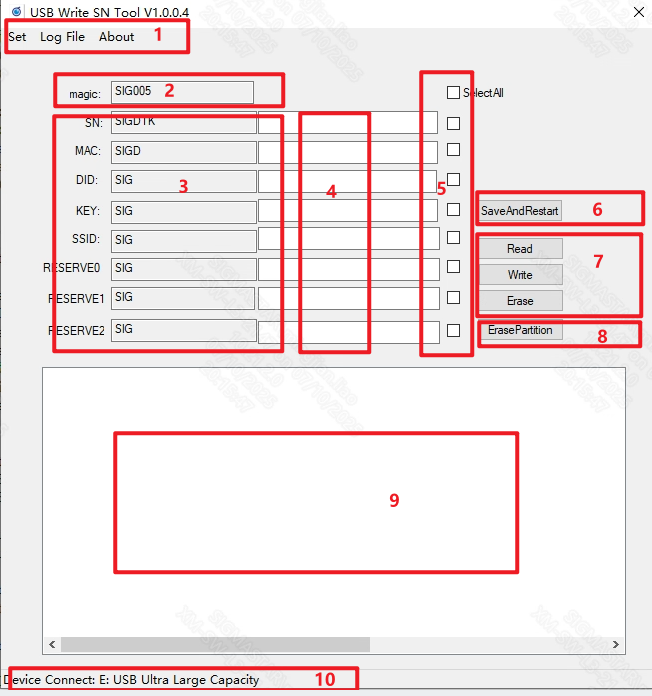
- Settings and configuration options
- Magic is the header string used for verification. The data must be consistent when writing and reading. If not, the data is invalid.
- The prefix of each vendor_id, generally used in scenarios where the first part of the data of the same batch of products remains unchanged
- The variable data part of each vendor_id only supports input of numbers
- Check the vendor_id that needs to perform the same operation
- After the product is burned, you must click this button to set the environment variable ota_upgrade_status to 0. Otherwise, you will not be able to exit ufu mode and cannot boot normally.
- For read, write and erase operations, the data written to the vendor area is prefix + variable data. For example: the prefix is set to SIG, the variable data is set to 123, and the data written is SIG123. The length of the written data must be consistent with the DataLength configured in the setting interface, otherwise an error will be reported.
- Erase the entire vendor area
- Log display
- Status bar, showing whether the device is successfully connected
1.5.3 Settings Interface
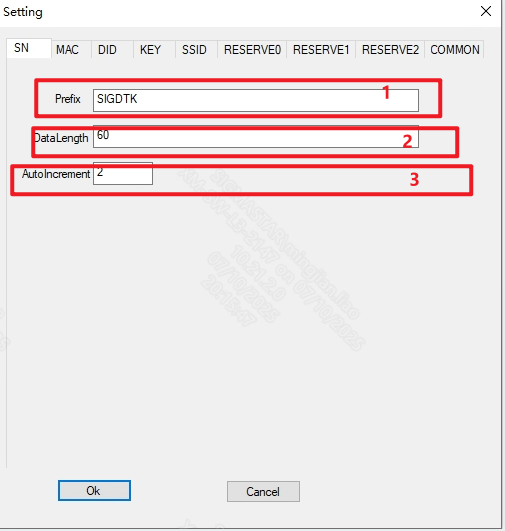
You can pre-configure the various ini files in the Config folder
- Set the prefix of vendor_id
- Length of valid data written
- Configure the value that automatically increases each time the vendor_id is written into the variable data input column. This is suitable for scenarios where the vendor_id of the same batch of devices increases continuously. Set it to 0 when the auto-increment function is not used.
2. vendor_burn demo
2.1. Introduction
As introduced in Section 1.1, the user-layer app can read, write, and erase the vendor area through the standard storage media operation interface. The user-layer demo source code can be found in sdk/verify/sample_code/source/pcupid/vendor_storage/.
2.2. Compilation
For compilation instructions, please refer to the Readme in the source code path.