ADB Porting and User Guide
1. Porting
ADB (Android Debug Bridge) is a command-line tool mainly used for communication and debugging with embedded Linux devices. It provides functions such as connection with devices, file transfer, debugging and command execution, and can establish communication with embedded devices through USB connection or network.
The ADB tool depends on OpenSSL and Zlib when it is compiled. Before compiling the ADB tool, you need to cross-compile OpenSSL and Zlib. The versions are as follows:
- OpenSSL: 1.1.1i
- Zlib: 1.2.12
1.1. Traditional method
1.1.1. OpenSSL cross-compilation
OpenSSL is an open source software library that provides a set of cryptographic functions and tools for secure communications. It is widely used in the implementation of security protocols, the establishment of encrypted communications, and the management of digital certificates.
1.1.1.1. Source code download
Version: 1.1.1i
1.1.1.2. Cross-compilation
After the resource package is downloaded, unzip it and enter the opensl-1.1.1i directory. Execute the Configure configuration file to configure the compilation tool chain and specify the corresponding installation path, as follows:
tar -zxvf openssl-1.1.1i.tar.gz
cd openssl-1.1.1i/
export PATH=/tools/toolchain/gcc-10.2.1-20210303-sigmastar-glibc-x86_64_aarch64-linux-gnu/bin:$PATH ; export ARCH=arm64 ; export CROSS_COMPILE=aarch64-linux-gnu-
./Configure --prefix=$PWD/install linux-aarch64
make clean -j8
make -j8
make install
Note that the export command in the above example steps specifies the compilation chain address. In actual operation, please declare it according to the actual compilation chain path. After executing the above steps, you will find the generated header files and library files in the openssl-1.1.1i/install/ path.
1.1.2. Zlib cross-compilation
Zlib is an open source data compression library that provides efficient compression and decompression functions.
1.1.2.1. Source code download
Version: 1.2.12
1.1.2.2. Cross-compilation
After the resource package is downloaded, decompress it and enter the zlib-1.2.12 directory. Execute the configure file to configure the installation directory as follows:
tar -xvf zlib-1.2.12.tar.xz
cd zlib-1.2.12/
export PATH= /tools/toolchain/gcc-10.2.1-20210303-sigmastar-glibc-x86_64_aarch64-linux-gnu/bin: $PATH ; export ARCH= arm64 ; export CROSS_COMPILE= aarch64-linux-gnu-
./configure --prefix=$PWD/install/ --shared
After generating the Makefile, you need to re-specify the compilation chain parameters:
-CC=gcc
+CC=aarch64-linux-gnu-gcc
...
-LDSHARED=gcc -shared -Wl,-soname,libz.so.1,--version-script,zlib.map
-CPP=aarch64-linux-gnu-gcc -E
+LDSHARED=gcc -shared -Wl,-soname,libz.so.1,--version-script,zlib.map
+CPP=aarch64-linux-gnu-gcc -E
...
-AR=ar
+AR=aarch64-linux-gnu-ar
....
-RANLIB=ranlib
+RANLIB=aarch64-linux-gnu-ranlib
Details of the Makefile settings:
make clean -j8
make -j8
make install
Note that the export command in the above example steps specifies the compilation chain address. In actual operation, please declare it according to the actual compilation chain path. After executing the above steps, you will find the generated header files and library files in the zlib-1.2.12/install/ path.
1.1.3. ADB cross-compilation
1.1.3.1. Source code download
git clone https://github.com/yoannsculo/adbd.git
1.1.3.2. Cross-compilation
After the download is complete, go to the adbd/adb directory and modify adb.h and Makefile.
Modify adb.h as follows:
-#define ADB_TRACE 1
+#define ADB_TRACE 0
Modify Makefile (can be directly overwritten):
# adbd

TOOLCHAIN=aarch64-linux-gnu-

SRCS+=adb.c
SRCS+=fdevent.c
SRCS+=transport.c
SRCS+=transport_local.c
SRCS+=transport_usb.c
SRCS+=sockets.c
SRCS+=services.c
SRCS+=file_sync_service.c
SRCS+=jdwp_service.c
SRCS+=framebuffer_service.c
SRCS+=remount_service.c
SRCS+=usb_linux_client.c
SRCS+=log_service.c
SRCS+=utils.c

VPATH+= ../libcutils
SRCS+= $(VPATH)/array.c
SRCS+= $(VPATH)/hashmap.c
SRCS+= $(VPATH)/properties.c
SRCS+= $(VPATH)/threads.c
SRCS+= $(VPATH)/socket_inaddr_any_server.c
SRCS+= $(VPATH)/socket_local_client.c
SRCS+= $(VPATH)/socket_local_server.c
SRCS+= $(VPATH)/socket_loopback_client.c
SRCS+= $(VPATH)/socket_loopback_server.c
SRCS+= $(VPATH)/socket_network_client.c
SRCS+= $(VPATH)/load_file.c

CPPFLAGS+= -DADB_HOST=0
CPPFLAGS+= -DHAVE_PTHREADS
CPPFLAGS+= -D_XOPEN_SOURCE -D_GNU_SOURCE
CPPFLAGS+= -fPIC
CPPFLAGS+= -I .
CPPFLAGS+= -I ../include
CPPFLAGS+= -I ../../zlib-1.2.12/install/include/
CPPFLAGS+= -I ../../openssl-1.1.1i/install/include/openssl/

CPPFLAGS+= -L ../../zlib-1.2.12/install/lib/
CPPFLAGS+= -L ../../openssl-1.1.1i/install/lib/

CFLAGS+= -O2 -g -Wall -Wno-unused-parameter
LDFLAGS= -static

LIBS= -lrt -lpthread -lcrypto -ldl

CC=$(TOOLCHAIN)gcc
LD=$(TOOLCHAIN)gcc
STRIP=$(TOOLCHAIN)strip

OBJS= $(SRCS:.c=.o)

all: adbd

adbd: $(OBJS)
    $(LD) -o $@ $(LDFLAGS) $(OBJS) $(LIBS) $(CPPFLAGS)
    $(STRIP) adbd

clean:
    rm -rf $(OBJS)
After the modification is completed, cross-compile:
cd adbd/adb/
export PATH=/tools/toolchain/gcc-10.2.1-20210303-sigmastar-glibc-x86_64_aarch64-linux-gnu/bin:$PATH; export ARCH=arm64; export CROSS_COMPILE=aarch64-linux-gnu-
make clean -j8
make all -j8
After execution, the adb device application adbd will be generated in this directory.
Note that the adbd generated in the above steps will depend on the dynamic library libz.so.1.
1.2. Based on Buildroot
adb belongs to the android-tools package, version 4.2.2. You need to ensure that Buildroot enables the following configuration:
BR2_PACKAGE_ANDROID_TOOLS=y
...
BR2_PACKAGE_ANDROID_TOOLS_ADB=y
BR2_PACKAGE_ANDROID_TOOLS_ADBD=y
When compiling and building android-tool, it will determine whether BR2_PACKAGE_ANDROID_TOOLS_ADB and BR2_PACKAGE_ANDROID_TOOLS_ADBD are y to decide whether to compile adb and adbd.
export PATH= /tools/toolchain/gcc-10.2.1-20210303-sigmastar-glibc-x86_64_aarch64-linux-gnu/bin: $PATH ; export ARCH= arm64 ; export CROSS_COMPILE= aarch64-linux-gnu-
cd 3 rdparty/buildroot-masters
make android-tools
The adbd built in this way depends on libz.so.1, libcrypto.so.1.1, libcrypt.so.1, and libatomic.so.1. The relevant lib libraries are integrated in the 3rdparty/buildroot-master/output/target/usr/lib/ folder.
2. Environment Setup
2.1. Kernel Configuration
The implementation of ADB depends on the FunctionFS framework, so you need to open the relevant configuration to compile and generate the corresponding ko. The kernel uses ConfigFs for implementation. Open the configuration as follows:
Device Drivers  --->
    [*] USB support  --->
        <M>   USB Gadget Support  --->
            USB Peripheral Controller  --->
                <M> Sstar MSB250X USB 2.0 Device Controller
            ...
            <M>   USB Gadget functions configurable through configfs
                [*]   Function filesystem (FunctionFS)
The final generated list:
udc-core.ko
libcomposite.ko
usb_f_fs.ko
udc-msb250x.ko
2.2. Image packaging
Put the cross-compiled program into the directory project\release\chip\pcupid\dispcam\common\glibc\10.2.1\release\bin\debug. At the same time, you need to add an execution script in the application layer to enable Function File System, the script content is as follows:
#!/bin/sh
export LD_LIBRARY_PATH=/config/lib:$LD_LIBRARY_PATH
ifconfig lo up

USB_DEVICE_DIR=/sys/kernel/config/usb_gadget/s-star/
USB_CONFIGS_DIR=/sys/kernel/config/usb_gadget/s-star/configs/default.1
USB_FUNCTIONS_DIR=/sys/kernel/config/usb_gadget/s-star/functions

config_adb()
{
    #no attributes, all parameters are set through FunctioFS
    mkdir ${USB_FUNCTIONS_DIR}/ffs.adb
    ln -s ${USB_FUNCTIONS_DIR}/ffs.adb ${USB_CONFIGS_DIR}/ffs.adb
}

# main
if [ -d /sys/kernel/config/usb_gadget ]
then
    umount /sys/kernel/config
fi

mount -t configfs none /sys/kernel/config
mkdir $USB_DEVICE_DIR
mkdir $USB_CONFIGS_DIR
mkdir ${USB_DEVICE_DIR}/strings/0x409
mkdir ${USB_CONFIGS_DIR}/strings/0x409

# Configure configs
# MaxPower/bmAttributes
echo 0x02 > ${USB_CONFIGS_DIR}/MaxPower
echo 0xC0 > ${USB_CONFIGS_DIR}/bmAttributes

# Configure strings
# manufacturer/product/serialnumber/configuration
echo "Linux Foundation" > ${USB_DEVICE_DIR}/strings/0x409/manufacturer
echo "ADB gadget" > ${USB_DEVICE_DIR}/strings/0x409/product
echo "0123" > ${USB_DEVICE_DIR}/strings/0x409/serialnumber
echo "ADB" > ${USB_CONFIGS_DIR}/strings/0x409/configuration

# Configure function
config_adb

# Mount and run adbd application
mkdir -p /dev/usb-ffs/adb
mount -o uid=2000,gid=2000 -t functionfs adb /dev/usb-ffs/adb
export TERMINFO=/config/terminfo
start-stop-daemon --start --quiet --background --exec /customer/adbd
#/customer/adbd &
#/usr/sbin/adbd &
sleep 2

# Configure device
# UDC/bDeviceClass/bDeviceProtocol/bDeviceSubClass/bMaxPacketSize0/bcdDevice/bcdUSB/idProduct/idVendor
echo 0xef > ${USB_DEVICE_DIR}/bDeviceClass
echo 0x01 > ${USB_DEVICE_DIR}/bDeviceProtocol
echo 0x02 > ${USB_DEVICE_DIR}/bDeviceSubClass
echo 0x00 > ${USB_DEVICE_DIR}/bMaxPacketSize0
echo 0x0419 > ${USB_DEVICE_DIR}/bcdDevice
echo 0x0200 > ${USB_DEVICE_DIR}/bcdUSB
echo 0x0102 > ${USB_DEVICE_DIR} /idProduct
echo 0x1d6b > ${USB_DEVICE_DIR} /idVendor
UDC= `ls /sys/class/udc/ | awk 'NR==1'`
echo $UDC > ${USB_DEVICE_DIR} /UDC
The default LD_LIBRARY_PATH of the script is specified as /config/lib, so the dependent dynamic library needs to import this path. Please adjust it according to actual needs.
The public version uses USB P0 as the Device and USB P1 as the Host by default. If you need to use USB P1 for verification, you need to modify the kernel DTS and script:
Modify the kernel DTS as follows:
        ...
        msb250x-udc-p1 {
            ...
-            status = "disabled";
+            status = "okay";
        };
        ...
        sstar_ehci1: sstar-ehci-1 {
            ...
-            status = "okay";
+            status = "disabled";
        };
        ...
Modify the script as follows:
-UDC=`ls /sys/class/udc/ | awk 'NR==1'`
+UDC=`ls /sys/class/udc/ | awk 'NR==2'`
3. Test verification
Windows host tools:
platform-tools_r33.0.1-windows.zip
After the environment is installed on the PC, connect the device to the PC via a USB cable; the following common commands can be used for testing:
adb devices --> Enumerate adb devices
adb shell --> Shell to connect to adb device
adb push/pull --> Transfer files with adb devices
3.1. adb devices

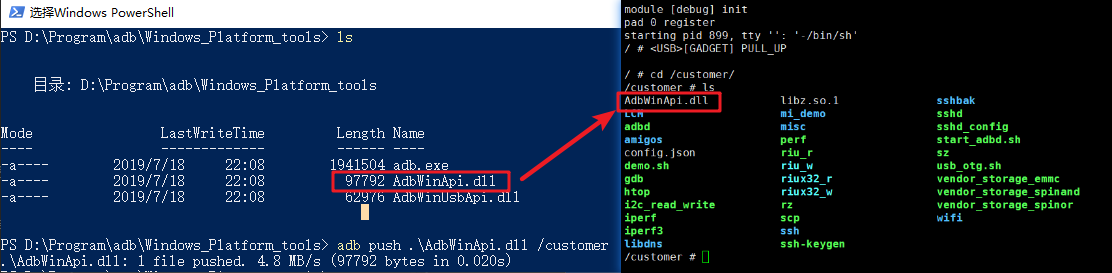
3.2. adb push
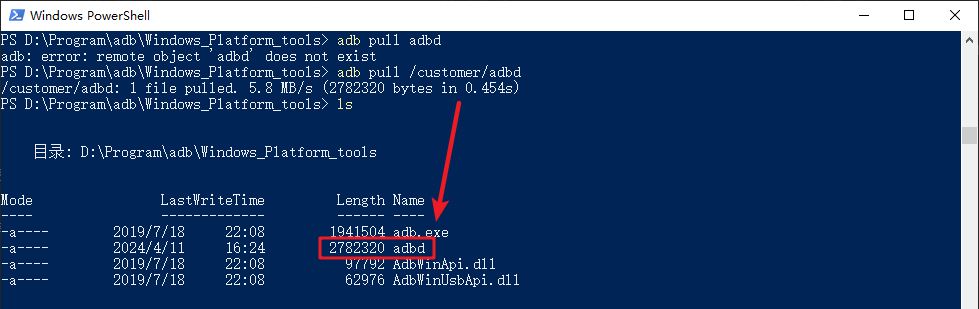
3.3. adb pull
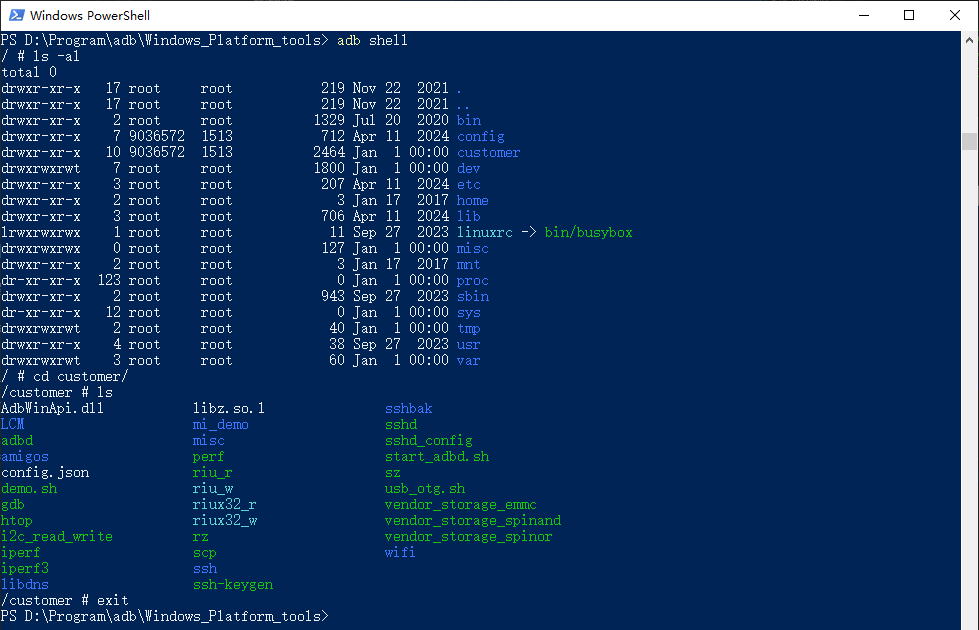
3.4. adb shell
4. Common Q&A
Q1: adb (1.0.31 adb client) cannot connect to the device, how to solve it?
When the PC-side adb host scans and connects devices, it first obtains the USB device VID value, and then matches it with the company that has applied for the VID from usb if or reads the VID under /user/xx/.android/adb_usb.Ini. If VID, interfaceClass, interfaceSubClass, and interfaceProtocol are correct, it means that the external USB device is an ADB gadget and can be connected normally.
Modification method: If the VID is not in the applied array, you can create a /user/xx/.android/adb_usb.Ini file on your PC and add the corresponding VID; the device VID can be queried in the hardware ID in the device manager.
Q2: The ADB on the board works fine on Windows 10, but it cannot recognize the device on Windows 7. What should I do?
This is usually a driver installation problem. You can use this driver installation tool ADBDriverInstaller.zip. After the USB port of the board is plugged into the PC, use this tool to find and install it directly.
Q3: After the ADB on the board is running, an error log appears: error: Address family not supported by protocol: cannot open transport registration socketpair
The kernel configuration needs to be enabled:
makefile
-*- Networking support  --->
    Networking options  --->
        <*> Unix domain sockets
Q4: After running ADB on the board, the error "cannot bind 'tcp:5037'" appears
If the adb source code has not been customized, adb will use network-related operations by default. You can avoid this log by running ifconfig lo up on the board, that is, let adb bind to the local loopback IP port.
!!! note "Q5:Unable to connect after PC run adb connect device IP, customized modification of the adb source code is required, go to the adbd/adb directory and modify adb.c.
    //    property_get("service.adb.tcp.port", value, "");
    //if (!value[0]) {
        //property_get("persist.adb.tcp.port", value, "");
    //}
    //if (sscanf(value, "%d", &port) == 1 && port > 0) {
    //    printf("using port=%d\n", port);
    //    listen on TCP port specified by service.adb.tcp.port property
    //    local_init(port);
    //} else
    //    printf("using port=%d\n", port);
    //    listen on TCP port specified by service.adb.tcp.port property
    //    local_init(port);
    //}
    +    char * env_port = getenv("ADB_TCP_PORT");
    +    if(!env_port){
    +        port = 5555;
    +    }else{
    +       sscanf(env_port, "%d", &port);
    +    }
    +    if(port > 0){
    +       printf("using port=%d\n", port);
    +       local_init(port);
    +    }