IPU Model Recognition Program Description
1. Function Introduction
This demo mainly demonstrates how to insert the IPU model recognition part into the entire pipeline from sensor to panel. It uses the IPU algorithm library functions and model for face detection, displaying the detection results in real-time.
  Use GFX to draw recognition box
                                                                                                                                              +--------+          +------------+
  +---------+                       +---------+                       +---------+    |--->dev1 chn3 port0:Rotate-->dev1 chn0 port0:Source---> |  DISP  | -------->|  Panel     |
  |   VIF   | ---> (dev0 chn1 port0)|   ISP   | (dev0 chn1 port1)---> |   SCL   | ---|                                                        +--------+       ^  +------------+
  +---------+                       +---------+                       +----+----+    |                                                                         |
                                                                                     |                                                         +--------+     +--------+
                                                                                     |---------------->dev1 chn1 port0:Scaled----------------> |  DET   | --> |  GFX   |
                                                                                                                                               +--------+     +--------+
  Use CPU to draw recognition box
                                                                                                                                              +---------+         +------------+
  +---------+                       +---------+                       +---------+    |---------------->dev1 chn0 port0:Source---------------> |  FFMPEG | ------->|  RTSP/TCP  |
  |   VIF   | ---> (dev0 chn1 port0)|   ISP   | (dev0 chn1 port1)---> |   SCL   | ---|                                                        +---------+      ^  +------------+
  +---------+                       +---------+                       +----+----+    |                                                                         |
                                                                                     |                                                        +--------+     +----------+
                                                                                     |---------------->dev1 chn1 port0:Scaled----------------> |  DET   | --> | CPU DRAW |
                                                                                                                                              +--------+     +----------+
-
Since the SCL of Pcupid only supports port0, the output of the ISP needs to be routed to two SCLs. Then the detection function of DLA is added to the pipeline. First, the SCL dev1 chn3 port0 performs the image rotation operation based on parameters, then SCL dev1 chn0 port0 scales it and outputs to the screen. SCL dev1 chn1 port0 scales the buffer info from the ISP of the original resolution to the buffer info of the resolution supported by the IPU network model for the DET processing. After obtaining the target's coordinate information, if the GFX is used to draw the box on the FB, it is attached to the DISP; if the CPU is used to draw the box, it is attached to the RTSP stream (when using RTSP for display, the box must be drawn using CPU to be shown on the screen).(Currently, the matched model in the code is sdy48l.img, path: project/board/pcupid/dla_file/ipu_net/det/)
-
When the character "q" is typed, the process exits.
2. Compilation Environment Description
Note
Usually, the corresponding program has already been packaged on the board side, so program compilation is not mandatory. You can directly find prog_dla_detection_demo in the /customer/sample_code/dla_detection_demo folder on the board side. If you cannot find the file or need to modify the program yourself, you can refer to the following steps.
-
In the project path, choose deconfig for full package compilation based on the board (emmc/nand/nor, ddr model, etc.);
For example, for the
Comake PI D1board, using emmc and ddr4 configuration, use the following deconfig; for other board models, refer to the user manual:dispcam_pcupid.emmc.glibc-12.4.0-arm-squashfs.comake.pi.d1.1024.dual_sensor.bga_ddr4_riscv_defconfigExecute the following commands in the project directory to compile:
make dispcam_pcupid.emmc.glibc-12.4.0-arm-squashfs.comake.pi.d1.1024.dual_sensor.bga_ddr4_riscv_defconfigmake clean && make image -j8 -
Change to the sdk/verify/sample_code directory and execute
make source/pcupid/dla/detection_demofor compilation; by default, it streams to the mipi panel, and to stream to ffmpeg->tcp, uncomment the FFMPEG := true line in detection_demo.mk. -
sample_code/out/arm/app/prog_dla_detection_demoto get the executable file;
3. Running Environment Description
The type of Sensor used in the system is decided during compilation. You can check the CONFIG_SENSOR_TYPE parameter in the alkaid deconfig to confirm
-
Board-side environment:
Comake PI D1board's mipi panel interface corresponds to CON8. Connect the mipi panel device, and sensor pad0 corresponds to J5. Connect the mipi sensor to sensor pad0. The demo uses gc2053.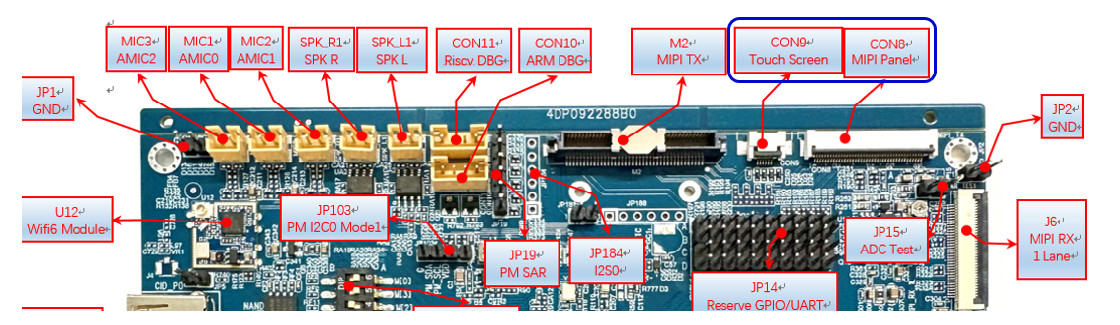
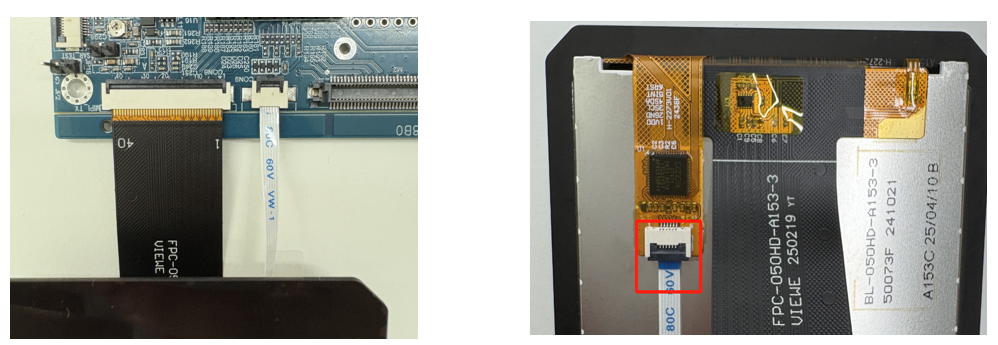
The CON8 MIPI screen connects from the top with FPC; ensure to connect it correctly, as shown in the first image below.
The CON9 near the screen connects from the bottom with FPC and from the top near the mainboard; ensure to connect it correctly, as shown in the second image below.
The J5 sensor connects from the bottom with FPC; ensure to connect it correctly, as shown in the right two images below.
-
DTS configuration:
The default DTS is already configured and does not require modification.
-
Sensor driver configuration:
The gc2053_MIPI.ko is already loaded by default and does not require modification
insmod /config/modules/5.10/gc2053_MIPI.ko chmap=1
4. Running Instructions
-
Place the executable file
prog_dla_detection_demoon the board and change permissions to 777. -
Use gc2053 as the sensor.
-
Run the command, such as
./prog_dla_detection_demo model sdy48l.img index 0 rotate 90to enter object detection-
input:
-
model:The path to the ipu network model file. You need to manually copy it fromalkaid/project/board/pcupid/dla_file/ipu_net/det/*.img. Specify the path using the model parameter when running the demo. For detailed model specifications, refer toalkaid/project/board/pcupid/dla_file/ipu_net/README.txtand documentation. -
index: Sensor channel selection. The maximum specification of Comake PI D1 supports 2Lane (or split into two paths 1 lane + 1 lane) corresponding to SR0 (chmap=1) and SR2 (chmap=4). The parameters loaded can be configured in /customer/demo.sh. The selectable parameters here are 0/1.
-
-
output:
- None
-
Note: This demo relies on the ffmpeg lib, which is located in sdk/verify/prebuild_libs/ffmpeg/lib. In the emmc version, it is typically copied to the board at /customer/3rd_party_libs/ffmpeg/lib/. Therefore, you need to set the environment variable; if this directory does not exist under customer, please copy it from the sdk to the specific location and export the env:
export LD_LIBRARY_PATH=${LD_LIBRARY_PATH}:/customer/3rd_party_libs/ffmpeg/lib/
5. Running Results Description
-
Viewing Effects
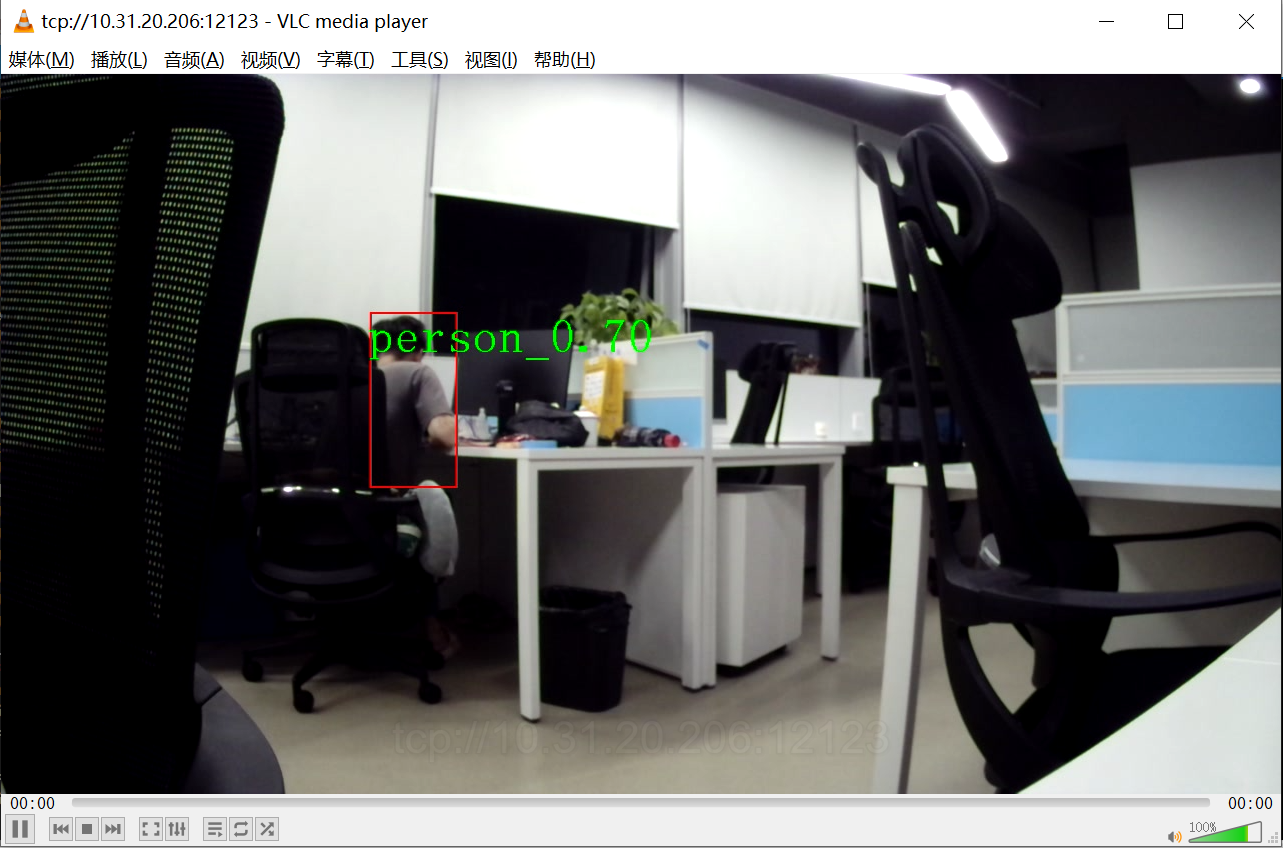
After running prog_dla_detection_demo, you can use video playback software such as ffplayer, VLC media player, or potplayer to play via link. A successful playback will display the sensor image, or connect to the mipi screen to see the sensor image directly on the mipi screen.
If streaming to ffmpeg->tcp display, run a player on the PC terminal, for example,
.\ffplay.exe tcp://10.24.16.40:12123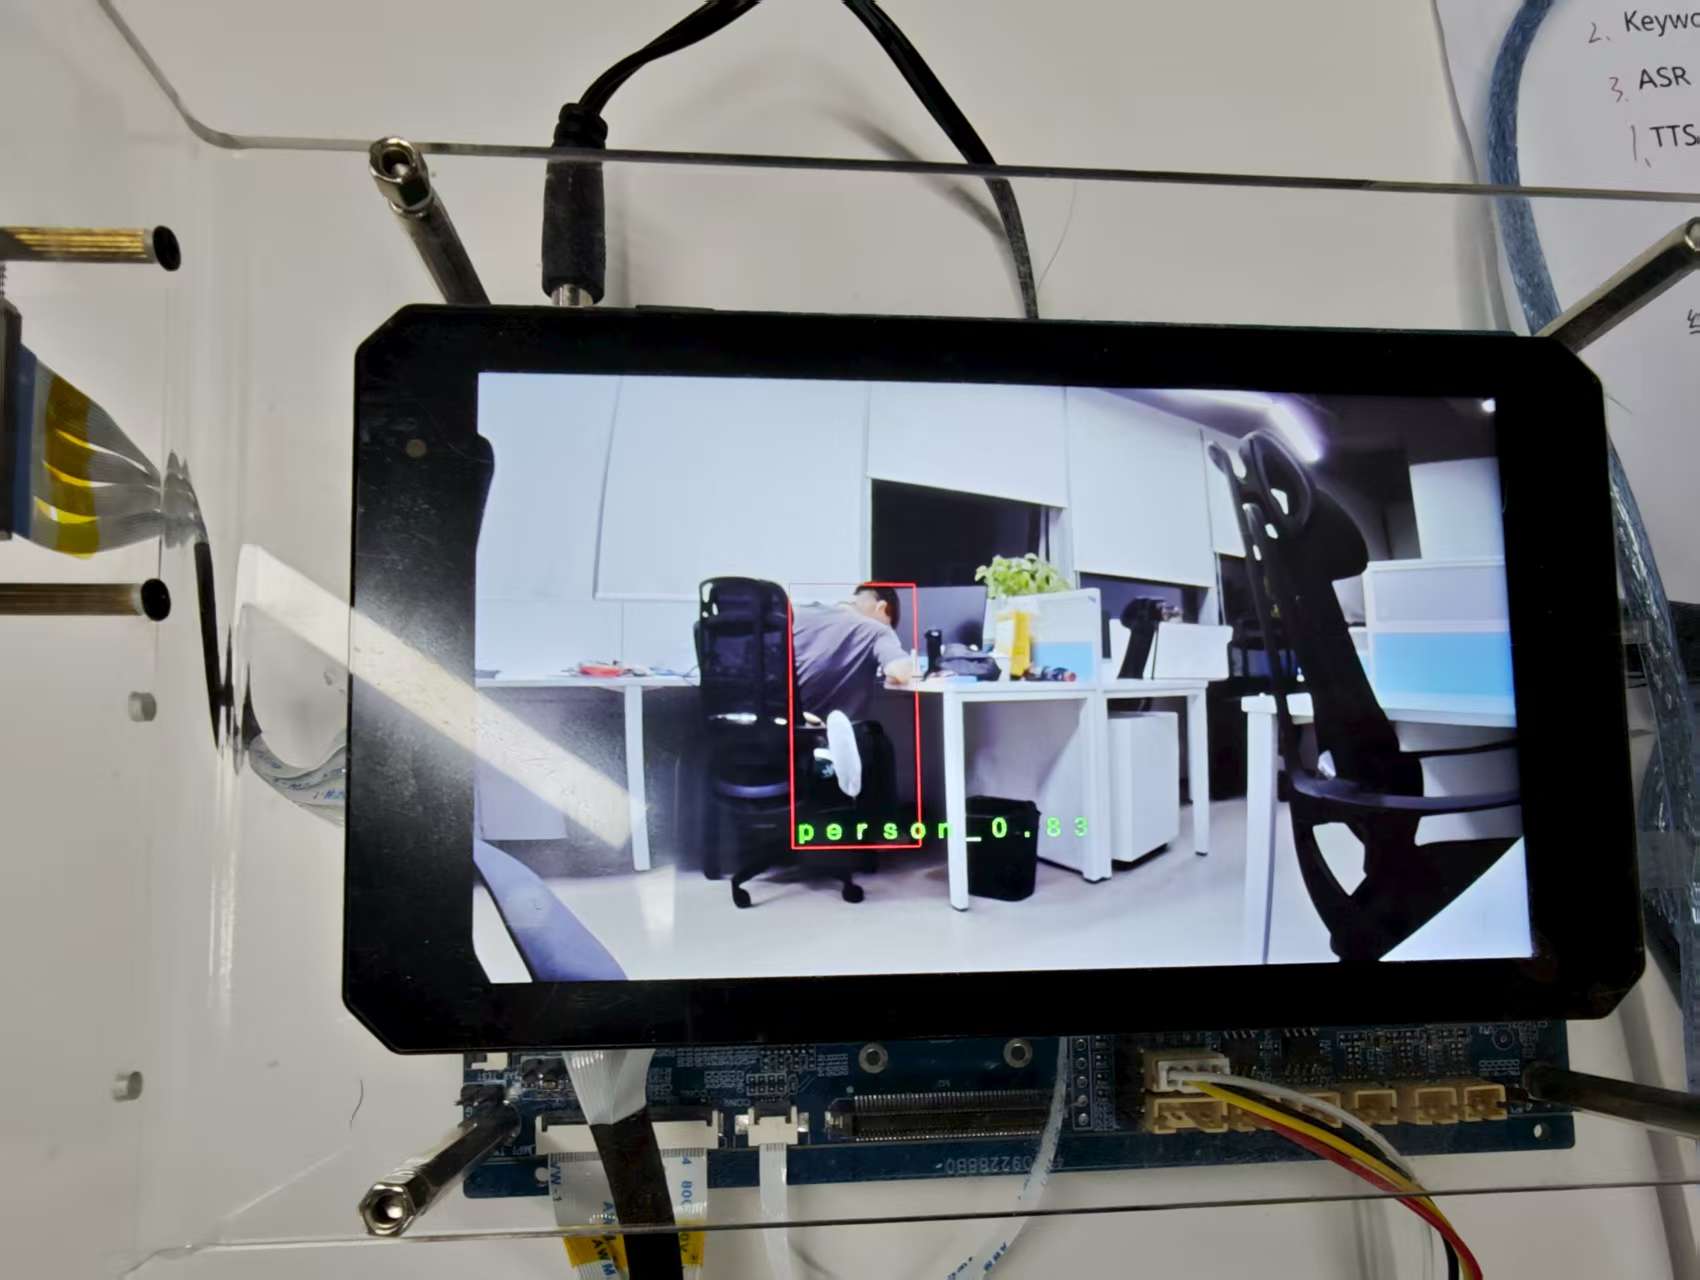
If streaming to mipi display, just connect to the mipi screen.
6. Model Adaptation
The IPU model recognition function used in this detection demo utilizes library functions from the Detection Algorithm.
In the Detection Algorithms, the types of algorithms and corresponding detection class names are introduced. The current demo's detection class name corresponds to the sd model.
If you need to use other models in the detection demo, you need to modify the corresponding array of class names in the demo; otherwise, the character display will be inaccurate. Taking the modification of the class name array (cocoClasses) for the spd model as an example:
Currently, the demo is adapted for the sd model, and the corresponding class name array (cocoClasses) is as follows:
char cocoClasses[CLASS_MAX_NUM][16] =
{
        "person",
        "bicycle",
        "car",
        "motocycle",
        "bus",
        "truck",
        "cat",
        "dog",
        "head",
        "face"
};
According to the introduction, it can be learned that the spd model outputs a total of 3 categories: pedestrian (class_id=0), head (class_id=1), and face (class_id=2); Correspondingly, you can modify the class name array (cocoClasses) in the demo:
char cocoClasses[CLASS_MAX_NUM][16] =
{
        "person",
        "head",
        "face"
};
Then, at runtime, select the spd model for the model parameter to run and display the recognition box and strings normally.
The method is the same when adapting other models.