ALSA Audio Capture and Playback Program Description
1. Demo Test Item Description
This demo can test the ALSA interface and scenarios under the Comake PI D1 environment, including recording, playback, passthrough direct connection, AMIC/DMIC/I2S/ECHO tests, and supports recording gain and playback volume settings.
2. Compilation Environment Description
Note
Generally, the corresponding programs have already been packaged on the board by default, so program compilation is not mandatory. You can directly find prog_audio_ai_ao_demo in the /customer/sample_code/audio_ai_ao_demo folder on the board. If you cannot find the file or need to modify the program, you can refer to the following steps.
2.1. In the project path, select defconfig based on the board (nand/nor, ddr model, etc.) for full package compilation;
For example, for Comake PI D1 model board, set the toolchain and use the emmc configuration command as follows; for other boards, refer to the specific model's Development Environment Setup.
export ARCH=arm
export CROSS_COMPILE=arm-unknown-linux-gnueabihf-12.4.0-
export PATH=$PATH:/tools/toolchain/riscv_gcc/bin/:/tools/toolchain/arm-unknown-linux-gcc-12.4.0-glibc-2.37-gnueabihf/bin
make dispcam_pcupid.emmc.glibc-12.4.0-arm-squashfs.comake.pi.d1.1024.dual_sensor.bga_ddr4_riscv_defconfig
make clean; make image -j16
2.2. Enter the sdk\verify\sample_code directory and execute:
make clean; make source/pcupid/audio/ai_ao_demo
Place the executable file prog_audio_ai_ao_demo from the out directory onto the board at the path /customer/sample_code/audio_ai_ao_demo and change the permissions to 777.
3. Runtime Environment Description
Note
If you are using the code package we provided and have compiled with the defconfig from the example, then the following dts configurations do not need to be modified as they are already configured by default.
The currently running board model is Comake PI D1.
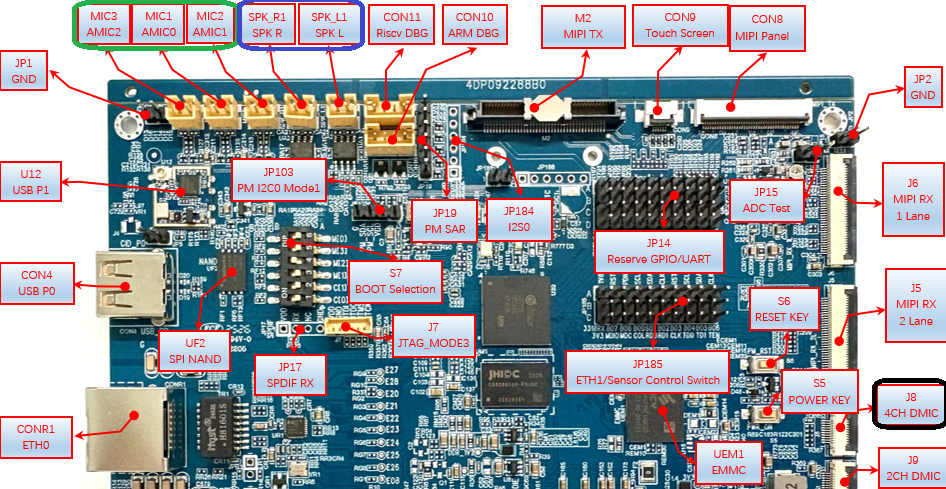
3.1. AMIC connects to MIC0,MIC1,MIC2 (as shown in the green box in the image), and the speakers connect to SPK_L and SPK_R (as shown in the blue box in the image);
3.2. The linear 4-microphone array DMIC connects to J8 (as shown in the black box in the image). The padmux configuration in (kernel/arch/arm/boot/dts/pcupid-comake-pi-d1-dual-sensor-padmux.dtsi) is as follows, while commenting out the conflicting pins:
#if 1
                // DMIC
                <PAD_GPIOA_14            PINMUX_FOR_DMIC_8CH_MODE_2       MDRV_PUSE_DMIC0_CLK>,
                <PAD_GPIOA_15            PINMUX_FOR_DMIC_8CH_MODE_2       MDRV_PUSE_DMIC0_D0>,
                <PAD_GPIOA_16            PINMUX_FOR_DMIC_8CH_MODE_2       MDRV_PUSE_DMIC0_D1>,
                <PAD_GPIOA_17            PINMUX_FOR_DMIC_8CH_MODE_2       MDRV_PUSE_DMIC0_D2>,
                <PAD_GPIOA_18            PINMUX_FOR_DMIC_8CH_MODE_2       MDRV_PUSE_DMIC0_D3>,
                // PM_IR
                <PAD_PM_ADC00_IN         PINMUX_FOR_PM_IR_IN_MODE_2       MDRV_PUSE_IR4>,
#endif
4. Command Execution and Result Description
Execute cd /customer/sample_code/audio_ai_ao_demo to navigate to the corresponding file path.
4.1. Command line usage format: ./prog_audio_ai_ao_demo [usecase] -i [interface] [options]
The optional relationship between usecase and interface is as follows:
| usecase | interface |
|---|---|
| capture | adc_a/adc_b/dmic/echo_rx/i2s_a_rx/i2s_b_rx/i2s_c_rx |
| playback | dac/echo_tx/i2s_a_tx/i2s_b_tx/i2s_c_tx |
| passthrough | adc_a-dac/adc_b-dac/echo_tx-echo_rx |
| pass_mix | adc_a/adc_b-dac hardware mixing, including playing audio and AI-AO direct connection |
| pass_echo | echo_tx-echo_rx echo collection |
The options are explained in the following table:
| options | Meaning | options | Meaning |
|---|---|---|---|
| -A | Audio card number for capturing | -F | Path to save captured audio file, wav format |
| -a | Audio card number for playback | -f | Audio file path for playback, wav format |
| -D | Device number for capturing audio | -T | Duration for captured audio, in seconds |
| -d | Playback device number | -t | Duration for playback audio, in seconds |
| -C | Number of channels for capturing audio | -V | Captured audio gain, percentage, 0-100 |
| -c | Number of channels for playback audio | -v | Playback audio volume, percentage, 0-100 |
| -R | Sampling rate for captured audio | -r | Sampling rate for playback audio |
4.2. Example explanations:
// Use AMIC to record for 10 seconds, recording gain set to 60%, audio saved in test.wav
./prog_audio_ai_ao_demo capture -i adc_a -F test_amic.wav -A 0 -D 0 -R 8000 -C 1 -T 10 -V 60
// Use DMIC to record for 10 seconds, recording gain set to 60%, audio saved in test.wav
./prog_audio_ai_ao_demo capture -i dmic -F test_dmic.wav -A 0 -D 0 -R 8000 -C 1 -T 10 -V 60
// Use SPEAKER to play audio for 10 seconds, volume set to 40%
./prog_audio_ai_ao_demo playback -i dac -f ./test.wav -a 0 -d 0 -c 2 -t 10 -v 40
// Passthrough AI hardware direct connection, recording and playing simultaneously
./prog_audio_ai_ao_demo passthrough -i adc_a-dac -a 0 -d 0 -r 8000 -v 60 -A 0 -D 0 -R 8000 -V 60
// Play an audio segment, starting echo collection for speaker echoes, recording gain 50%, playback volume 40%, duration 10s
./prog_audio_ai_ao_demo pass_echo -i echo_tx-echo_rx -f ./48K_16bit_STERO_30s.wav -F echorx.wav  -a 0 -d 0 -r 48000 -t 10 -v 40 -A 0 -D 0 -R 48000 -T 10 -C 2 -V 50
// ADC/DAC hardware mixing, looping playback audio for 10 seconds, then starting hardware direct connection of ADC-DAC
// At this time, the sound played by the speaker will contain AMIC input and music, Ctrl+C to exit
// t: music duration, demo will loop playback this segment until exit
// v: music playback volume, V: sidetone volume, controls the volume of passthrough
./prog_audio_ai_ao_demo pass_mix -i adc_a-dac -f ./48K_16bit_STERO_30s.wav -a 0 -d 0 -r 48000 -t 10 -v 40 -A 0 -D 0 -R 48000 -V 50
5. Key Code Implementation Description
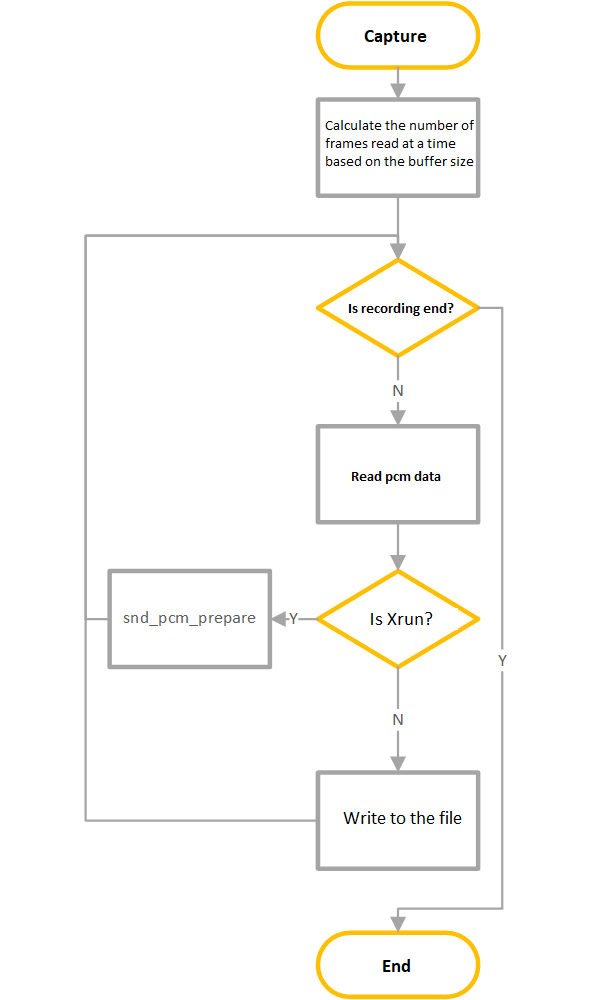
5.1. The overall flowchart for recording is as follows:
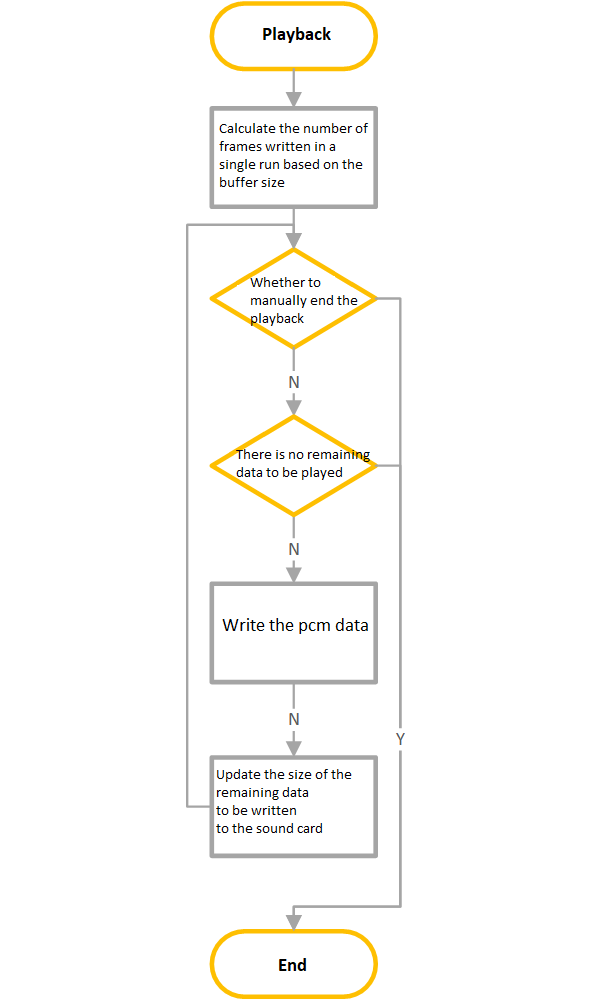
5.2. The overall flowchart for playing audio is as follows:
5.3. The ALSA mixer control flow is as follows:
