OTA Upgrade User Guide
1. Overview
This article introduces the upgrade solution provided by the Sigmastar platform, which mainly includes the process of packaging, unpacking, and upgrading in OTA upgrade. It supports partition packaging, partition upgrade, batch packaging and upgrading of new and old folders, file differential upgrade, and AB partition upgrade.
For upgrade package background server maintenance, terminal download and management, please use third-party services.
2. Partition packaging process
2.1. Introduction to packaging tools
The packaging tool is executed on a Linux server, running in Ubuntu 20.04. It only generates the required file headers based on the files currently being upgraded.
The bin directory of the packaging tool is:
project/image/makefiletools/bin/otapack
The bin directory of the unpacking tool is:
release/chip/pcupid/dispcam/common/glibc/$(TOOLCHAIN_VERSION)/bin/mi_demo/ota_otaunpack/otaunpack
After the make command is used to package successfully, the otaunpack version corresponding to the image will be automatically released to the project/image/makefiletools/bin/ directory.
otapack tool command parameter introduction:
-c --create: Create an empty upgrade package file header. This command creates the file header and can use -b or -e to add a script to start or end the upgrade.
-b --begin-script: Specify a shell script file on the server and package it into the upgrade package for the board to execute before the upgrade.
-e --end-scrip: Specify a shell script file on the server and package it into the upgrade package for the board to execute after the upgrade is completed.
-a --append: Append new header information to the created upgrade package. The new information must include the upgrade-related information. For specific methods, please refer to the example, or configure as needed in the remaining parameter introductions.
-s --src-file: Specify the source file path that needs to be updated on the server.
-d --dst-file: Specify the path of the target file or partition node to be updated in the target board.
-t --dst-file-size: The size of the target file or partition to be updated, in bytes, which can be expressed in hexadecimal or decimal.
-m --file-mode: Specify updated file permissions, refer to Linux mode_t.
-o --diff-old: Specify the old files or folder directory for differential upgrade in the server.
-n --diff-new: Specify the new file or folder directory for differential upgrade in the server.
-l --add-log: Specify string information so that the string information can be obtained when upgrading each block or file. The maximum limit is 512 bytes.
--block-update: Set the source file specified in the server to raw partition data.
--ubi-update: Set the source file specified in the server to the volume of the UBI file system.
--file-update: Set the source file specified in the server to a single file upgrade.
--file-add: Set the source file specified in the server to the newly added file in the target board.
--file-delete: Only update the packaged data header and delete the specified target file on the board.
--dir-update: Scan the contents of the old and new folders, compare the differences, additions, and reductions, and then perform batch packaging.
--dir-update-diff: Scan the contents of the new and old folders, compare the differences, additions, and reductions, and then batch-package the files that differ to package their differential data.
--script-add: Package a shell script specified by -src-file on the server and execute it on the target board. The script file name displayed during execution is as shown in -dst-file. This feature is supported starting from version 0.3.
--help: Print help information.
--debug: Turn on debugging information.
otaunpack tool command parameter introduction:
-x: Unpack and upgrade compressed files
-r: Unpack and upgrade non-compressed files
-t: Specify a readable and writable folder path for differential upgrade
2.2. General packaging process example
-
Create an empty header
otapack -c SStarOta.bin
-
If necessary, you can add scripts using the -b/-e command
otapack -c SStarOta.bin -b start.sh -e end.sh
-
Update the header data according to the packaged files
otapack -a SStarOta.bin -s ./images/kernel -d /dev/mtdblock8 -t 0x500000 --block-update
-
Loop through the 3 steps to package all the files
-
Compress the upgrade package
gzip SStarOta.bin
2.3. Packaging introduction in ALKAID
OTA packaging process has now been integrated into the Makefile.
When the program is compiled and packaged, enter the command under project:
make image-ota
The following interactive interface will appear, specifying the script path to be executed on the board. You can choose to add or not add it:
Start scripts:

End scripts:
When packaging partitions, the packaged partition data is listed:
Make ipl ?(yes/no)
After making the relevant selection, SStarOta.bin.gz will be generated in project/image/output/images/
The partitions will be configured for packaging in the config file that configures the partition.
Example:
There is a variable: OTA_IMAGE_LIST in the file spinand.ubifs.p2.partition.config
Append the partition name to be packaged after this variable, and add the field xxx$(OTABLK) in the partition configuration to configure the target node path that needs to be upgraded for the partition.
Only if the partition name is added to OTA_IMAGE_LIST, will you be asked whether to upgrade the partition to OTA when make image-ota.
All the logic of the partition packaging script is implemented in image/ota.mk. Those who are interested can study it on their own.
2.4. RAW DATA packaging without file system
The steps of partition upgrade are mostly similar. Fill the files to be upgraded into the corresponding mtdblock. The packaging process is also the same. The difference is that in RAW DATA partition packaging, you need to create the upgrade header and fill in the data yourself. Here is an example of spinand IPL partition packaging:
define makeota
@read -p "Make $(1) ?(yes/no)" select;    \
if [ "$${select}" == "yes" -o "$${select}" == "y" ]; then    \
    $(foreach n,$(3),$(PROJ_ROOT)/image/makefiletools/bin/otabinheader -s $(2) -d $(n) -t $(4) -p $(5) -a $(IMAGEDIR)/SStarOta.bin;cat $(2) >> $(IMAGEDIR)/SStarOta.bin;) \
fi;
endef

ipl_spinand_mkota_:
    $(call makeota,$(patsubst %_spinand_mkota_,%,$@),$(IMAGEDIR)/ipl_s.bin,$($(patsubst %_spinand_mkota_,%,$@)$(OTABLK)),$($(patsubst %_spinand_mkota_,%,$@)$(PATSIZE)),0)
2.5. ubifs/ squashfs/ jffs2 packaging
If these partitions are newly created and added to OTA_IMAGE_LIST, there is no need to add special processing in ota.mk, and this type of partition upgrade files will be processed uniformly.
The partition upgrade method of UBIFS is slightly different from the other two formats, so please use --ubi-update when packaging UBIFS.
2.6. Individual file packaging
The option for packaging individual files is --file-update. Currently, there is no package specifically for file updates in ALKAID, so users need to add it manually.
2.7. Script file packaging
The -script-add option can package a shell script file on the server for execution on the board. The name of the shell script file packaged on the board is specified by -dst-file or not.
3. Partition update process
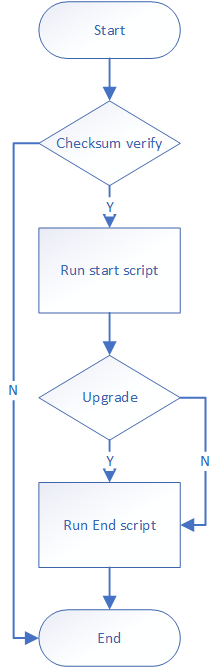
3.1. Upgrade process
3.2. Notes before partition upgrade
Before upgrading the partition, make sure that the partition is successfully umounted. You can perform relevant umount actions in the start scripts. If you need to update a file, make sure that the file is in a readable and writable file system and has write permission.
3.3. Compressed upgrade package update
otaupack -x SStarOta.bin.gz
3.4. Uncompressed upgrade package update
otaupack -r SStarOta.bin
3.5. Upgrade UI display
When upgrading, you can specify a full-screen background image to be pasted on the framebuffer. The image supports jpg and png formats. At the same time, a progress bar is drawn in the framebuffer. otaunpack supports progress bar and text UI rotation after version 0.2. Setting the -s parameter 0/½/3 supports None/90°/180°/270° rotation.
otaunpack -x SStarOta.bin.gz -p upgrade.jpg
3.6. Get the upgrade status
In the END script, use the internal variable OTA_STATUS to get the upgrade status.
If OTA_STATUS is 0, the upgrade is successful, otherwise it is -1.
3.7. SPI-NAND bad block processing
In the program packaged and upgraded using the --block-update command, if the mtdblock block device node is set, this operation will not handle bad blocks. It is recommended to use this node for nor flash upgrades. If spinand needs to be upgraded and bad blocks need to be handled at the same time, please use --block-update to set it to the mtd character device node. The otapack and otaunpack applications can support the use of mtd-utils to handle bad blocks during upgrades after version 0.2. Please open nand_write and flash_eraseall in busybox.
4. A/B partition package upgrade
4.1. A/B partition packaging
The upgraded image file may have multiple matches for the target partition or file to be upgraded during the upgrade. Generally, there are two groups of partitions, A and B, which back up each other.
Without considering the boot process of A/B partitions backing up each other, the packaging of A/B partitions needs to consider matching multiple upgrade target paths or matching multiple backup upgrade files. There are two specific cases:
-
A single image source file corresponds to a single target address
For example, the kernel partition corresponds to
/dev/mtd4and/dev/mtd5. When packaging, the "-d" option can take multiple target paths:otapack -s ./kernel -d "/dev/mtd4 /dev/mtd5" -
The packaging settings of multiple image source files corresponding to a single target address are the same as those of A/B partitions, and the same target address can be filled in during packaging.
4.2. Partition Table
Support output partition table after version 1.3
Command:
./otapack -out-layout layout.txt -r pack.bin
--out-layout: Specify the output partition table file name and path
-r: Specify the OTA upgrade package, which must be uncompressed
Output partition table format
0,boot.bin,/dev/mtd0,0x1
0,boot.bin,/dev/mtd1,0x1
1,kernel,/dev/mtd3,0x1
1,kernel,/dev/mtd4,0x1
2,kernel_otaenv.sh,kernel_otaenv.sh,0x1
3,misc.fwfs,/dev/mtd6,0x1
4,miservice.ubifs,/dev/ubi0_0,0x1
5,customer.ubifs,/dev/ubi0_1,0x1
Each line is used to describe the information of a partition in the following format:
[image id], [dst file name],[destination path],[upgrade mask]
image id: Each partition or file has a unique serial number
dst file name: The image source file filled in when packaging partition or files
destination path: Destination address. When there are multiple targets, it is possible that the same partition but different targets are represented by multiple lines, such as boot.bin in the figure above.
upgrade mask: Upgrade mask, used to change the upgrade strategy. The upgrade mask must be in hexadecimal and must be prefixed with '0x'. The default upgrade mask is all 0x1. There are two ways to modify the "upgrade mask". In principle, method a is used.
a) Configure fixed upgrade mask before upgrade. Add field xxx$(OTAMASK) in file spinand.squashfs.partition.config, which can be configured before compiling to set the value of "updrade mask" when generating partition table .
Like:
//One mirror source corresponds to two target addresses and configure two OTAMASKs
kernel$(OTABLK) = /dev/mtd3 /dev/mtd4
..
kernel$(OTAMASK) = 0x2 0x4
or
//One mirror source corresponds to one target address and configures one OTAMASK
miservice(OTABLK) = /dev/ubi0_1
..
miservice(OTAMASK) = 0x2
b) After generating the partition table, manually modify layout.txt to update the upgrade mask. (Note: The partition table is only generated by the otapack tool, and no characters can be used except the upgrade mask)
4.3. A/B partition upgrade
After using the otapack tool to output the partition table, modify the mask to define the upgrade method using the above two methods.
The command for upgrading using the partition table adds '-y' to the original command using otaunpack to specify the partition table and '-m' to configure the upgrade mask to be referenced during the upgrade.
During the upgrade, the parameter '-m' is logically & operated with the upgrade mask defined in the partition table specified by the actual '-y'. If the result is not 0, it means that the upgrade is possible, and otaunpack can perform the upgrade operation.
The default upgrade mask output by the otapack tool is 0x1. When upgrading with otaunpack, use '-m 0x1' to upgrade all partitions by default.
Example:
1, kernel, /dev/mtd3, 0x2 2, kernel, /dev/mtd4, 0x4
If the target path /dev/mtd3 is defined as partition A, and /dev/mtd4 is defined as partition B, the former uses the upgrade mask '0x2' (bit1), and the latter uses '0x4' (bit2), then the command used to upgrade partition A is:
./otaunpack -r pack.bin -y layout.txt -m 0x2
To upgrade the B partition, use the command:
./otaunpack -r pack.bin -y layout.txt -m 0x4
If only some partitions are defined in the partition table, for example, in the following table, the upgrade mask of partition A is specified as '0x2', the upgrade mask of partition B is '0x4', and the upgrade mask of non-A/B partitions is '0x1'
0,boot.bin,/dev/mtd0,0x2
0,boot.bin,/dev/mtd1,0x4
1,kernel,/dev/mtd3,0x2
1,kernel,/dev/mtd4,0x4
2,kernel_otaenv.sh,kernel_otaenv.sh,0x1 (write the kernel image size into the script of the environment variable, no need to configure in config, automatically packaged into SStarOta.bin. OTAMASK defaults to 0x1, and needs to be upgraded when upgrading the kernel: manually modify OTAMASK to be consistent with upgrading the kernel, or '-m' carries 0x1 (bit0) to upgrade the part)
3,misc.fwfs,/dev/mtd6,0x1
4,miservice.ubifs,/dev/ubi0_0,0x1
5,customer.ubifs,/dev/ubi0_1,0x1
There are several options available for upgrading:
-
Only upgrade the A partition command:
./otaunpack -r pack.bin -y layout.txt -m 0x2 -
Only upgrade the B partition command:
./otaunpack -r pack.bin -y layout.txt -m 0x4 -
Upgrade A partition and normal partition commands:
./otaunpack -r pack.bin -y layout.txt -m 0x3 -
Upgrade A partition and normal partition commands:
./otaunpack -r pack.bin -y layout.txt -m 0x5
Note:
The only sign of a successful upgrade is OTA_UPGRADE_STATUS = 0. After the upgrade is completed, the otaunpack tool will redirect OTA_STATUS to end.sh for users to obtain the OTA upgrade status.