Device Mapper User Guide
Device Mapper provides a mapping framework from logical devices to physical devices for the Linux kernel, through which users can customize resource management strategies.
Device Mapper has Device Mapper Verity and Device Mapper Crypt
-
DM-Verity (Device Mapper Verity) and DM-Crypt (Device Mapper Crypt) are two different device mapper modules in the Linux kernel, which are used to provide different functions.
-
DM-Crypt (Device Mapping Encryption): DM-Crypt is used to encrypt block devices. It works by creating a cryptographic mapping on a block device. The cryptographic mapping stores data encrypted on the underlying device and decrypts it when the data is read. DM-Crypt uses various encryption algorithms and ciphers to protect the confidentiality of data. DM-Crypt can be used to protect sensitive data on storage devices such as hard drives, partitions, or files. It can be used to create encrypted file systems or encrypted storage volumes to ensure the security of data during storage and transmission.
1. veritysetup and cryptsetup
veritysetup and cryptsetup are command-line tools used to configure and manage device integrity verification (dm-verity) and block device encryption (dm-crypt) in Linux systems.
veritysetup: is a tool for configuring and managing dm-verity (device integrity verification). dm-verity is a feature provided by the Linux kernel that can be used to verify the integrity of data on block devices. The veritysetup tool can be used to create and manage dm-verity volumes, including creating root hashes and verifying data blocks.
cryptsetup: is a tool for configuring and managing dm-crypt (block device encryption). dm-crypt is a function provided by the Linux kernel for data encryption at the block device level. The cryptsetup tool can be used to create and manage encrypted volumes, including creating encrypted volumes, setting keys, opening and closing encrypted volumes, and performing other operations related to block device encryption.
If you don't have the above two apps, please contact FAE to obtain them, or compile and generate them yourself.
2. Device Mapper Verity
dm-verity is a target device type under the Device mapper architecture. It is a virtual block device that is specifically used for file system verification. When fs is mounted, it directly specifies the dm-verity device, that is, the device that fs directly interacts with is dm-verity. dm-verity calls the real block driver to read the corresponding block, and calculates the hash value and compares it with the corresponding hash value in the hash-tree. If they are equal, it means that the block has not been tampered with, and the block data is returned to fs. If they are not equal, it means that the block has been tampered with and the system halts.
Dm-verity stipulates that there can only be two target devices, one is the data device (Data Device) and the other is the hash device (Hash Device)
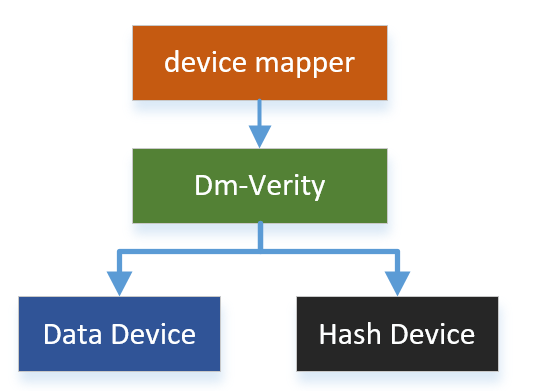
There is a one-to-one relationship between the mapped device and the target device. The read operation on the mapped device is mapped to the read operation on the target device. In the target device, dm-verity maps the read operation to the read operation of the data device.
However, at the end of the read operation, dm-verity adds an additional verification operation to calculate a hash value for the read data and compare this hash value with the value stored in the hash device. If they are different, the read operation is marked as an error.
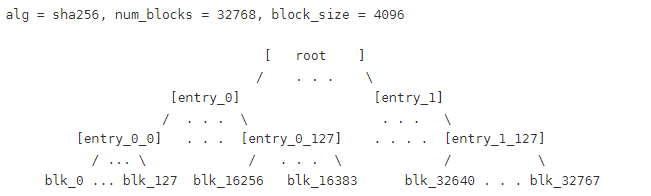
Assuming that the size of each block in the data device and the hash device is 4KB, and assuming that the hash algorithm SHA256 is used, that is, the hash value of each block of data is 32B (256 bits), then each block (4KB) in the hash device stores 4096/32=128 hash values. Therefore, in layer0, one block of the hash device corresponds to 128 blocks of the data device.
When reading data, dm-verity also needs to prevent the hash value stored in the hash device from being tampered with. Therefore, layer1 is added, and each block of data in layer1 corresponds to 128 blocks of layer0.
The data in layer1 is the hash value calculated for the data in layer0 (the data in the hash device and the data device). If there is only one piece in layer1, then stop there, otherwise continue to increase the layer until layer_n has only one piece. Finally, the hash value is calculated for layer n again, and this hash value is called the root hash. This root hash can reflect the changes in the data device and the hash device. By verifying the root hash, you can check whether the data has been tampered with.
dm-verify supports most file systems. As long as the file system is on a block device, dm-verify can be used.
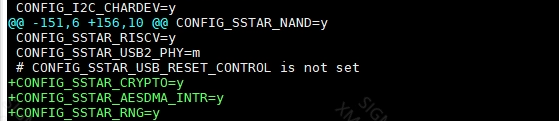
2.1 < span id = jump1 > kernel config 
- DM_verity related config
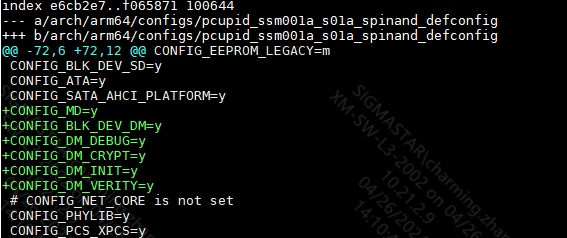
- SSTAR AES driver configuration
2.2 Manually test dm-verity
Veritysetup lib library path declaration
export LD_LIBRARY_PATH=/xxx/yyy/lib:$LD_LIBRARY_PATH
Test the following command. If there is no error, it means that dm_verity functions normally.
- Format the hash device and obtain the root hash value
./veritysetup format /dev/mmcblk0p1 /dev/mmcblk0p2 --data-block-size=512 --hash-block-size=512 --debug
- Activate the verity device
./veritysetup create
or:
./veritysetup open /dev/mmcblk0p1
- Read:
dd if=/dev/mapper/ < name > of=test.bin bs=16 count=1
2.3 Implementing dm-verity on the same partition
2.3.1 Generate files with hash devices
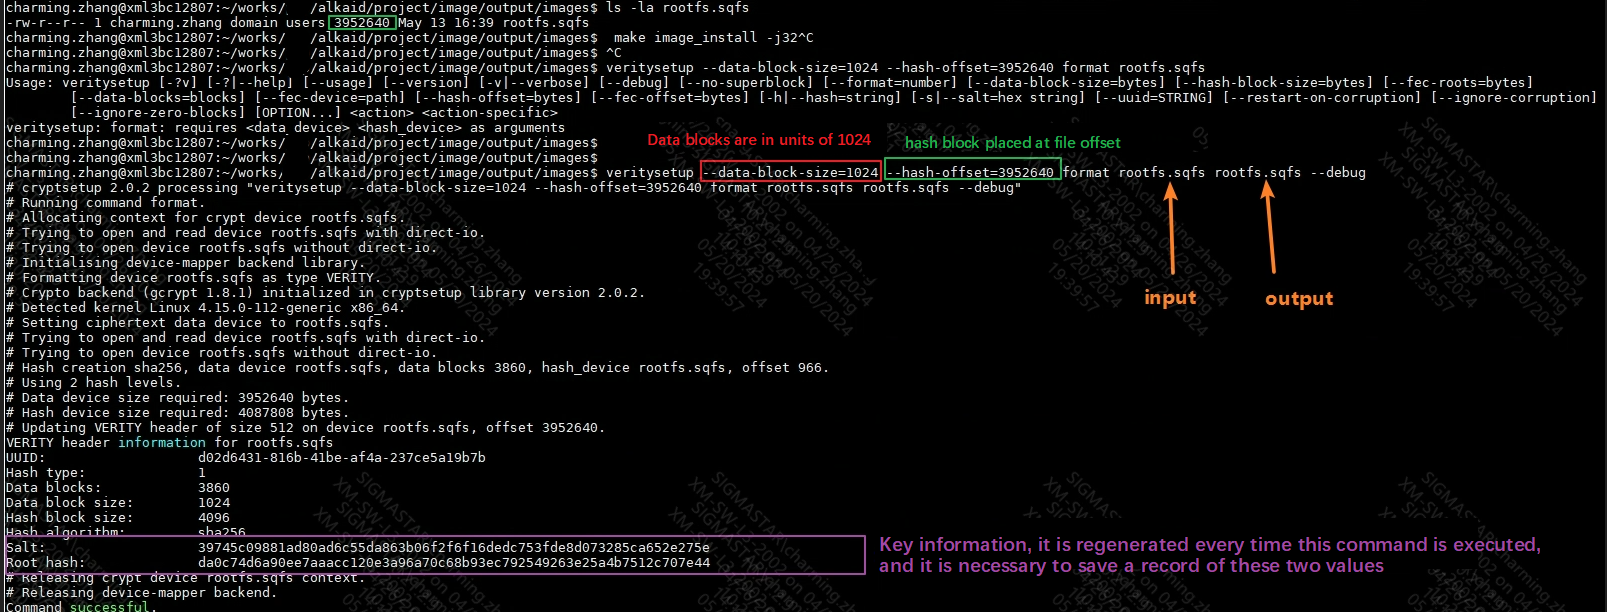
The PC generates a rootfs.sqfs with a hash device. The location of the hash device is determined by the value of --data-block-size and needs to be changed according to the actual rootfs.sqfs.
The new rootfs.sqfs will have hash device information at the end. Be sure to back up the old rootfs to prevent parameter errors from damaging the data device.
2.3.2 rootfs partition size
Check whether the rootfs patition size is greater than or equal to the newly generated rootfs.sqfs size. If it is less, you need to manually modify the patition to increase the length of the rootfs. The checking process is as follows:
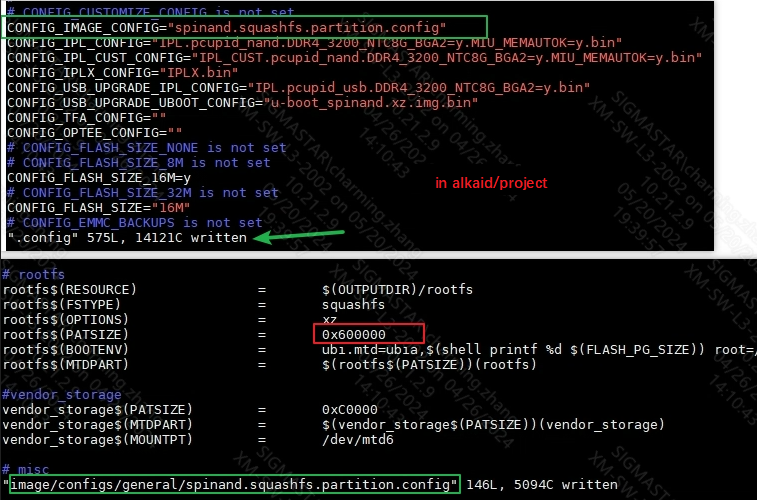
The modified size must meet the requirements, update the newly generated rootfs.sqfs to the partition, (network update cmd in uboot: estar scripts/[[rootfs.es)
2.3.3 Modify bootargs
Original bootargs: ubi.mtd=ubia,2048 root=/dev/mtdblock5 rootfstype=squashfs ro init=/linuxrc LX_MEM=0x1000000000,0x40000000 mma_heap=mma_heap_name0,miu=0,sz=0x10000000 mma_memblock_remove=1 cma=2M mm a_heap=mma_heap_fb,miu=0,sz=0x1CF0000 mmap_reserved=fb,miu=0,sz=0x800000,max_start_off=0x3f600000,max_end_off=0x3fe00000 mtdparts=nand0:1792k@1280k(BOOT),1792k(BOOT_BAK),256k(ENV),5m(KERNEL),5m(RECOVERY),6m(rootfs),768k(vendor_storage),1m(MISC),1m(DM-V),106752k(ubia) nohz=off
New bootargs: ubi.mtd=ubia,2048 mtdparts=nand0:1792k@1280k(BOOT),1792k(BOOT_BAK),256k(ENV),5m(KERNEL),5m(RECOVERY),6m(rootfs),768k(vendor_storage),1m( MISC),1m(DM-V),106752k(ubia) console=ttyS0,115200 root=/dev/dm-0 dm-mod.create="dm-verity,,,ro,0 7720 verity 1 /dev /mtdblock5 /dev/mtdblock5 1024 4096 3860 966 sha256 da0c74d6a90ee7aaacc120e3a96a70c68b93ec792549263e25a4b7512c707e44 39745c09881ad80ad6c55da863b06f2f6f16dedc753fde8d073285ca652e275e" LX_ MEM=0x1000000000,0x40000000 mma_heap=mma_heap_name0,miu=0,sz=0x10000000 mma_memblock_remove=1 cma=2M mma_heap=mma_heap_fb,miu=0,sz=0x1CF0000 mmap_reserved=fb,miu=0,sz=0x800000,max_start_off=0x3f600000,max_end_off=0x3fe00000 nohz=off
Note that mtdparts needs to be placed before dm-0. If it is placed after dm-0, the node has not been generated when verifying dm-verity, resulting in an error.
Parameter explanation:
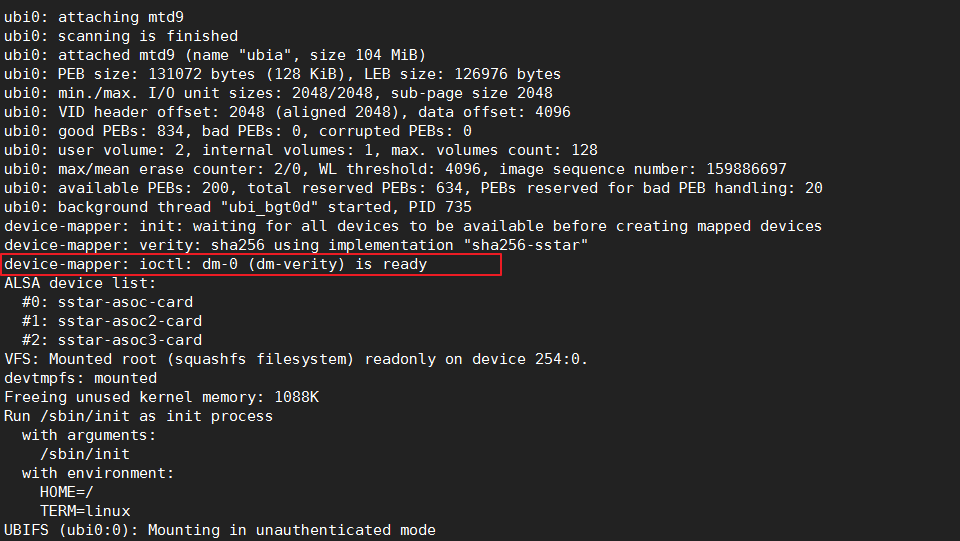
dm-mod.create= If kernel/rootfs.sqfs has been updated and bootargs has been set correctly, reboot. If everything goes well, the kernel will be entered normally, as shown below. veritysetup --data-block-size=1024 format rootfs.sqfs dm_v.bin //rootfs.sqfs is the original binary ubi.mtd=ubia,2048 mtdparts=nand0:1792k@1280k(BOOT),1792k(BOOT_BAK),256k(ENV),5m(KERNEL),5m(RECOVERY),6m(rootfs),768k(vendor_storage),1m(MISC),1m(DM-V),106752k(ub ia) console=ttyS0,115200 root=/dev/dm-0 dm-mod.create="dm-verity,,,ro,0 7720 verity 1 /dev/mtdblock5 /dev/mtdblock8 1024 4096 3860 1 sha256 da0c74d6a90ee7aaacc120e3a96a70c68b93ec792549263e25a4b7512c707e44 39745c09881ad80ad6c55da863b06f2f6f16dedc753fde8d073285ca652e275e" LX_ MEM=0x1000000000,0x40000000 mma_heap=mma_heap_name0,miu=0,sz
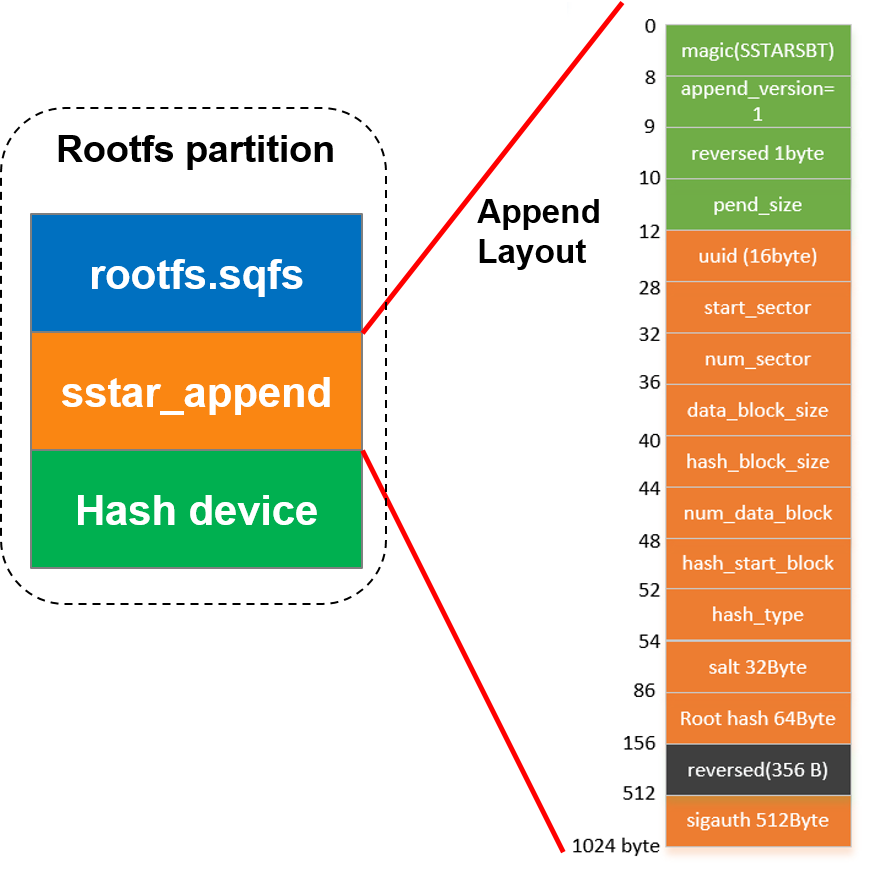
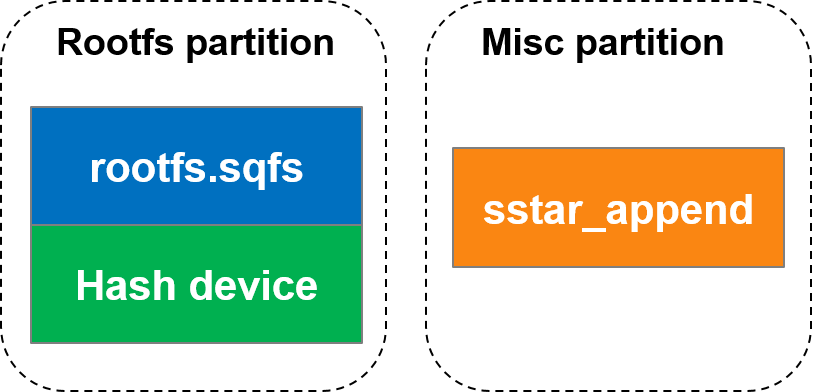
bootcmd=dcache on; loados nand 0x23000000 KERNEL by_header; bootm 0x23000000; dcache on; loados nand 0x23000000 RECOVERY by_header; bootm 0x23000000; Restart verification, if successful, enter the kernel normally Currently, there are two ways to package the append data of dm-verity, namely packaging it in the middle of the rootfs partition (rootfs_middle) or storing it in the misc partition (misc_partition). The distribution of rootfs partition in rootfs_middle mode is as follows: During the verification of append data, because the complete rootfs is not needed, loading the complete rootfs will take extra time. If the rootfs magic is not found in the rootfs addr, 512 bytes will be loaded from the pattern, the rootfs size in the header will be read, the size length will be skipped to load the append data, and then the append data signature verification process will be performed and the bootcmd will be rebuilt. The purpose of this step is to ensure the credibility of data such as roothash. In addition, the distribution in misc_partition mode is as follows: The append data will be stored in the misc partition in the form of files. The distribution of append data is the same in both modes. In the misc_partition mode, the Uboot stage will read directly according to the file name. Modify kernel config to support dm-verity. For details, refer to 2.1 kernel config . Go to project/image/config/general and add BOOTCMD_ENV to generate automatic signature verification instructions. In the Uboot stage, environment variables will be set to verify the rootfs in dm-verity mode. The principle is to verify the signature of Binary through the sigauth_fs command. BOOTCMD parameter explanation: sigauth_fs EX: sigauth_fs rootfs mid 0x21000000 rootfs supports automatic signing in dm-verity mode, and will automatically generate a signed Image.
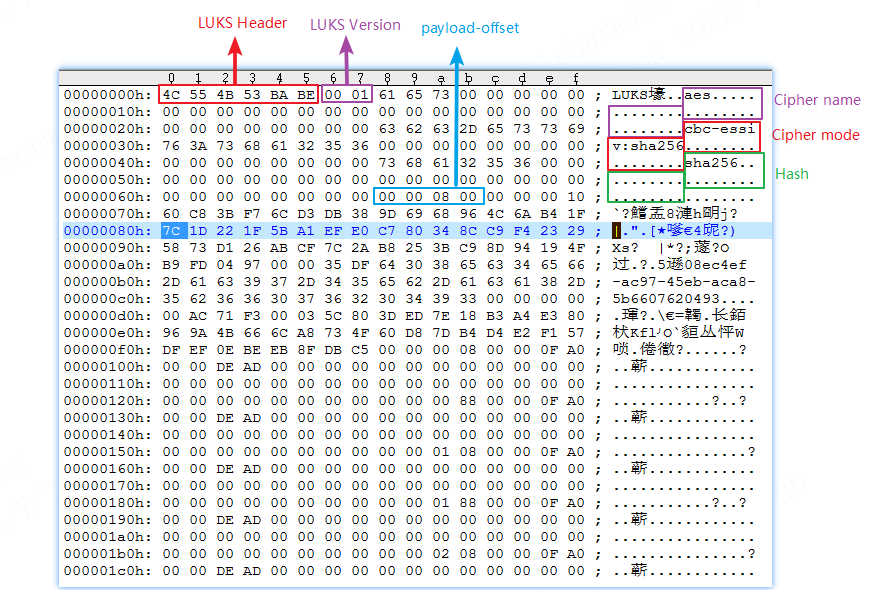
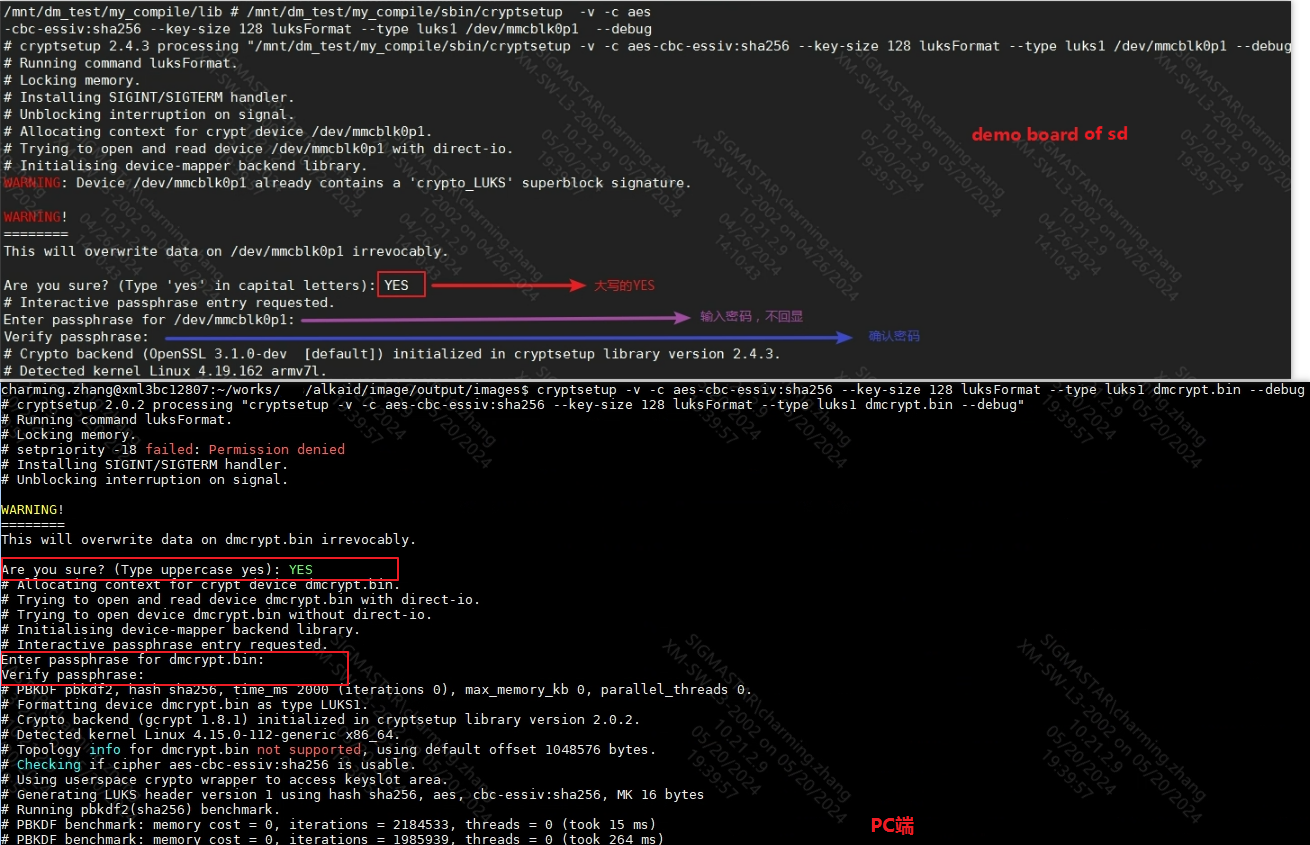
Its automatic signing supports two methods, namely the full-process automatic generation method and the rootfs separate generation method. The full process automatic generation method under dm-verity relies on makefile. The actual operation steps are as follows: Enter the project directory, make xxx_defconfig; make clean -j32; make image-nocheck -j32; Go to project/image/security_boot_tools/ and modify the dm_verity.config file. Parameter description in the dm_verity.config file (whether to use dm-verity to verify rootfs depends on this file): Currently, the packaging method of dm-verity's append data can be modified in project/image/security_boot_tools/Makefile by modifying the ROOTFS_PACKET_TYPE keyword (optional misc_partition/rootfs_middle): After all modifications are completed, in project/image/security_boot_tools/, run make clean;make; to generate the image_secure directory, which contains all the Image files in the boot process (the Images in the directory have been signed). The separate generation of rootfs under dm-verity relies on sh scripts. The actual operation steps are as follows: Enter the project directory, make xxx_defconfig; make clean -j32; make image-nocheck -j32; Go to the project/image/security_boot_tools/tools path and execute commands through the auto_generate_dmverity.sh script. Explanation of the command execution: ./auto_generate_dmverity.sh [origin rootfs binary] [private key] EX: ./auto_generate_dmverity.sh ../../output/images/rootfs.sqfs ../rsa2048/private-image.pem rootfs.sqfs Finally, you can get the signed rootfs image: Burn the image file. If everything goes well, enter the kernel normally. Dm-crypt is a transparent block device encryption subsystem in the Linux kernel 2.6 and later. It is part of the device mapper (dm) infrastructure and uses encryption routines from the kernel Crypto API. dm-crypt is implemented as a device mapper target and can be stacked on top of other device mapper transformations. Thus, it can encrypt entire disks (including removable media), partitions, software RAID volumes, logical volumes, and files. Device Mapper crypt uses the LUKS standard for hard disk encryption. LUKS (Linux Unified Key Setup) is a standard for Linux hard disk encryption. By providing a standard disk format, it not only promotes compatibility between distributions, but also provides secure management of multiple user passwords. Compared with existing solutions, LUKS stores all necessary setup information in the partition information header, allowing users to seamlessly transfer or migrate their data. That is, LUKS is a disk format AES-CBC-ESSIV: Luks header screenshot of SHA256 encryption Payload-offset is the location where the encrypted plaintext data is stored. The figure shows 0x800. Note that payload-offset is in units of 512 bytes, so the location where the encrypted plaintext data is stored is 0x800*0x200. Create a new partition to simulate the crypto scenario. Select one of the following: SD card partition nand partition The following takes aes-cbc-essiv:sha256 as an example. export LD_LIBRARY_PATH=/xxx/yyy/lib:$LD_LIBRARY_PATH SD card (ARM demo board): /mnt/dm_test/cryptsetup/v2.4.1/sbin/cryptsetup -v -c aes-cbc-ess iv:sha256 --key-size 128 luksFormat --type luks1 /dev/mmcblk0p1 --debug nand(PC): cryptsetup -v -c aes-cbc-essiv:sha256 --key-size 128 luksFormat --type luks1 dmcrypt.bin --debug If there is no error, the command is successful. As shown in the following figure (partial): Add keyfile to luks key-slot dd if=/dev/random of=/customer/keyfile bs=1024 count=4 cryptsetup luksAddKey /dev/mmcblk0p1 /customer/keyfile cryptsetup -d /customer/keyfile -s 128 -c aes-cbc-essiv:sha256 create luks /dev/mmcblk0p1 The keyfile needs to be kept strictly confidential. The following are only examples of possible storage locations. Users need to choose an appropriate storage location based on actual scenarios. Generally, it is placed in the root directory, /etc/directory, and you need to ensure that the file permissions are set correctly (such as root access only) In the USB flash drive, it is necessary to meet the customer's scenario. This operation requires the password entered when creating: SD: /mnt/dm_test/cryptsetup/v2.4.1/sbin/cryptsetup luksOpen /dev/mmcblk0p1 luks Nand: /mnt/dm_test/cryptsetup/v2.4.1/sbin/cryptsetup luksOpen /dev/mtdblock8 luks Create a vfat file system on the Luks disk. This step is only required for the first time. mkfs.vfat /dev/mapper/luks mount -t vfat /dev/mapper/luks /tmp At this point, you can read and write data normally in the tmp directory The written file will be encrypted with CBC and written to SD/Nand. When reading data, it will be decrypted with CBC and then displayed. The SD card sector number is encrypted with ECB and used as the IV value used by CBC. cryptsetup benchmark cryptsetup benchmark --cipher aes-cbc aes-xts-plain64: cryptsetup -v -c aes-xts-plain64 --key-size 512 --hash sha512 luksFormat --type luks1 /dev/mmcblk0p1 aes-cbc-essiv:sha256: cryptsetup -v -c aes-cbc-essiv:sha256 --key-size 128 luksFormat --type luks1 /dev/mmcblk0p1 cryptsetup -v status luks cryptsetup luksDump /dev/mmcblk0p1 cryptsetup -v isLuks /dev/mmcblk0p1 cryptsetup luksAddKey --key-slot 7 /dev/mmcblk0p1 keyfile cryptsetup luksHeaderBackup /dev/mmcblk0p1 --header-backup-file /tmp/header.bin cryptsetup luksHeaderRestore /dev/mmcblk0p1 --header-backup-file /mnt/header.bin head -c cryptsetup close /dev/mmcblk0p1[,
+][;
[,
+]+]
Parameter name
Value set in command line
Remarks
name
dm-verity
Customizable
uuid
None
Optional, see 5.1 Generate files and burn them, uuid in the screenshot
minor
none
none
flags
ro
ro=read only rw=read and write
start_sector
0
From which block does rootfs.sqfs start calculating hash
num_sectors
7720
refers to the number of blocks calculated by rootfs.sqfs. The original rootfs length is 3952640/512=7720. The length of sectors is fixed to 512.
target_type
verity
verity = 验证digest link: https://www.kernel.org/doc/html/next/admin-guide/device-mapper/verity.html
version
1
版本号,当前有0 和1。
This is the type of the on-disk hash format.
This is the type of the on-disk hash format.br>0 is the original format used in the Chromium OS.
The salt is appended when hashing, digests are stored continuously and the rest of the block is padded with zeroes.
1 is the current format that should be used for new devices.
The salt is prepended when hashing and each digest is padded with zeroes to the power of two.
dev
/dev/mtdblock5
data device 的节点
hash_dev
/dev/mtdblock5
hash device 的节点
data_block_size
1024
data block 设置的长度,固定为512的倍数
hash_block_size
4096
The length of the hash block setting, fixed to a multiple of 512
num_data_blocks
3860
= actual file length/data_block_size = 3952640/1024=3860
hash_start_block
966
The current hash is inserted at the end of rootfs, so =3952640/4096 = 965, this is the first block of hash, the first bolck is the hash header, so the real hash block needs +1
algorithm
sha256
Which hash algorithm to use
digest
da0c74d6a90ee7aaacc120e3a96a70c68b93ec792549263e25a4b7512c707e44
See 5.1 Generate and burn files, the key information in the screenshot is root hash
salt
39745c09881ad80ad6c55da863b06f2f6f16dedc753fde8d073285ca652e275e
See 5.1 Generate and burn files, key information in the screenshot
2.3.4 Restart test
2.4 Implementing dm-verity in different partitions
2.4.1 Adding a partition
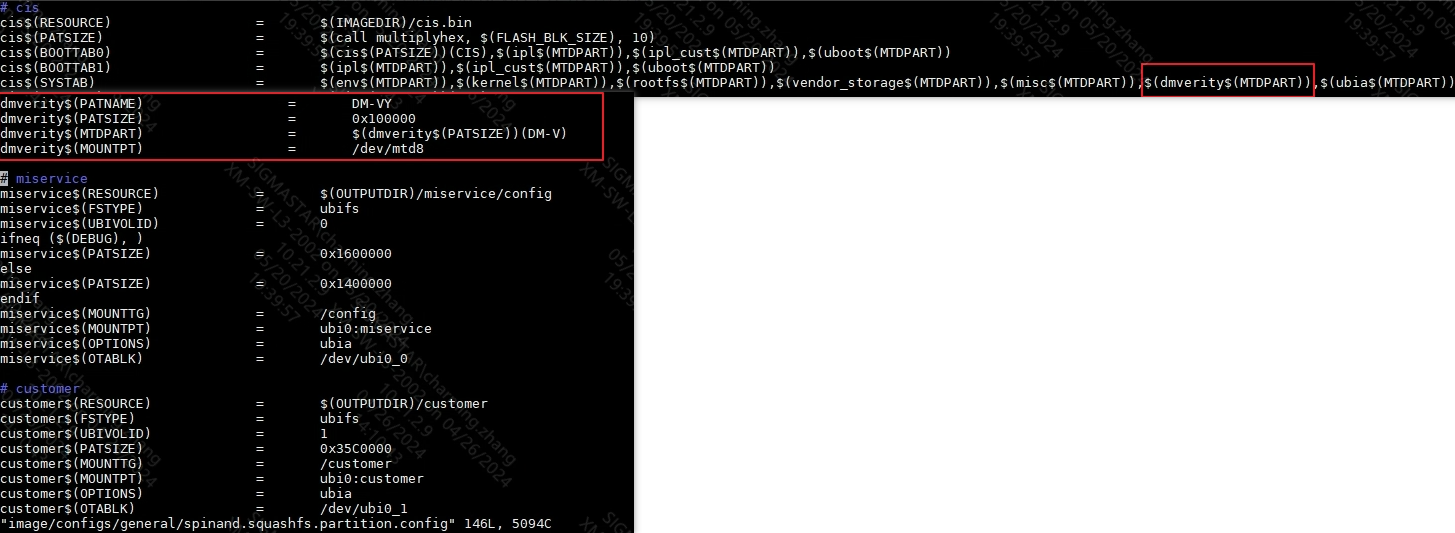
2.4.2 Execution on PC
2.4.3 Update dm_v.bin to dm_v partition – estar scripts/[[dmv.es
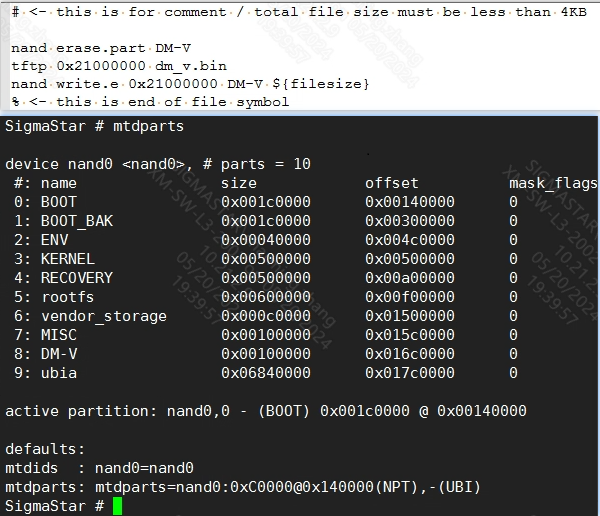
2.4.4 Modify bootargs
2.4.5 Restart
2.5 Automatic signature script deployment dm-verity
2.5.1 dm-verity packaging method and signature verification process
2.5.2 rootfs dm-verity function configuration

2.5.3 dm-verity automatic signature script
2.5.3.1 dm-verity full process automatic generation
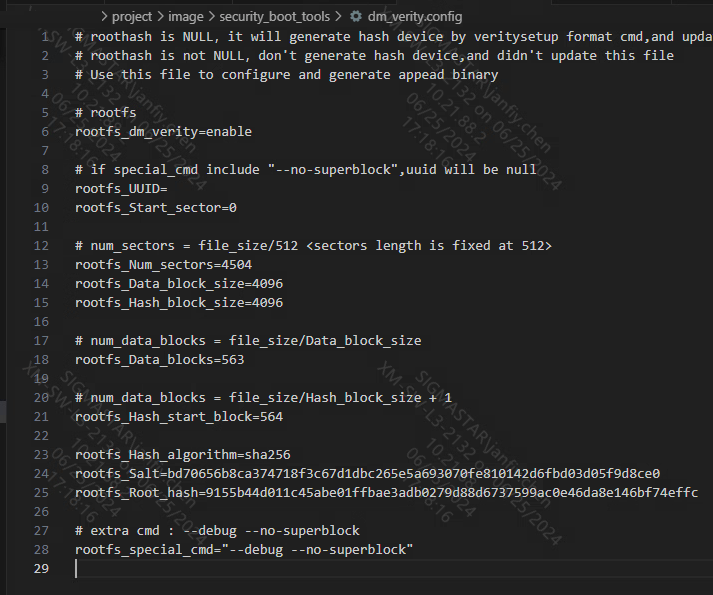
Name
Description
rootfs_dm_verity
Choose whether to open the dm-verify process. When rootfs_dm_verity=enable, it means it is on. At this time, rootfs does not go through the secure boot process.
rootfs_UUID
Automatically filled with the UUID of the hash device, empty if special_cmd contains "--debug --no-superblock"
rootfs_Start_sector
indicates the starting sector of rootfs. According to the rootfs partition, rootfs is usually placed in the first block of the partition, i.e. 0
rootfs_Num_sectors
Automatically filled, indicating the number of rootfs sectors, each sector contains 512 bytes
rootfs_Data_block_size
Automatically filled, indicating the rootfs data block size, the default is 4kb, fixed to a multiple of 512
rootfs_Hash_block_size
Automatically filled, indicating the rootfs hash block size, the default is 4kb, fixed to a multiple of 512
rootfs_Data_blocks
Automatically filled, indicating the number of rootfs data blocks
rootfs_Hash_start_block
Automatically filled, indicating the rootfs hash device start data block
rootfs_Hash_algorithm
Automatically filled, hash algorithm type, sha256 is used by default
rootfs_Salt
Automatically filled, hashed Salt value
rootfs_Root_hash
Automatically fill in the root hash value. When the value is empty, the veritysetup format action will be repeated. If it is not empty, the action will be skipped.
**(Note: If you want to re-perform the veritysetup operation, such as modifying the hash device or changing the rootfs size, be sure to delete the root hash value and then compile!)**

2.5.3.2 dm-verity rootfs generated separately

2.5.4 Burn
3. Device Mapper crypt
3.1 luks format

3.2 kernel config
3.2.1 dm_crypt related config
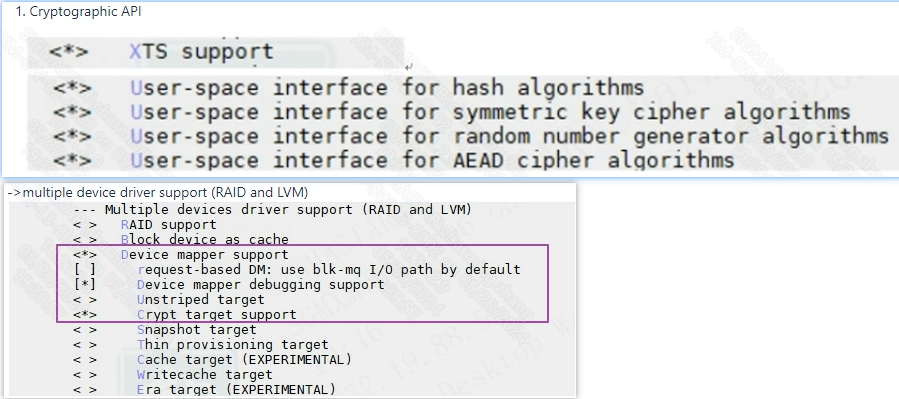
3.2.2 SSTAR AES driver configuration
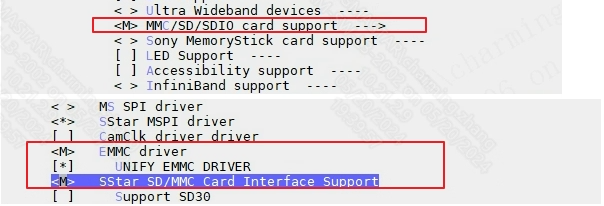
3.2.3 Partitioning

3.3 cryptsetup implements dm-crypt
3.3.1 Cryptsetup lib library path declaration
3.3.2 Create LUKS1 disk format - This step can be done on L3, and can be done on the demo board during testing.
3.3.3 File key for decryption (optional)
3.3.4 Mapping Luks Volume
3.3.5 Creating a file system
3.3.6 Mounting the file system
3.4 Cryptsetup related commands