Development Environment Setup
REVISION HISTORY
| Revision No. | Description |
Date |
|---|---|---|
| 1.0 | 07/10/2025 |
1. Development Environment
1.1. Explanation of Development Environment
Due to the limited resources of embedded single-board computers, development and debugging tools cannot be run directly on the board. Usually, development and debugging are done through cross-compilation and debugging, which involves a "host machine + target machine" setup. In most cases, the processors of the host machine and the target machine are different. The host machine needs to establish a cross-compilation environment suitable for the target board. The program is compiled, linked, and positioned on the host machine to obtain the executable file. The executable file is then burned into the target machine and run on it. This article uses a typical development environment as an example to explain the process.
Development environment usually includes a Linux server(For code compilation), a Windows workstation(For code authoring), and an EVB (target board,for code execution), all of which are in the same network, as shown in Figure 1-1.
After the bootloader (IPL+uboot) on the target board is started, the operating information on the target board is output to the host machine through the serial port for display. Commands can be entered in the host machine's console to control the target machine.
A cross-compilation environment is established on the Linux server, and the Windows workstation is connected to the EVB board through the serial port. Developers can perform program development on the Windows workstation or remotely log in to the Linux server for program development. Specific software descriptions for each part are shown in Table 1-1.
Figure 1-1 Embedded Development Diagram
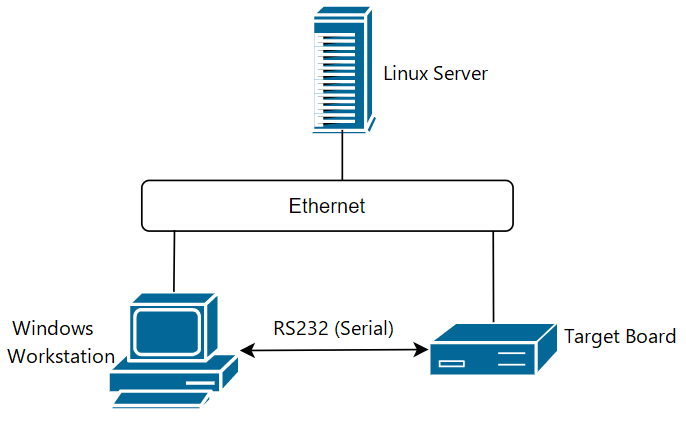
Table 1-1 Description of Software in Development Environment
| Operation Platform | Operating System | Software Description |
|---|---|---|
| Windows workstation | Windows XP/7/10 | putty (or Xshell/SecureCRT, etc.), tftp server (tftpd32), SStar ISP tool (Flash_Tool_xxx.exe) |
| Linux Server | Ubuntu or CentOS. | It is recommended to use a fully installed version of Ubuntu 18.04 or above. NFS, telnetd, samba, vim, ARM cross-compilation environment (GCC version 11.1.0), etc. Other application software is determined based on specific development needs and is usually installed by default. Proper configuration is all that is needed. |
| EVB | SStar Linux | The Linux kernel is based on the Linux standard kernel version 5.10.117 and the file system is made based on busybox version 1.20.2. It includes commonly used Linux commands such as telnetd. |
1.2. Setting Up the Development Environment
It is recommended that users use a 64-bit Linux server. This development package may have unknown compatibility issues on 32-bit Linux servers, older versions of Linux servers, or less well-known Linux servers. The recommended hardware configuration is as follows:
- CPU Intel(R) Xeon(R) CPU E5-2450 0 @ 2.10GHz or better
- DDR: >= 16GB
- Hard disk >= 600GB
- Gigabit Ethernet
- OS: Ubuntu 18.04 64bit
Or, use a virtual machine with the same configuration.
1.2.1 Linux Server Version Used in the Release Package
cat /proc/version
Linux version 4.15.0-112-generic (buildd@lcy01-amd64-027) (gcc version 7.5.0 (Ubuntu 7.5.0-3ubuntu1~18.04)) #113-Ubuntu SMP Thu Jul 9 23:41:39 UTC 2020
lsb_release -a
LSB Version: core-9.20170808ubuntu1-noarch:printing-9.20170808ubuntu1-noarch:security-9.20170808ubuntu1-noarch
Distributor ID: Ubuntu
Description: Ubuntu 18.04.5 LTS
Release: 18.04
Codename: bionic
1.2.2. Setting up the Network Environment
Users are required to configure and install network components such as NFS, Samba, and SSH by themselves.
1.2.3. Installing Required Software Packages
Please install the following tools. If any of the tools are missing or their versions are incompatible, compilation errors may occur.
sudo apt-get install libc6-dev-i386 lib32z1 lib32ncurses6 libuuid1 cmake libncurses-dev libncursesw5-dev bc xz-utils automake libtool libevdev-dev pkg-config mtd-utils android-tools-fsutils bison flex libssl-dev libmpc-dev squashfs-tools gawk build-essential
1.2.4. Installing the Cross-Compilation Toolchain
The release package provides the Cross-Compilation Toolchain:
aarch64-unknown-linux-gcc-12.4.0-glibc-2.37-gnu.tar.xz
arm-unknown-linux-gcc-12.4.0-glibc-2.37-gnueabihf.tar.xz
The installation steps are as follows:
Step 1. Create a tool directory:
sudo mkdir -p /tools/toolchain or sudo mkdir -p /opt/sstar (we take /tools/toolchain as an example in this article)
Step 2. Unzip and install:
sudo tar -xvf ./aarch64-unknown-linux-gcc-12.4.0-glibc-2.37-gnu.tar.xz -C /tools/toolchain
sudo tar -xvf ./arm-unknown-linux-gcc-12.4.0-glibc-2.37-gnueabihf.tar.xz -C /tools/toolchain
Step 3. You can either export it directly each time you compile or add it to the startup script such as /etc/profile,~/.bashrc, etc.
Example: export PATH=${PATH}:/tools/toolchain/arm-unknown-linux-gcc-12.4.0-glibc-2.37-gnueabihf/bin
1.3. Other Configuration
1.3.1. Default Shell Configuration
The compilation script defaults to using bash, and the system's default shell is required to be bash. You can confirm this by running the command ls -la /bin/sh. For example, in Ubuntu, which is the most commonly used operating system, higher versions of Ubuntu use dash as the default shell. To change it, follow the steps below:
# ls -la /bin/sh
lrwxrwxrwx 1 root root 4 Jun 15 08:49 /bin/sh -> dash

# sudo dpkg-reconfigure dash
Select <NO> in the pop-up interface

# ls -la /bin/sh
lrwxrwxrwx 1 root root 4 Jun 15 08:49 /bin/sh -> bash
1.3.2. Setting Default Python Version to Python 2.x
There are differences in semantics between Python 2 and Python 3, and the SDK compilation script uses the semantics of Python 2. Therefore, it is necessary to set the system's default Python version to Python 2.x. Please refer to relevant documents on the internet for instructions on how to modify this, such as using the update-alternatives tool for configuration.
Note:
mksquashfs is included in the Ubuntu distribution. If it is not available, install it as instructed.
If using an older version of Ubuntu, such as Ubuntu 16.04, it is recommended to update the sources. For specific instructions, please refer to relevant documents on the internet. Failure to update may cause compilation errors in the future.
2. Compilation
Taking the SPI NAND/NOR/EMMC boot mode supported by this chip as an example. Various startup methods are implemented in the SDK through different configuration files, and the scripts are packaged into a burnable image.
Attention
For the Comake PI D1 development board, only surport EMMC boot mode 。
2.1. Environment Variable Configuration for Compilation
Before compiling the SDK, configure the environment variables required for compilation: PATH specifies the path to the cross-compiler.CROSS_COMPILE specifies the type of cross-compiler.ARCH specifies the chip architecture. If you have opened Riscv for Linux compilation, you need to configure the Riscv toolchain
ARM32-glibc(Kernel6.1):
export PATH=/tools/toolchain/riscv_gcc/bin/:/tools/toolchain/arm-unknown-linux-gcc-12.4.0-glibc-2.37-gnueabihf/bin:$PATH
export CROSS_COMPILE=arm-unknown-linux-gnueabihf-12.4.0-
export ARCH=arm

ARM64(Kernel6.1):
export PATH=/tools/toolchain/riscv_gcc/bin/:/tools/toolchain/aarch64-unknown-linux-gcc-12.4.0-glibc-2.37-gnu/bin:$PATH
export CROSS_COMPILE=aarch64-unknown-linux-gnu-12.4.0-
export ARCH=arm64
2.2. Unzip sdk
tar zxvf project-xxx.tar.gz
tar zxvf boot-xxx.tar.gz
tar zxvf kernel-xxx.tar.gz
tar zxvf sdk-xxx.tar.gz
tar zxvf optee-xxx.tar.gz
boot-xxx.tar.gz: Uboot src code
kernel-xxx.tar.gz: Kernel src code
project-xxx.tar.gz: Contains scripts for making image and no open source lib/ko and head files
sdk-xxx.tar.gz: Test demo / Application package framework
optee-xxx.tar.gz: optee src code(Not every project has this source code, depending on the actual project support)
2.3. Compile project
2.3.1 deconfig fields description
The public/vanilla defconfig is the top-level default configuration file.The public version of deconfig is for the public version of EVB board (SSM) / Demo board (SSZ) hardware. Please adapt the client's actual board according to the actual differences

2.3.2 Compilation option description
Go to the directory you just unzipped: cd project/
a. Select the corresponding config based on the Boot_type
glibc-12.4.0-arm is 32bit Linux toolchain, glibc-12.4.0 is 64bit Linux toolchain
The project for Kernel 6.1 references the Defconfig:
| Chip | Packaging_Flash_Mem | Defconfig |
|---|---|---|
| SSD2355 | BGA14_EMMC_ExDDR_ARM64 | dispcam_pcupid.emmc.glibc-12.4.0-squashfs.comake.pi.d1.1024.dual_sensor.bga_ddr4_riscv_defconfig |
| SSD2355 | BGA14_EMMC_ExDDR_ARM32 | dispcam_pcupid.emmc.glibc-12.4.0-arm-squashfs.comake.pi.d1.1024.dual_sensor.bga_ddr4_riscv_defconfig |
b. clean and compilation
For example: Taking the Comake PI D1 development board as an example, if you choose Emmc Flash 64bit, then execute the following command to compile all sdk.
make dispcam_pcupid.emmc.glibc-12.4.0-squashfs.comake.pi.d1.1024.dual_sensor.bga_ddr4_riscv_defconfig
make clean;make image -j8;
if you choose Emmc Flash 32bit, then execute the following command to compile all sdk.
make dispcam_pcupid.emmc.glibc-12.4.0-arm-squashfs.comake.pi.d1.1024.dual_sensor.bga_ddr4_riscv_defconfig
make clean;make image -j8;
After the compilation is complete, the generated images are in project/image/output/images, The default-generated images are for TFTP burning. For details on the burning method, please refer to Chapter 2.3. TFTP Burning (LAN Port Burning) in the document 'Burning User Guide'.
If you want to generate USB upgrade files, continue executing the following command in the current directory.
./image/makefiletools/script/make_usb_factory_sigmastar.sh -f
When the command is executed, the file SstarUsbImage_xxxx(date).bin will be generated in the project/image/output/images directory. For details on the burning method, please refer to Chapter 2.1. USB Device Burning in the document 'Burning User Guide'.
Note:
-
For the first compilation, please be sure to execute the
make clean;make image -j8command under project for complete compilation (including recompiling boot/kernel) -
To increase debugging efficiency, in addition to the first compilation, subsequent debug can directly compile the corresponding modified modules under project and then re-pack quickly, for example:
Compile only kernel:
make linux-kernel_clean;make linux-kernel -j8Compile only boot:
make boot_clean;make boot -j8Quickly package only sdk image:
make image-fast-nocheck -j8
2.4. Compile boot
The boot compilation option has been added to the SDK compilation under project. Therefore, it is recommended to compile boot directly under project after boot modification. After compilation, there is no need to manually release to the path under project, just repackage the project.
2.5. Compile kernel
The kernel compilation option has been added to the SDK compilation under project. Therefore, it is recommended to compile kernel directly under project after kernel modification. After compilation, there is no need to manually release to the path under project, just repackage the project.
3. FAQ
3.1. Boot Separate Compilation
Unzip boot-xxx.tar.gz and go to the boot directory:cd boot/
a. Select the corresponding config based on the Flash_Type
| Boot Type | Other | System | Defconfig |
|---|---|---|---|
| EMMC | BGA14 | 64bit | pcupid_comake_pi_d1_emmc_arm64_defconfig |
| EMMC | BGA14 | 32bit | pcupid_comake_pi_d1_emmc_defconfig |
| SPI_NAND | BGA14 | 64bit |
b. Clean and compilation
make clean;make -j8
c. For example: When select Nand Flash, run:
make pcupid_ssm001a_s01a_spinand_arm64_defconfig;
make clean;make -j8;
The compiled files are located in the current /boot directory.
Note: To compile separately in the boot directory, you need to manually release the generated image to the corresponding directory of the project before packaging it
| Nand Flash | Nor Flash | Emmc |
|---|---|---|
| u-boot_spinand.xz.img.bin | u-boot.xz.img.bin | u-boot_emmc.xz.img.bin |
| project/board/uboot/u-boot.xz.img.bin | project/board/uboot/u-boot.xz.img.bin | project/board/uboot/u-boot.xz.img.bin |
3.2. Boot Separate Compilation
Unzip kernel-xxx.tar.gz and go to the kernel directory:cd kernel/
a. Select the corresponding config based on the Flash_Type
| Chip | Packaging | Memory | Flash Type | Toolchain | System | Defconfig |
|---|---|---|---|---|---|---|
| SSD2355 | BGA14 | External | EMMC | glibc | 64bit | pcupid_comake_pi_d1_emmc_dual_sensor_defconfig |
| SSD2355 | BGA14 | External | EMMC | glibc | 32bit | pcupid_comake_pi_d1_emmc_dual_sensor_defconfig |
b. Clean and compilation
make clean;make -j8
c. For example: When select emmc flash, run:
make pcupid_comake_pi_d1_emmc_dual_sensor_defconfig;
make clean;make image -j8;
Note: The package in the project is the kernel directory pointed to by the soft link directly, so the kernel does not need to be released manually, just package the project directly
If the kernel has new kernel modules, the corresponding module needs to be added to kernel_mod_list/kernel_mod_list_late (ko in kernel_mod_list_late will be loaded after mi module)
Modification path: project/kbuild/customize/$(KERNEL_VERSION)/$(CHIP)/dispcam/kernel_mod_list