RISCV DEVELOPMENT ENVIRONMENT USER GUIDE
REVISION HISTORY
| Revision No. | Description |
Date |
|---|---|---|
| 1.0 | 04/22/2024 | |
| 1.1 | 04/18/2025 |
1. OVERVIEW
There are two ways to build RISCV's environment:
-
Makefile-based script compilation.
-
The RISCV development environment is based on MounRiver Studio. MRS (www.mounriver.com) is an integrated development environment for embedded projects (RISC-V/ARM), providing complete development resources including editors, C compilers, macro assemblers, linkers, library management, simulation debuggers, etc.
Script compilation is recommended
2. RISCV SDK script compilation method
The python environment uses version 2.7.17
2.1. Combined compilation of RISCV and Linux code
The combined compilation of RISCV and Linux code means that the RISCV source code is placed in the linux source path, and RISCV is compiled together with the compilation project.
2.1.1. Configuration of the toolchain
Decompress the toolchain:
tar -xvf riscv_gcc.tar.xz
The path after decompression of the toolchain in this article is: /tools/toolchain
export PATH=${PATH}:/tools/toolchain/gcc-10.2.1-20210303-sigmastar-glibc-x86_64_aarch64-linux-gnu/bin:/tools/toolchain/riscv_gcc/bin;

export CROSS_COMPILE=aarch64-linux-gnu-;

export ARCH=arm64
2.1.2. Source code decompression
Create the folder riscv/kernel in the same level as project in linux Source code
mkdir -p riscv/kernel
Decompress the released pcupid_riscv_isw.tar.xz file to the riscv/kernel directory
cd riscv/kernel
tar -xvf ~/Pcupid_DLD00V2.2.8-RISCV.tar.xz -C ./
2.1.2. Select defconfig
Go to the project directory of the linux compilation folder, and compile the same way as image
make dispcam_pcupid.spinand.glibc-10.2.1-squashfs.ssm001b.256.dual_sensor.bga_ddr3_riscv_defconfig
The compiled mak file for riscv will be set in the above defconfig CONFIG_RISCV_CONFIG="pcupid_riscv_isw"
2.1.3. Compile to get image
make clean
make image -j8
According to the settings in project/board/riscv/riscv.mk, RISC-V will prioritize using the source code for compilation.
After compilation, riscv/kernel/rtk/proj/build/pcupid_riscv_isw/out/u-pcupid_riscv_isw.bin will be automatically copied to project/board/riscv/riscfw, and a hard link will be created to project/image/output/images/riscvfw for subsequent creation of USB upgrade bin files.
2.2. Compile only RISCV code
2.2.1. Unzip the toolchain and source code
Decompress the gcc-sigmastar-7.2.0-riscv64-unknown-elf.tar.xz package and source code pcupid_riscv_isw.tar.xz
2.2.2. Configuration of the toolchain
export PATH=/users/yongfeng.wu/riscv/gcc-sigmastar-7.2.0-riscv64-unknown-elf/bin/:$PATH
export CROSS_COMPILE=riscv64-unknown-elf-
2.2.3. Compilation
cd rtk/proj
./tng/configure.pl pcupid_riscv_isw
Execute compilation command
make clean
make -j32
2.2.4. Update Riscv firmware and package image
The generated binary file is located in:
build/pcupid_riscv_isw/out/u-pcupid_riscv_isw.bin.
Copy the generated binary file to the project directory
cp build/pcupid_riscv_isw/out/u-pcupid_riscv_isw.bin ../../project/board/riscv/riscfw
Repackage the image file
cd project
make image_install -j8
2.3. Added customer application
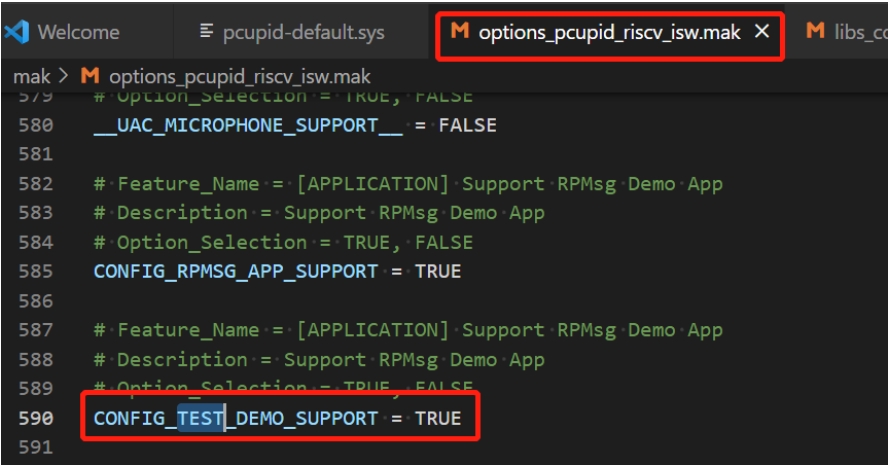
If you need to add applications, perform the following four steps. The following uses adding a test demo as an example.
2.3.1. Add config
In riscv/kernel/rtk/proj/mak/ directory of options_pcupid_riscv_isw.mak, increase the application CONFIG.
2.3.2. Add compile path
-
Add new applications PRODUCT_SC in riscv/kernel/RTK/proj/make/lib_common.mak file.
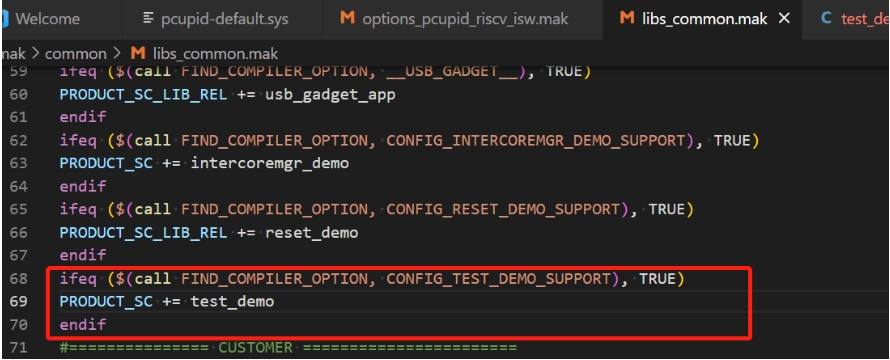
Note that you need to use PRODUCT_SC to compile the source code. If you use PRODUCT_SC_LIB_REL, you will get an error.
-
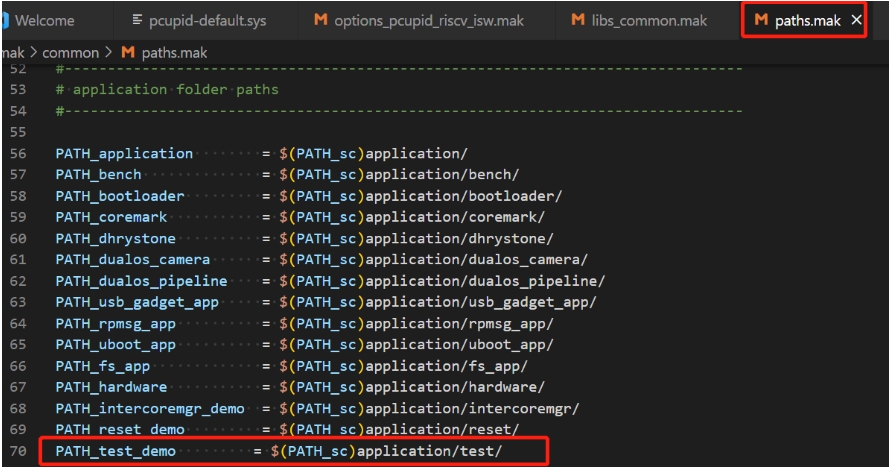
Add application path in riscv/kernel/rtk/proj/mak/paths.mak file.
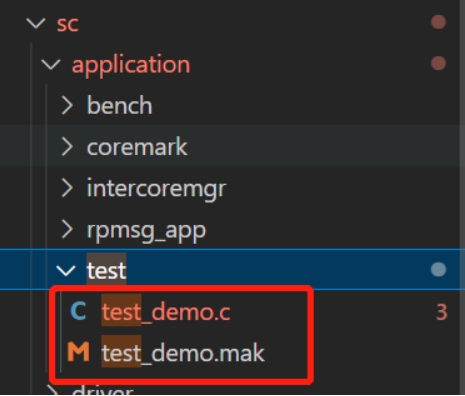
2.3.3. Add mak compilation configuration files and source files
Content in test_demo.c
#include <string.h>
#include "sys_sys_isw_cli.h"
#include "cam_os_wrapper.h"

static int MyTestMain(CLI_t *pCli, char *p) {
    CamOsPrintf("demo test\n");

    return 0;
}

SS_RTOS_CLI_CMD(test_demo,
                "Rest test",
                "Usage: reset_test [cmd]\n"
                "Cmd:\n"
                "   reset_arm: reset arm\n"
                "   reset_soc: reset soc\n"
                "   shutdown_soc: shutdown soc\n"
                "   reset_reason: get last reset reason\n",
                MyTestMain);
Content in test_demo.mak
PROCESS = lib
SRC_C_LIST := test_demo.c
PATH_C := $(PATH_test_demo)/\
2.3.4 Compile
Because the config file is modified, you need to run the config command again in the rtk/proj directory.
./tng/configure.pl pcupid_riscv_isw
make clean
make -j8
3. MOUNRIVER STUDIO INSTALLATION
3.1. Download
Download the installation package from the MounRiver official website (the one used in this article is MounRiver_Studio_Setup_V183.zip):
http://www.mounriver.com/download
3.2. Installation
Unzip the installation package and double-click Setup to install.
3.3. MounRiver Help Document
3.3.1 Online Help Document
3.3.2 IDE Integrated Help Document
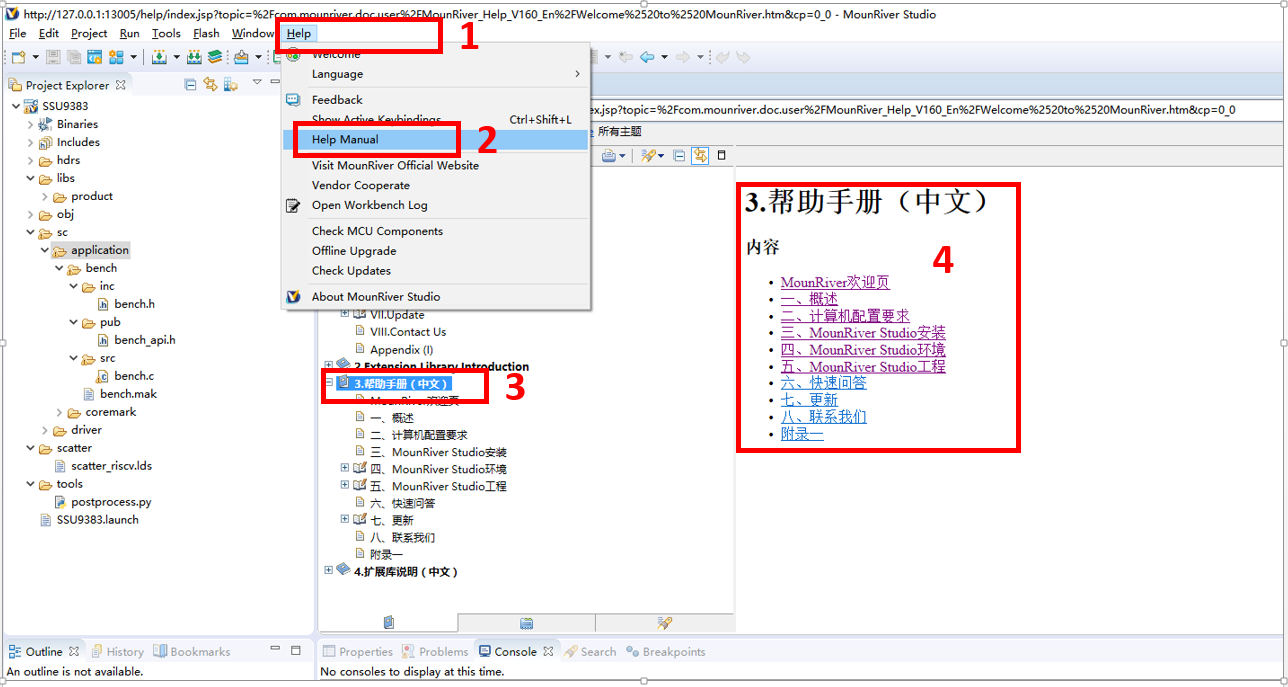
Steps to open offline help documents:
-
Click the "Help" button on the IDE.
-
Select "Help Manual" in the pop-up window.
-
On the left side of the opened "Help Manual" window, select "Help Manual (Chinese)".
-
The directory of the help manual will be displayed later, and you can browse it one by one or on demand.
3.4. PYTHON ENVIRONMENT INSTALLATION
3.4.1. Download
Download the 3.8 version installation package from the Python official website. The 3.8.10 version is recommended:
https://www.python.org/ftp/python/3.8.10/python-3.8.10-amd64.exe
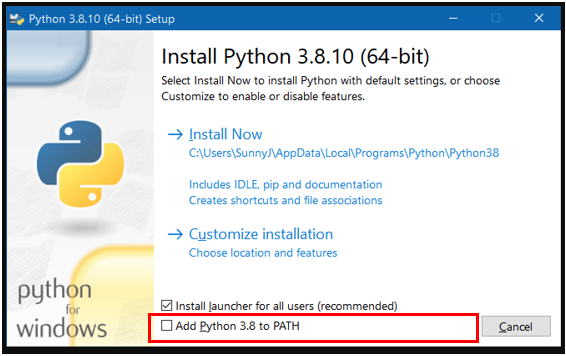
3.4.2. Installation
Double-click the downloaded installer to install. Remember to check the "Add Python to PATH" option.
3.5. Open the mounriver project file
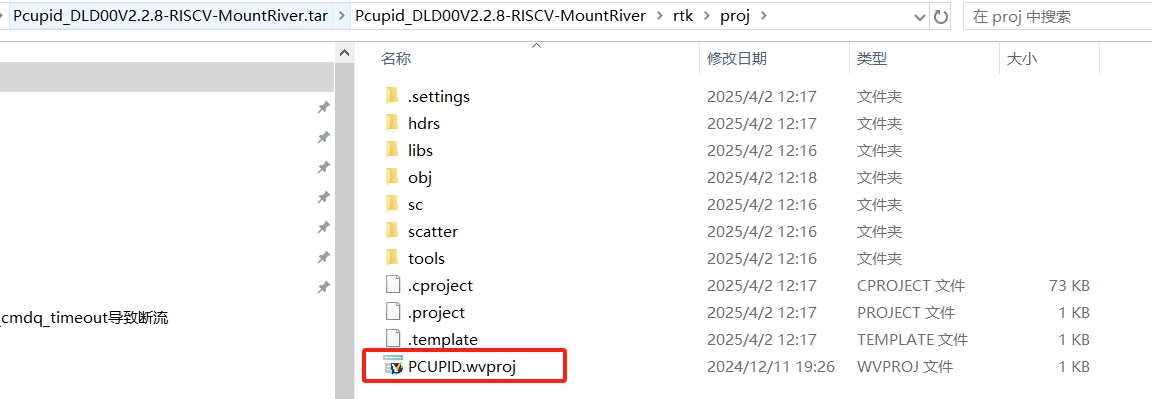
Unzip the Pcupid_DLD00V2.2.8-RISCV-MountRiver.tar.xz
Double-click PCUPID.wvproj to open RISCV's MounRiver project
3.6. Compile
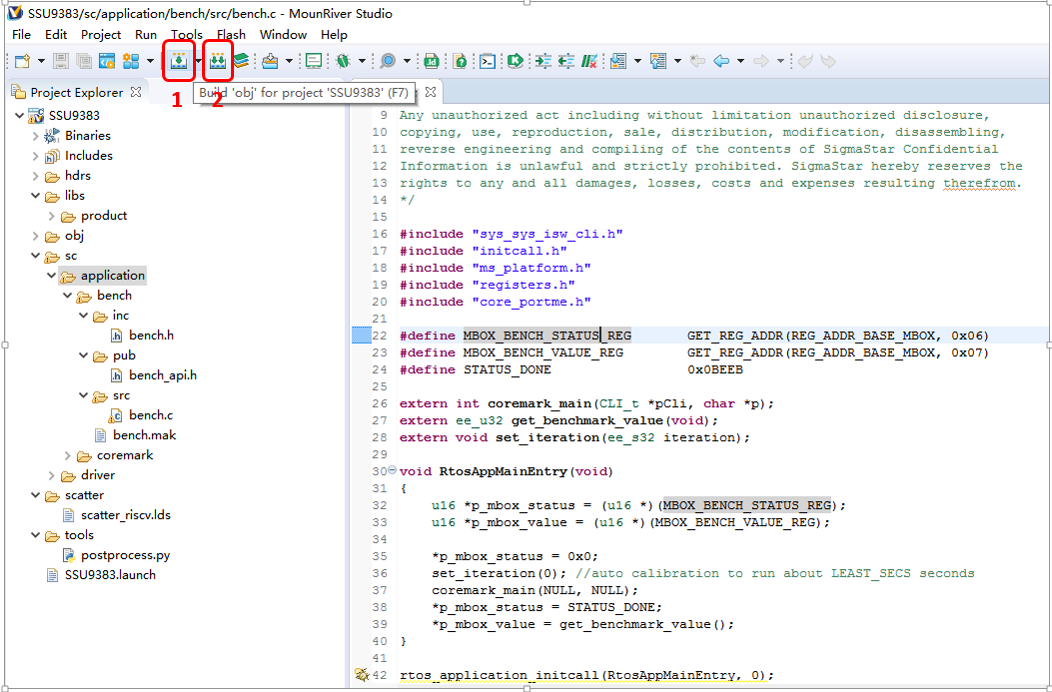
-
Click button 1, Build, and you can perform the build operation.
-
Click button 2, Rebuild, and you will first perform the clean operation and then the build operation.
-
After the build is completed, you can generate a new firmware PCUPID.fw in the obj directory.
3.7. Update Firmware
- Linux alakid project: Use PCUPID.fw to replace project/board/pcupid/riscv/pcupid_riscv_isw.bin in alkaid and regenerate the images package. You can also replace the new firmware with the riscvfw file burned into the images directory. After burning the new images and restarting, the system will use the new firmware to start RISCV.
4. System Overview
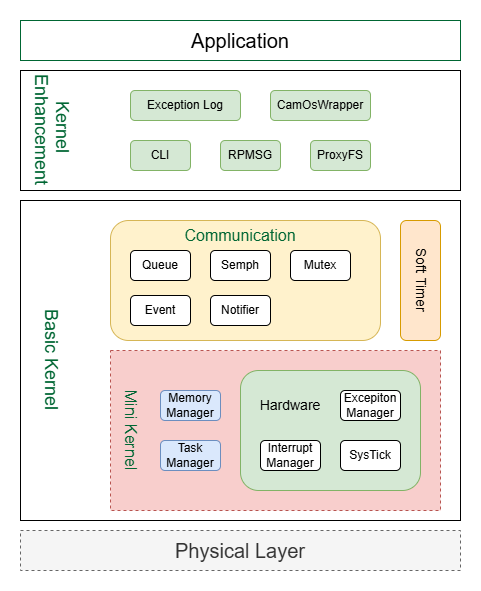
Architecture Description:
-
Physical hardware layer: It consists of physical hardware, including CPU, DDR, I2C, UART and other hardware modules;
-
Basic kernel layer: The basic kernel layer mainly includes hardware-related driver code, CPU-related interrupt management, exception management, system clock, and basic task management and memory management provided by the operating system. In addition, the kernel also provides a series of communication tools such as message queues, semaphores, etc. The task management and communication-related components are the same as the official usage of FreeRTOS. Please refer to the official documentation provided by FreeRTOS;
-
Kernel enhancement: Kernel enhancement mainly implements certain system extension functions based on the basic kernel, such as:
-
CLI: Provides user command line operations, users can test or observe the system operation status through the command line;
-
RPMSG: Provides a communication mechanism between FreeRTOS and Linux;
-
ProxyFS: Implements FreeRTOS to read and write Linux files through a virtual file system, which can be used for FreeRTOS calibration data access;
-
Exception Log: Implements recording the last log of system errors to shared memory;
-
CamOsWrapper: Implements a unified cross-system call interface for different systems, which facilitates code normalization and unified usage;
-
-
Industry application: The upper-layer application implemented by the customer's application logic by calling the lower-layer interface.
5. Directory Structure
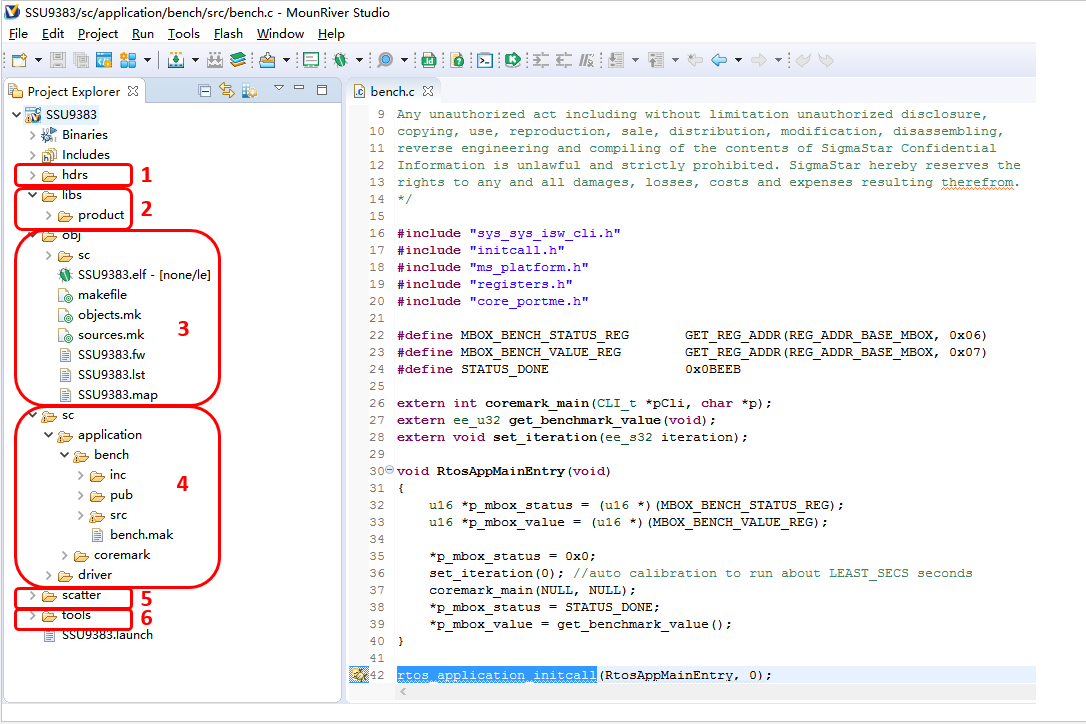
Directory description:
-
Directory 1, hdrs, is the header file directory of the sdk. All libraries released in the form of library have their corresponding header files in this directory.
-
Directory 2, libs/product, is the library file directory of the sdk. All libraries released in the form of library are in this directory.
-
Directory 3, obj, is the output directory of MounRiver compilation, which contains automatically generated makefiles and compilation result files, such as PCUPID.fw, which is the firmware that can be burned into the flash to run RISCV.
-
Directory 4, sc, is the directory where the libraries and apps released in the form of source code in the SDK are located. The application directory contains demo programs, and the driver directory contains drivers.
-
Directory 5, scatter, is the directory where the link script is located.
-
Directory 6, tools, is the directory where the tools you need to use are stored. For example, the script (postprocess.py) that converts ELF into the firmware that can be burned into the flash and executed is in this directory.
5.1. Demo Application Introduction
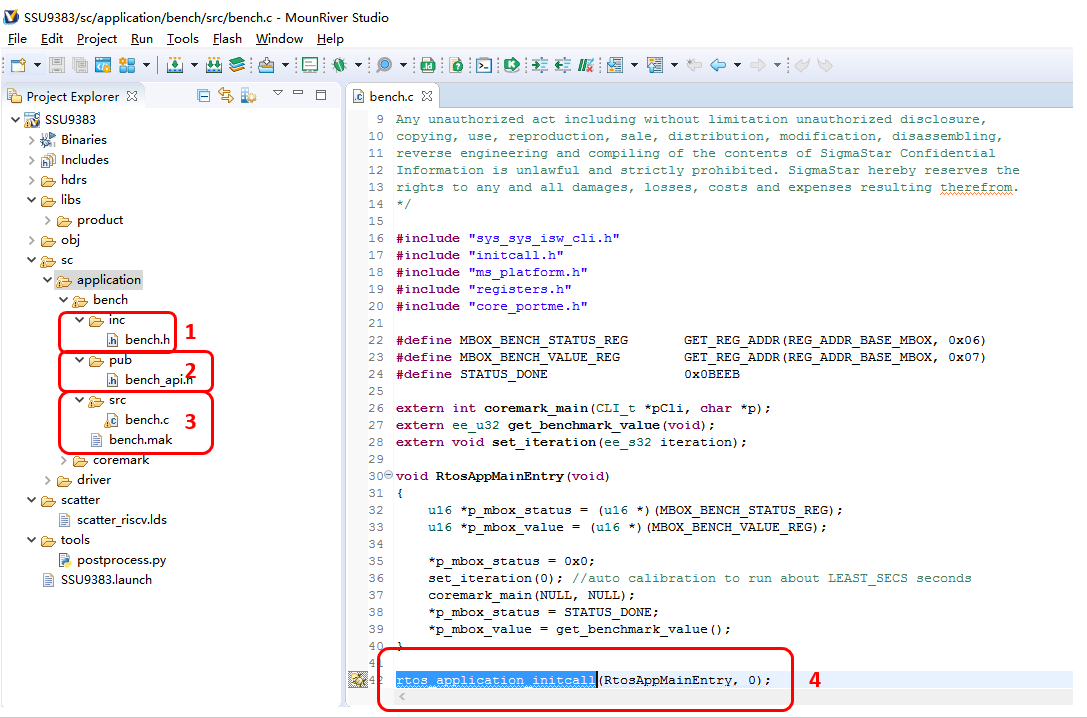
-
Directory 1, inc, stores the header files inside the module, which are not used by other modules.
-
Directory 2, pub, stores the header files that will be used by other modules.
-
Directory 3, src, is the source code file of the module.
-
Function 4, rtos_application_initcall(), is used to specify the entry function of the application module. The first parameter is the function name, and the second parameter is used to set the execution order of the module entry function. It is generally configured to 0. When there are multiple application modules, the execution order of the application function can be determined by configuring parameters 0, 1, 2, and 3. The smaller the number, the earlier it will be executed.
-
The entry function RtosAppMainEntry() of the Bench module simply calls the coremark_main() function to perform the coremark operation.