Sigmastar Secureboot_debugsop Manual
REVISION HISTORY
| Revision No. | Description |
Date |
|---|---|---|
| 1.0 | 03/06/2024 |
1. Signing Process Description
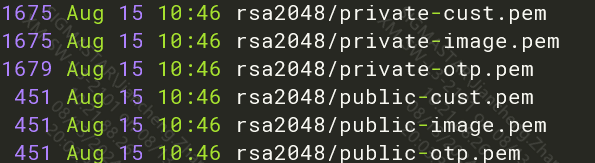
1.1 Key Description Related to Signing and Verification:
-
private-otp.pem is used for signing IPL
-
public-otp.pem is burned into OTP, used for verifying IPL in ROM code
-
private-cust.pem is used for signing IPL_CUST
-
public-cust.pem is inserted into IPL, used for verifying IPL_CUST in the IPL flow
-
private-image.pem is used for signing UBOOT/TFA/SMF/OPTEE/Kernel
-
public-image.pem is inserted into IPL_CUST, used for verifying UBOOT/TFA/SMF/OPTEE in the IPL_CUST flow
-
UBOOT reads public-image.pem from IPL_CUST to verify Kernel/rootfs, etc.
1.2 IPL
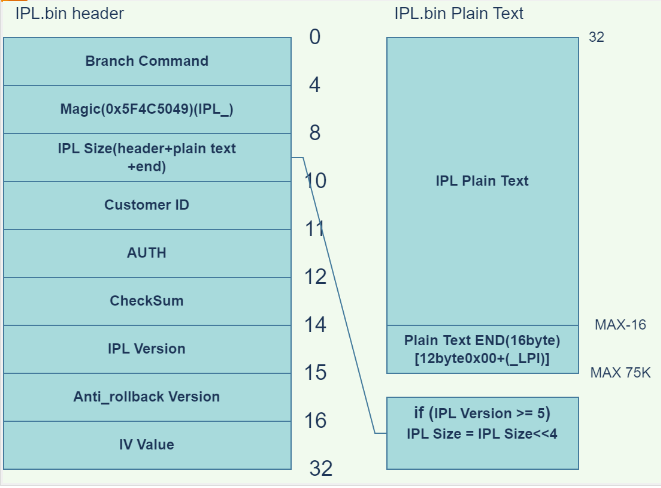
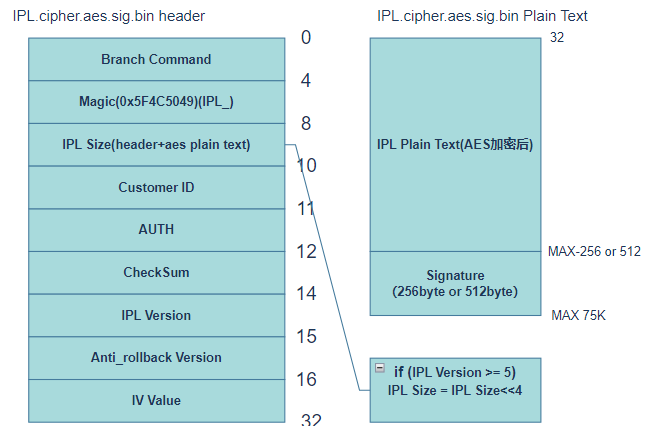
1.2.1 Unsigned IPL.bin
-
Branch Command (4 bytes) contains an instruction that allows the program pointer to jump directly to the Plain text part of IPL, as the first 32 bytes of IPL are the IPL header and do not contain executable code.
-
Magic (4 bytes) is used to identify the text type, with IPL's Magic being 0x5F4C5049, corresponding to the ASCII characters IPL_.
-
IPL Size (2 bytes) stores the size of the entire IPL.bin file; if IPL Version >= 5, the actual IPL Size = header-stored IPL Size << 4.
-
Customer ID (1 byte) stores the customer ID.
-
AUTH (1 byte) is 0xFA, which enters debug mode; in debug mode, even if the Secure Boot field in OTP is not enabled, ROM will still verify IPL.
-
CheckSum (2 bytes) is a checksum calculated from the plain text + end part of IPL.bin to prevent errors during data transmission. If the plain text changes, the Checksum will also change.
-
IPL Version (1 byte) is the version number, currently 05; for versions 05 and later, the actual IPL Size needs to right shift the IPL Size data in the header by 4 bits.
-
Anti_rollback Version (1 byte) is the anti-rollback version number, which prevents IPL/IPL_CUST/TF-A/OPTEE/UBOOT/KERNEL from downgrading to previous versions.
-
IV Value (16 bytes) is used for decryption in AES CBC and CTR modes.
-
IPL Plain text is the Payload Data of IPL.bin (valid data).
-
Plain text END byte (16 bytes) is the end marker for IPL Payload Data, totaling 16 bytes, fixed as [12 bytes 0x00 + (_LPI)].
1.2.2 Signed IPL.bin
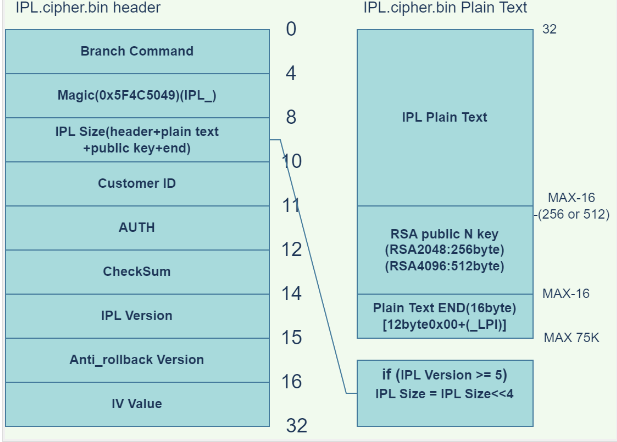
Comparison of Signed IPL and Unsigned IPL
-
Header Part
(a) The IPL Size changes, increasing the size of the RSA Public N Key; the Key Size depends on whether a 2048 (256 bytes) or 4096 (512 bytes) Key was used for signing IPL_CUST.
(b) The Checksum changes because Public N Key data is newly added between PlainText and END, requiring a recalculation of the checksum.

-
Plain Text
(a) Public N Key data is added between Plain Text and END; the size of the Key data depends on the size of the private key used for signing IPL_CUST.
1.2.3 Setting IPL to Debug Mode
By setting the AUTH bit of the 11th byte of the IPL header to 0xFA, the debug mode is entered; in debug mode, even if the Secure Boot field in OTP is not enabled, ROM will still verify IPL.
./add_ipl_header.py ./IPL.cipher.bin ./IPL.cipher2.bin 0 1 // Debug mode
./add_ipl_header.py ./IPL.cipher.bin ./IPL.cipher2.bin 0 0 // Normal mode
Comparing the header: it can be seen that only the AUTH bit changes from 0x00 to 0xFA, with no other changes.

1.2.4 Structure of Signed Encrypted IPL bin
Only the plaintext part is involved in encryption; other locations are not involved, and if the plaintext is not 16-byte aligned during encryption, it will be padded with 0s to align to 16 bytes before encryption.
1.2.5 IPL Signing Command Description
(1) Insert the RSA key into the IPL, this key is used to verify the signature of IPL_CUST.
tools/key_proc.py --insert --rsa=tools/../rsa2048/public-cust.pem --IV=tools/../aeskey/IV.bin -f sboot_sign/IPL.bin
(2) Set debug mode
tools/add_ipl_header.py sboot_sign/IPL.cipher.bin sboot_sign/IPL.cipher2.bin 0 1 0 0
(3) Encrypt IPL
tools/key_proc.py --encrypt --encAlg=aes --mode=cbc --IV=tools/../aeskey/IV.bin --aes=tools/../aeskey/aesKey128_1.bin -f sboot_sign/IPL.cipher2.bin
(4) Signing the IPL
tools/key_proc.py --sign --rsa=tools/../rsa2048/private-otp.pem --bcb_rsa=tools/../rsa2048/private-cust.pem -f sboot_sign/IPL.cipher2.aes.bin
1.3 IPL_CUST
The signing process for IPL_CUST is identical to that of IPL, except that IPL_CUST does not have encryption/decryption processes.
1.3.1 IPL_CUST Signing Command Description
(1) Insert the RSA key into the IPL_CUST, this key is used to verify the signature of UBOOT.
tools/key_proc.py --insert --rsa=tools/../rsa2048/public-image.pem -f sboot_sign/IPL_CUST.bin
(2) Set debug mode
tools/add_ipl_header.py sboot_sign/IPL_CUST.cipher.bin sboot_sign/IPL_CUST.cipher2.bin 0 1 0 0
(3) Signing the IPL_CUST
tools/key_proc.py --sign --rsa=tools/../rsa2048/private-cust.pem -f sboot_sign/IPL_CUST.cipher2.bin
1.4 UIMAGE
The signing process for UIMAGE, which includes TFA, OPTEE, UBOOT, KERNEL, and RISCV, is the same.
Structure of the image before and after signing:
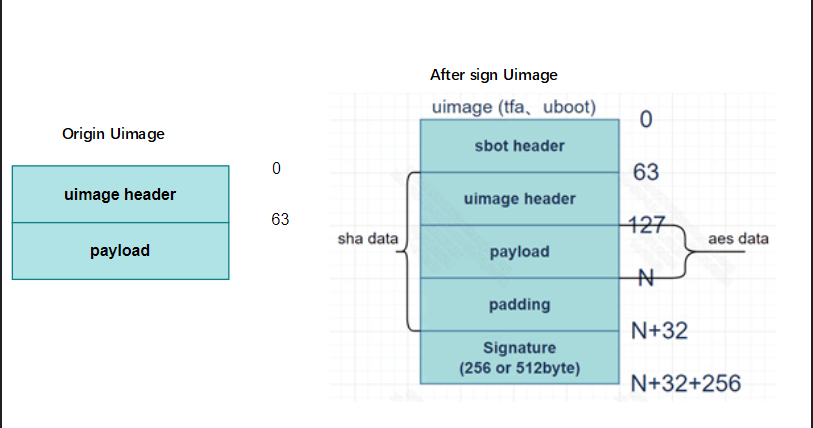
The main difference is that the signed image adds sbot header, padding, and signature parts.
(a) The sbot header is an additional layer added by secureboot, with a structure identical to the uimage header but with different content.
(b) Padding: An additional 32 bytes of data used to store the following data.

© Signature: Signing data.
1.4.1 UIMAGE Signing Command Description
Here, the UBOOT signing command is described; the above UIMAGE follows the same process.
(1) Insert the RSA key into the uboot, this key is used to verify the signature of rootfs or kernel.
tools/uboot_deal.sh sboot_sign/u-boot.img.bin sboot_sign/u-boot.img.bin.processed public-image
(2) Encrypt uboot
tools/key_proc.py --encrypt --encAlg=aes --aes=tools/../aeskey/aesKey128_1.bin -f sboot_sign/u-boot.img.bin.processed
(3) Add append data to the end of uboot
tools/key_proc.py --append --anti=0 --encAlg=aes --aeskeylen=128 --aeskeynum=1 --mode=ecb --IV=tools/../aeskey/IV.bin -f sboot_sign/u-boot.img.bin.aes.processed
(4) Signing the uboot
tools/key_proc.py --sign --rsa=tools/../rsa2048/private-image.pem -f sboot_sign/u-boot.img.bin.aes.append.processed
cp sboot_sign/u-boot.img.bin.aes.append.sig.processed sboot_sign/u-boot.img.bin.processed.sigout
(5) Add the sbot header to the uboot header
tools/mkimage -A arm -C none -a 0 -e 0 -n sbot -d sboot_sign/u-boot.img.bin.processed.sigout sboot_sign/u-boot.img.bin.processed.sigout.sbot
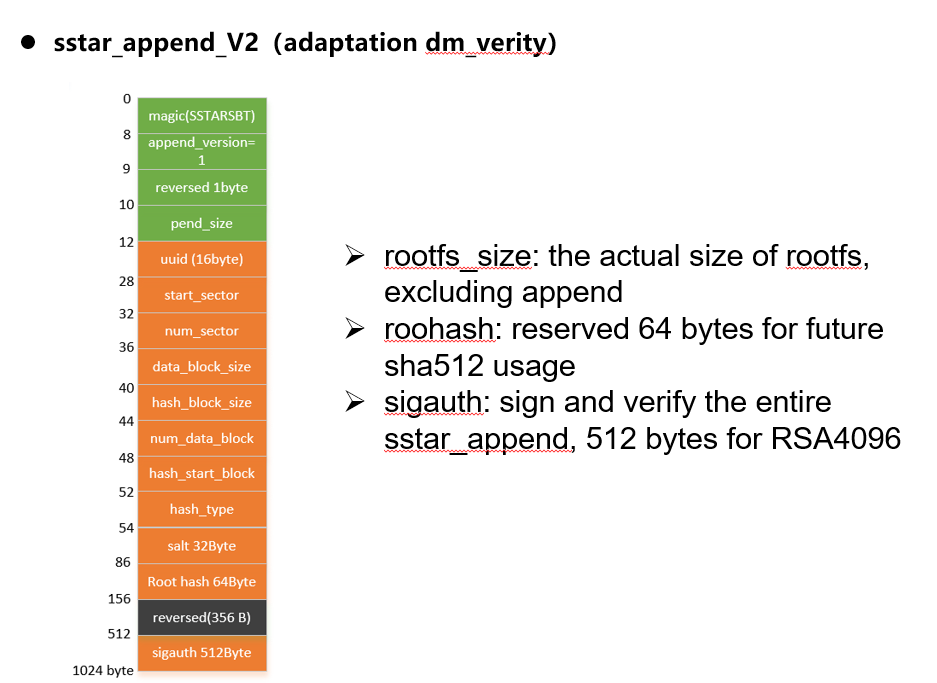
1.5 ROOTFS
The signing process for rootfs is the same as that for the above UIMAGE, except that rootfs does not add sbot header, and if dmverity is enabled, the structure of the padding data in rootfs will change to the following to store dmverity-related parameters.
1.5.1 ROOTFS Signing Command Description
-
Signing command description without dm verity:
(1) Add append data
tools/key_proc.py --append --anti=0 --aeskeylen=128 --aeskeynum=1 --mode=ecb --IV=tools/../aeskey/IV.bin -f sboot_sign/rootfs.ext4
(2) Add sign data
tools/key_proc.py --sign --rsa=tools/../rsa2048/private-image.pem -f sboot_sign/rootfs.append.ext4
-
Signing command description with dm verity:
(1) Calculate dm verify related data
veritysetup format sboot_sign/rootfs.ubifs tools/rootfs_hash_device.bin --data-block-size=4096 --hash-block-size=4096 --hash=sha256 --debug
(2) Add dmverify data to append data
tools/key_proc.py --append --append_version=1 --anti=0 --dm_verity=73c0a043-9b9e-4a37-b53f-344695bb3bfd,0,0,7440,4096,4096,930,10,932,sha256,7149ef0ab7c487925dc0b12d6be5a673c349e0b4a3fad0733280e57a3f040720,def09292e4f32935b520c639ded67df82dc8b023718e22f0b65f12d23f699383 -f sboot_sign/rootfs.ubifs
(3) Add sign data
tools/key_proc.py --sign --rsa=tools/../rsa2048/private-image.pem -f sboot_sign/rootfs.append.ubifs
(4) Align the rootfs length to 1024
dd if=/dev/zero bs=1 count=3328 >> sboot_sign/rootfs.append.sig.ubifs
(5) splicing data
cat sboot_sign/rootfs.ubifs sboot_sign/rootfs.append.sig.ubifs sboot_sign/rootfs.ubifs.hash > sboot_sign/rootfs.ubifs.sigout
2. Secureboot Related Issues
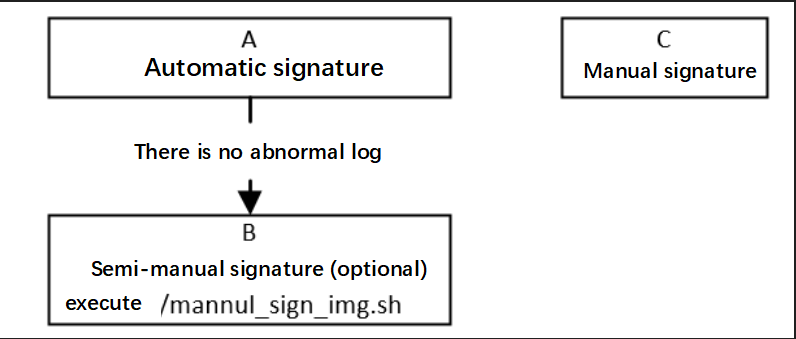
2.1. Signing Failure
| Process | Method | Exit Conditions | Next Step | Information to Provide to RD | Related Reference FAQ |
|---|---|---|---|---|---|
| A | Execute make clean; make (or make clean; make image_prepare; make secure_boot) in the alkaid directory image/security_boot_tools/ | 1. Abnormal log 2. No abnormal log |
1. Contact RD 2. End |
Compilation log under image/security_boot_tools/ and sign_image.config file | |
| B | Execute ./mannul_sign_img.sh in the alkaid directory image/security_boot_tools/, note that automatic signing must pass first for mannul_sign_img.sh to exist | 1. Abnormal log 2. No abnormal log |
1. Contact RD 2. End |
Compilation log under image/security_boot_tools/ and sign_image.config file | |
| C | The old version does not have automatic signing; commands must be executed step by step according to SOP | 1. Abnormal log 2. No abnormal log |
1. First check if files and keys exist; if they do, contact RD for further analysis 2. End |
Compilation commands and error logs | SecureBoot_SOP |
2.2. Verification Failure

| Process | Method | Exit Conditions | Next Step | Information to Provide to RD | Related Reference FAQ |
|---|---|---|---|---|---|
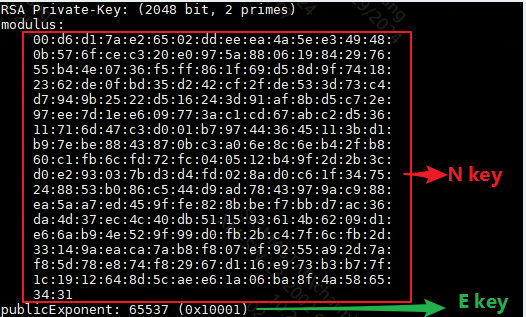
| A | Rom Code: 1. OTP_SECUREBOOT not burned, switch to normal boot, enter uboot, use otpctrl cmd to read RSA N key and E key from OTP 2. SECUREBOOT ENABLE burned, but RSA key not burned Other stages: Check if the previous stage's binary contains RSA N key data Then compare with the public.pem used for signing【There are two ways to view public.pem content: 1. ./key_proc.py --keyN -f public.pem then check public.bin 2. openssl rsa -text -in private.pem command can view N E key values, see Figure 3 private.pem content】 |
1. Correctly burned 2. SECUREBOOT ENABLE burned, but RSA key not burned or unsure if RSA key was correctly burned 3. Partially correct 4. Not burned |
1. Enter Process B 2. Contact RD 3. Confirm if the entire package code is tip code, replace the chip and re-burn 4. Re-burn otp in uboot |
Need to ask RD for OTP RSA read script to confirm if RSA is correctly written in OTP | None |
| B | If it is the python under image/security_boot_tools/tools/ in alkaid, pull new code, which is the latest. | 1. Python is the latest 2. Python is not the latest |
1. Enter Process C |
None | |
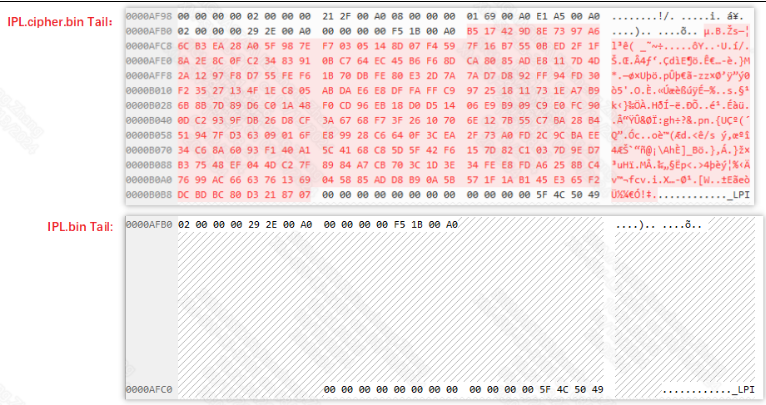
| C | Based on the header information in the image, find the end of IPL, check if there is signing data at the end (signing data of 256/512 bytes is not included in the size information recorded in the header) | 1. Image end contains 256/512 byte information 2. End does not contain signing data |
1. Contact RD and provide information 2. If manually signing, re-sign according to the document; for automatic signing (under alkaid's image/security_boot_tools/tools/), contact RD |
1. For automatic signing, provide compilation log under image/security_boot_tools/tools/ and sign_image.config file; for manual signing, provide signing commands 2. Dump register bank: 0x1122 and 0x12a0 |
Explanation of Verification Error Log Reasons
2.2.1. AUTH ERR Occurred in ROM Code Stage, Possible Reasons:
-
OTP RSA N/E key not correctly burned.
-
OTP RSA_KEY_LEN_SELECT/ROM_SELECT_AESKEY not correctly burned.
-
The RSA N/E key burned in OTP does not match the private key used for signing IPL.
-
Signing data not inserted at the end of IPL, or the inserted signing data is incorrect.
2.2.2. IPL Verification of IPL_CUST
"[SECURE] get keyN fail" Reason: The magic check in the IPL header in IMI failed, indicating that IPL was not correctly loaded into IMI.
2.2.3. IPL/IPL_CUST Stage
"[SECURE] get ipl_cust keyN fail" Reason: The magic check in the IPL_CUST header in DDR failed, indicating that IPL_CUST was not correctly loaded into the corresponding address in DDR.
2.2.4. "[SECURE] chk sboot magic fail" Reason:
The appending part of the uimage type image such as TFA/OPTEE/UBOOT is not correctly inserted at the end, leading to a failure in the magic check of the appended data.
2.2.5. "-Authenticate image XXX failed!" Possible Reasons:
-
The corresponding public key is not inserted at the end of IPL and IPL_CUST, or the inserted public key does not match the private key used for signing.
-
The image to be verified does not have signing data inserted.
-
The image to be verified was not successfully burned into flash.
UBOOT Stage
2.2.6. "[U-Boot] CUST RSA Key fail" Reason:
After reading IPL_CUST data from flash to DDR, the magic check of IPL_CUST failed, indicating that IPL_CUST data was not successfully read from flash.
2.2.7. "[U-Boot] chk image magic fail." Reason:
-
There is no correct kernel image data in the address specified by the first parameter after sigauth.
-
If verifying rootfs, it indicates that the rootfs_size (hexadecimal) environment variable is not set.
2.2.8. "[U-Boot] check data fail!" Reason:
The appending part of the kernel/rootfs image is not correctly inserted at the end, leading to a failure in the magic check of the appended data.
2.2.9. "[U-Boot] Authenticate failed!" Reason:
-
Check the two sets of dumped data; the first set of 32 bytes is the sha256 value calculated for the image, and the second set of data with the same length as the signing data is the verification data.
-
If the verification data conforms to the pkcs padding standard (most of the front data is 0xff), it indicates that the RSA calculation result is fine, and if the sha256 calculation is wrong, it indicates that the image in DDR is incorrect.
-
If the RSA result is wrong, check if the public key inserted into IPL_CUST matches the private key used for signing the kernel/rootfs image, and check if the signing data in DDR is correct.
2.3. Decryption Failure
| Process | Method | Exit Conditions | Next Step | Information to Provide to RD | **Related Reference FAQ ** |
|---|---|---|---|---|---|
| A | Check the signing command to see if encryption was performed | 1. Encryption performed and stuck at starting UBOOT 2. Encryption performed and stuck at starting IPL 3. No encryption |
1. Enter Process B 2. Enter Process C 3. Re-sign with encryption |
None | None |
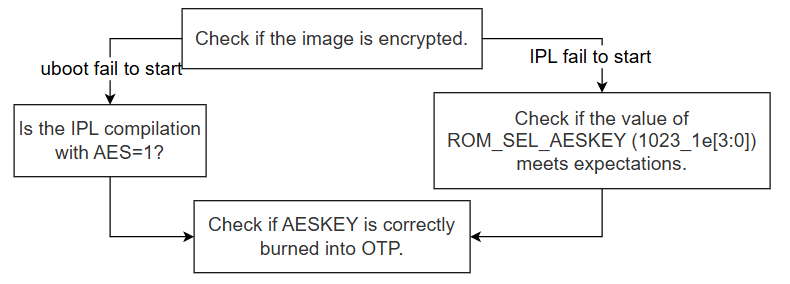
| B | Chips before Souffle need to pay attention to this flow; IPL compilation must include AES=1 | 1. Compilation includes AES=1 2. Compilation does not include AES=1 |
1. Enter Process D |
None | |
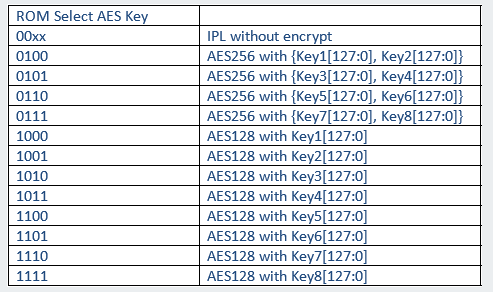
| C | Check the value in ROM_SEL_KEY to confirm which key is being used. You can read the value of 1023_1E[3:0]; see Figure 5 for the relationship between the read value and the key. | 1. The selection of keynum meets expectations 2. The selection of keynum is different from expected |
1. Enter Process D 2. OTP cannot be changed; please use the corresponding key for decryption |
None | None |
| D | In debug mode, switch to normal boot, enter uboot, and use otpctrl cmd to read AESKEY[1-4] from OTP (read as needed). Confirm that the value in the keynum used for signing matches the value in OTP to ensure the same key is used. | 1. Consistent 2. Inconsistent |
1. Contact RD and provide information 2. Update the read aeskey to the aeskey.bin used for encryption, or replace the chip |
dump register bank:0x1122 and 0x12a0 | None |
3. AESDMA Related Issues
3.1. AES Calculation Data Error
| Process | Method | Exit Conditions | Next Step | Information to Provide to SWRD | Related Reference FAQ |
|---|---|---|---|---|---|
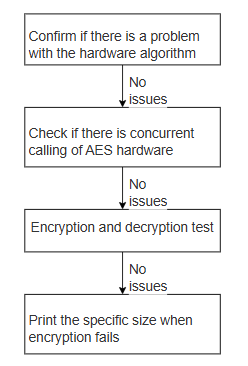
| A | 1. Disable kernel menuconfig SigmaStar Crypto driver 2. Continue running the customer's scenario to see if the issue still occurs. |
Exit Condition 1: Issue recurs==> Customer application layer issue Exit Condition 2: No issue |
Exit Condition 1: > Process ends Exit Condition 2: > B |
Exit Condition 1:<==> Let customer engineer check the application program issue | |
| B | Check if there are concurrent AES scenarios in the customer scenario, cancel all concurrent logic as much as possible, and switch to single-thread testing | Exit Condition 1: Forced single-threading works fine Exit Condition 2: Issue still recurs |
Exit Condition 1: Contact owner for handling Exit Condition 2: ==> C |
||
| C | 1. Confirm the size at which AESDMA calculation fails, prepare the corresponding case as follows: cd drivers/sstar/crypto/cryptodev/examples/ make clean;make ssbuild output Run output/install/cipher_aes* and output/aes on the board |
Exit Condition 1: At least one failed case Exit Condition 2: Test program works fine, but actual run has issues |
Exit Condition 1: > Report fail situation to owner Exit Condition 2: > D |
||
| D | 1. Print the specific size when encryption fails, design a specific data demo to reproduce the issue | Exit Condition 1: Can reproduce the issue 2: Cannot reproduce the issue |
Exit Condition 1: Contact owner for handling Exit Condition 2: Contact owner for further localization of the issue |
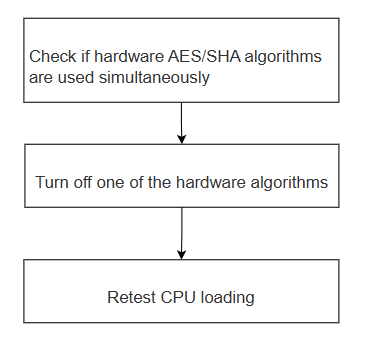
3.2. High AES/SHA CPU Loading
| Process | Method | Exit Conditions | Next Step | Information to Provide to SWRD | Related Reference FAQ |
|---|---|---|---|---|---|
| A | Check if there is concurrent use of hardware AES/SHA algorithms | Exit Condition 1: Yes Exit Condition 2: No |
Exit Condition 1: Enter B Exit Condition 2: Contact owner to optimize the program |
||
| B | Lower the priority of one of the hardware algorithms for AES/SHA, or directly disable one of the algorithms in the code, modify and run the aes/sha programs in example/output, and check the corresponding downgraded hw algorithm, print the prompt | Exit Condition 1: Print prompt shows the driver obtained is aes-generic/sha256-generic (software generic algorithm) Exit Condition 2: Print still shows the original hardware algorithm (sha256-sstar,*-aes-sstar) |
Exit Condition 1:<==> C Exit Condition 2: If this situation occurs, contact owner for modification |
||
| C | Retest CPU loading while running hw AES/SHA simultaneously | Exit Condition 1: CPU loading decreases Exit Condition 2: CPU loading does not decrease, or decreases but does not meet customer requirements |
Exit Condition 1: End process Exit Condition 2: Need to contact owner to optimize code for the scenario |
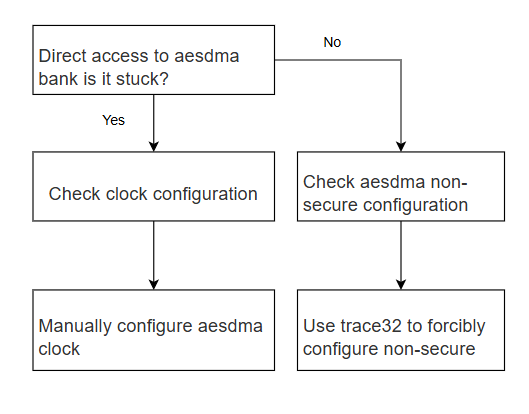
3.3. AESDMA Response Timeout
| Process | Method | Exit Conditions | Next Step | Information to Provide to SWRD | Related Reference FAQ |
|---|---|---|---|---|---|
| A | riu_r 1122 (aesdma bank) | Exit Condition 1: System hangs Exit Condition 2: Does not hang, but reads bank empty |
Exit Condition 1: >B Exit Condition 2: >C |
||
| B | Check the clock configuration of aesdma | Exit Condition 1: Clock not correctly configured Exit Condition 2: Clock correctly configured |
Exit Condition 1: Enter D Exit Condition 2: Contact owner for handling |
||
| C | Use trace32 to check if aesdma nonsecure is set | Exit Condition 1: aesdma nonsecure not set Exit Condition 2: aesdma nonsecure is set |
Exit Condition 1: Enter E Exit Condition 2. Contact owner for handling |
||
| D | Manually configure aesdma clock | Exit Condition 1: Configuration restores normal Exit Condition 2: Does not restore normal, can still reproduce the issue |
Exit Condition 1: Contact owner for handling Exit Condition 2: Contact owner for handling |
||
| E | Manually configure aesdma nonsecure with trace32, set bank1122 offset0 to 0x9d | Exit Condition 1: Configuration restores normal Exit Condition 2: Does not restore normal, can still reproduce the issue |
Exit Condition 1: Contact owner for handling Exit Condition 2: Contact owner for handling |