Development Environment Setup
1. Development Environment
1.1. Development Environment Description
Due to the limited resources of the embedded single board, development and debugging tools cannot run on the board itself. Typically, development and debugging are done using a cross-compilation approach, that is, in the form of "host machine + target board." Generally, the processor architectures of the host machine and the target board are different. The host machine needs to establish a cross-compilation environment suitable for the target board. Programs undergo "compilation - linking - locating" on the host machine to create an executable file. This executable file is then flashed onto the target board, where it runs. Below is an example of a typical development environment.
The development environment of Iford typically includes a Linux server, a Windows workstation, and an EVB (target board), all of which should be on the same network, as shown in Figure 1-1.
After the Bootloader (IPL + uboot) on the target board starts, operation information from the target board is output via the serial port to the host machine. By entering commands on the console of the host machine, the target machine can be controlled.
A cross-compilation environment is established on the Linux server, while the Windows workstation connects to the EVB board via a serial port so that developers can perform program development on the Windows workstation or remotely log in to the Linux server for program development. Specific software information for each part is as shown in Table 1-1.
Figure 1-1 Embedded Development Diagram
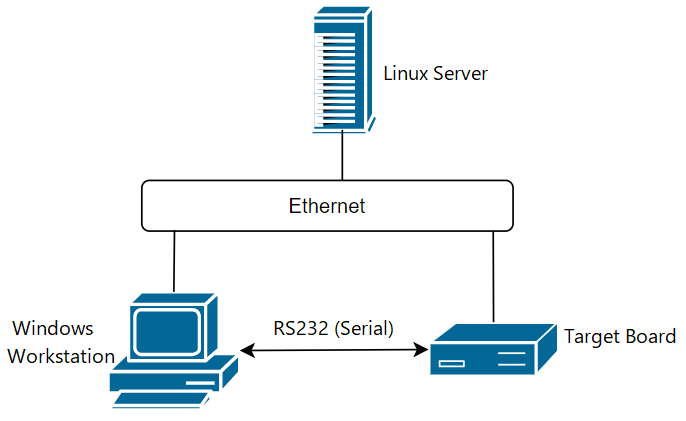
Table 1-1 Software Description of Development Environment
| Operating Platform | Operating System | Software Description |
|---|---|---|
| Windows Workstation | Windows XP/7/10/11 | Putty (or Xshell/SecureCRT, etc.), tftp server (tftpd32), SStar ISP Tool (Flash_Tool_xxx.exe) |
| Linux Server | Ubuntu or CentOS. It is recommended to use a fully installed Ubuntu version 16.04 or above. | NFS, telnetd, samba, vim, ARM cross-compilation environment (GCC version 11.1.0), etc. Other applications depend on specific development needs and are usually installed by default with appropriate configuration. |
| EVB | SStar Linux | The Linux kernel is based on the Linux standard kernel version 5.10.117 and the file system is built on busybox version 1.20.2, containing common Linux commands such as telnetd. |
1.2. Setting Up the Development Environment(Non-Docker)
It is recommended that users use a 64-bit Linux server. This development package may have unknown compatibility issues on 32-bit Linux servers, older versions of Linux servers, or less common Linux servers.
The recommended hardware configuration is as follows.Alternatively, use a virtual machine with similar specifications.:
- CPU: Intel(R) Xeon(R) CPU E5-2450 0 @ 2.10GHz or better CPU
- DDR: >= 16GB
- Hard Disk: >= 600GB
- Gigabit Ethernet
- OS: Ubuntu 18.04 64bit
1.2.1 Linux Server Version Used for the Release Package
cat /proc/version
Linux version 4.15.0-112-generic (buildd@lcy01-amd64-027) (gcc version 7.5.0 (Ubuntu 7.5.0-3ubuntu1~18.04)) #113-Ubuntu SMP Thu Jul 9 23:41:39 UTC 2020
lsb_release -a
LSB Version: core-9.20170808ubuntu1-noarch:printing-9.20170808ubuntu1-noarch:security-9.20170808ubuntu1-noarch
Distributor ID: Ubuntu
Description: Ubuntu 18.04.5 LTS
Release: 18.04
Codename: bionic
1.2.2. Network Environment Setup
Users should configure and install network components such as NFS, Samba, SSH, etc.
1.2.3. Software Package Installation
sudo apt-get install libc6-dev-i386 lib32z1 lib32ncurses5 libuuid1 cmake libncurses5-dev libncursesw5-dev bc xz-utils automake libtool libevdev-dev pkg-config mtd-utils android-tools-fsutils bison flex libssl-dev libmpc-dev squashfs-tools gawk rename
1.2.4. Installing the Cross-Compilation Toolchain
The release package provides the toolchain:
-
glibc:
gcc-11.1.0-20210608-sigmastar-glibc-x86_64_arm-linux-gnueabihf.tar.xz
Installation steps are as follows:
step1. Create a tool directory:
sudo mkdir -p /tools/toolchain or sudo mkdir -p /opt/sstar (this article takes /tools/toolchain as an example)
step2. Extract and install:
sudo tar -xvf ./gcc-11.1.0-20210608-sigmastar-glibc-x86_64_arm-linux-gnueabihf.tar.xz -C /tools/toolchain
step3. You can either export directly each time you compile or add it directly to startup scripts like /etc/profile or ~/.bashrc.
Example: export PATH=${PATH}:/tools/toolchain/gcc-11.1.0-20210608-sigmastar-glibc-x86_64_arm-linux-gnueabihf/bin
1.2.5 Other Configurations
1.2.5.1. Default Shell Configuration
The compilation script uses bash by default, requiring the system's default shell to be bash, which can be confirmed using the command ls -la /bin/sh. Taking the most commonly used Ubuntu as an example, high version Ubuntu defaults to dash; here’s how to change it:
# ls -la /bin/sh
lrwxrwxrwx 1 root root 4 Jun 15 08:49 /bin/sh -> dash

# sudo dpkg-reconfigure dash
# In the pop-up interface, select <NO>

# ls -la /bin/sh
lrwxrwxrwx 1 root root 4 Jun 15 08:49 /bin/sh -> bash
1.2.5.2. Set the Default Python Version to Python 2.x
There are semantic differences between Python 2 and Python 3. The SDK compilation script uses Python 2 semantics; therefore, it is necessary to set the system's default Python version to Python 2.x. Refer to online documents on how to change this, such as using the update-alternatives tool for configuration.
Note: mksquashfs comes pre-installed in Ubuntu; if not, install it as prompted.
If using older versions of Ubuntu, such as Ubuntu 16.04, it is recommended to update the repository. For detailed operations, refer to related documents online; failure to update may lead to subsequent compilation errors.
1.2.5.3. Set Default AWK Implementation
The compilation script uses awk/gawk by default; the system's awk version needs to be awk/gawk, which can be confirmed using the commands awk --help and awk --version. For Ubuntu, for example:
# awk --help
Usage: awk [POSIX or GNU style options] -f progfile [--] file ...
Usage: awk [POSIX or GNU style options] [--] 'program' file ...
POSIX options:        GNU long options: (standard)
    -f progfile        --file=progfile
    -F fs              --field-separator=fs
    -v var=val         --assign=var=val
...

# awk --version
GNU Awk 4.1.4, API: 1.1 (GNU MPFR 4.0.1, GNU MP 6.1.2)
Copyright (C) 1989, 1991-2016 Free Software Foundation.
...
If the default AWK implementation is not awk/gawk, install gawk, and then change the awk implementation to gawk:
sudo apt-get install gawk

sudo update-alternatives --config awk
# Select gawk as the default awk implementation
1.3 Environment Setup (Docker)
Note: This method requires that Docker is already installed on the system.
After downloading the SDK package from the official website, unzip it and navigate to Comake_PI_D2_GLSSV05C13_SDK/Tools/SDK_Docker/. Follow these steps to load the Docker environment:
#1. Load the image
   docker load < comake_d2_docker.tar
#2. Run the environment and enter Docker
   chmod +x run_docker.sh
   ./run_docker.sh
Refer to 1.2.4. Installing the Cross Compilation Toolchain to unzip the compilation tools from the Comake_PI_D2_GLSSV05C13_SDK/Tools/ToolChain/ path. It is recommended to keep the tools consistent with 1.2.4. Installing the Cross Compilation Toolchain.
Subsequently, all files on the host machine can be accessed via /work/comake_d2_docker.
2. Compilation
2.1. Environment Variable Configuration
Before compiling the SDK, configure the environment variables required for compilation. PATH specifies the cross-compiler path, CROSS_COMPILE specifies the type of cross-compiler, and ARCH specifies the chip architecture.
export PATH=$PATH:/tools/toolchain/gcc-11.1.0-20210608-sigmastar-glibc-x86_64_arm-linux-gnueabihf/bin
<If it has already been added to the environment variable in 1.2.4, this step can be omitted>
export CROSS_COMPILE=arm-linux-gnueabihf-
export ARCH=arm
2.2. Extract SDK
cd SourceCode
tar zxvf project-xxx.tar.gz
tar zxvf boot-xxx.tar.gz
tar zxvf kernel-xxx.tar.gz
tar zxvf sdk-xxx.tar.gz
tar zxvf optee-xxx.tar.gz
boot-xxx.tar.gz: uboot source code
kernel-xxx.tar.gz: kernel source code
project-xxx.tar.gz: Part of the compilation to create the image, containing non-open-source parts such as lib/ko and external API header file references
sdk-xxx.tar.gz: Testing Demo/application packaging framework part
optee-xxx.tar.gz: optee source code (not every project has this, it depends on the support situation for the actual project)
2.3. Project Compilation
2.3.1 Defconfig Naming Explanation
Before compilation, the corresponding defconfig needs to be selected. Each field of defconfig is described as follows:
$(PRODUCT).$(FLASH).$(TOOLCHAIN)-$(TOOLCHAIN_VERSION)-$(FS_TYPE).$(BAROD).$(DDR_SIZE).$(PACKAGE)_[$(DDR_TYPE)]_[$(OPTION)]_defconfig
| Field | Field Description | Example |
|---|---|---|
| PRODUCT | Product Type | For example: ipc/usbcam/nvr/dispcam/ipc-rtos |
| FLASH | Flash Type | For example: nor/nand/emmc |
| TOOLCHAIN | Compilation Tool | For example: glibc/uclibc |
| TOOLCHAIN_VERSION | Toolchain Version | For example: 11.1.0/10.2.1 |
| FS_TYPE | File System Type | For example: ramdisk/ext4fs/ramfs/squashfs |
| BAROD | Board Type | For example: ssc029a/ssm00a/ssm00c |
| DDR_SIZE | DDR Size | For example: 256/512x512 (two 512 chips) |
| PACKAGE | Chip Package Type | For example: bga1/bga2/qfn128 |
| DDR_TYPE | DDR Type, this field is optional | For example: ddr4/ddr3/lpddr3/lpddr4/lpddr4x. If this field is empty, the DDR type is ddr4. |
| OPTION | Identifies other functionalities; this field is optional | For example: hyp/optee/pm_rtos_dram/str/fastboot |
The meaning of DDR_SIZE, for example, 256: DDR SIZE 256MB corresponds to the size of LX_MEM in the .config file:
256MB=256*1024*1024Byte=0x10000000Byte
Similarly corresponds to the LX_MEM=0x10000000 parameter in the boot args.
2.3.2 Compilation
Enter the previously extracted project directory: cd project/ to compile the image:
Currently, Comake PI D2 supports two defconfig. The core board's defconfig only supports one-way 4-Lane Sensor and only includes the AI Glasses demo, so the packaged demos are relatively few. The bottom board's defconfig supports two 2+2 Sensors and contains more demo programs. For details about 4 Lane and 2+2 Sensors, see the First Application.
Compile the core board's defconfig:
cd project
make ipc_iford.emmc.glibc-11.1.0-ext4fs.ssc029d.256.bga8_lpddr4x_ai_glasses_defconfig
make clean;make image -j16
Compile the bottom board's defconfig:
cd project
make ipc_iford.emmc.glibc-11.1.0-ext4fs.ssc029d.256.bga8_lpddr4x_d2_full_defconfig
make clean;make image -j16
Generate the empty chip burning image:
make image-usb-factory -j16
After compilation, the generated image can be found in project/image/output/images/Usb_Ufu_Upgrade. The necessary tools for burning can also be obtained in this directory. For the burning method, please refer to the "Software Burning Instructions"
Note:
- When switching between different defconfigs for compilation, you must first execute
make clean, then executemake xxx_defconfig.Otherwise, it may result in execution errors.
Note:
-
Please ensure to execute
make clean;make image -j8for a complete compilation (including the compilation of boot/kernel) when compiling for the first time in the project. -
To enhance debugging efficiency, other than the first compilation, subsequent debugging can directly compile the corresponding modified module in the project and then quickly repackage it. For example:
Compile only the kernel:
make linux-kernel_clean;make linux-kernel -j8Compile only the boot:
make boot_clean;make boot -j8Quickly package the SDK image:
make image-fast-nocheck -j8
2.3 Boot Compilation
The SDK compilation under the project has already added boot compilation options, so it is recommended to compile the boot directly in the project using make boot after modifying it, without needing to manually release it to the project's path; just repackage the project directly.
2.4 Kernel Compilation
The SDK compilation under the project has already added kernel compilation options, so it is recommended to compile the kernel directly in the project using make linux-kernel after modification, without the need to manually release it to the project's path; just repackage the project directly.
3. Usage of Virtual Network Card
3.1. PC Environment
3.1.1. Confirm if the RNDIS Driver is Installed on the PC
After powering the Comake PI D2, the following drivers are loaded from the corresponding path:
insmod /lib/modules/5.10.117/udc-msb250x.ko
insmod /lib/modules/5.10.117/u_ether.ko
insmod /lib/modules/5.10.117/libcomposite.ko
insmod /lib/modules/5.10.117/usb_f_ecm.ko
insmod /lib/modules/5.10.117/usb_f_rndis.ko
insmod /lib/modules/5.10.117/g_ether.ko
Using the ifconfig command, if you can see the usb0 node, it indicates that the RNDIS driver is installed on the PC; otherwise, it means that the RNDIS driver is not installed on the PC, and the driver must be installed first to configure the network properly.
/ # ifconfig -a
lo        Link encap:Local Loopback
        LOOPBACK  MTU:65536  Metric:1
        RX packets:0 errors:0 dropped:0 overruns:0 frame:0
        TX packets:0 errors:0 dropped:0 overruns:0 carrier:0
        collisions:0 txqueuelen:1000
        RX bytes:0 (0.0 B)  TX bytes:0 (0.0 B)
usb0      Link encap:Ethernet  HWaddr CA:F1:94:09:D9:0A
        inet addr:169.254.129.241  Bcast:169.254.255.255  Mask:255.255.0.0
        UP BROADCAST RUNNING MULTICAST  MTU:1500  Metric:1
        RX packets:146060 errors:0 dropped:743 overruns:0 frame:0
        TX packets:210878 errors:0 dropped:0 overruns:0 carrier:0
        collisions:0 txqueuelen:1000
        RX bytes:8347070 (7.9 MiB)  TX bytes:326358396 (311.2 MiB)
3.1.2. Installing RNDIS Driver on PC
-
You can see the newly recognized USB device through Device Manager. If it is another device, check if the driver is not installed.
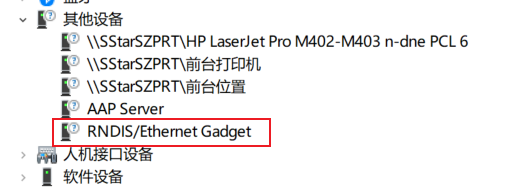
-
Follow the steps below for configuration:
-
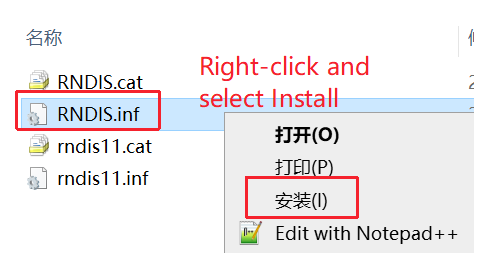
Download the RNDIS installation package by clicking on the RNDIS installation package, then extract it.
-
Right-click and select install, as shown in the figure below.
-
-
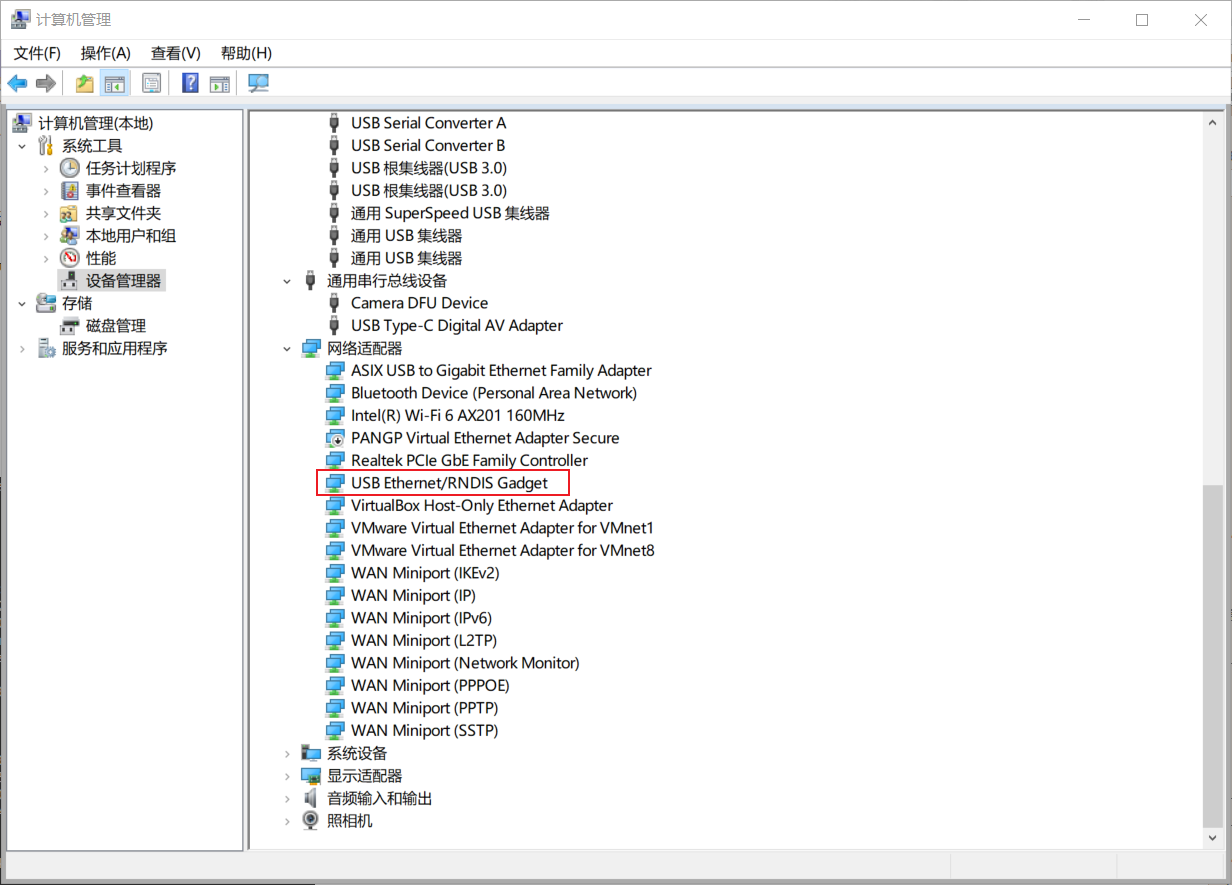
After successfully installing the driver, you can see "USB Ethernet/RNDIS Gadget" in the Network Adapter section.
3.1.3 Installing NFS Service on PC
Subsequently, to connect with the D2, you need to install the NFS service. It is recommended to install haneWin NFS. You can go to the haneWin NFS official website to download the corresponding installation package.
3.2. Comake PI D2 Automatic Network Configuration
Execute /customer/sample_code/bin/resource/setup_rndis.sh for network configuration operations.
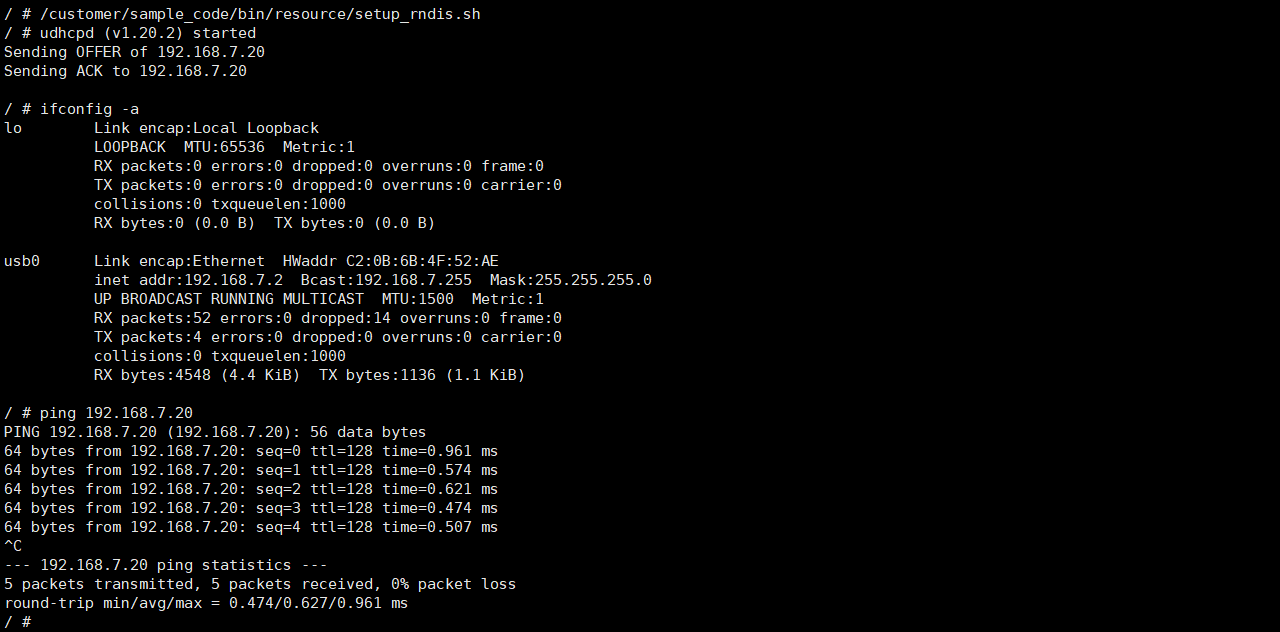
Once the network is configured, you can use NFS services along with the mount command to map files from the Windows side to the board. Detailed commands can refer to the following:
mount -t nfs -o nolock -o tcp 192.168.7.20:/d/nfs /mnt
In this case, /d/nfs refers to the NFS files on the D drive of Windows, while /mnt refers to the files on the board.
You can also run prog_vif_sensor_demo and use PotPlayer or VLC player on Windows to view the sensor streaming effect. For details, refer to the "First Application."