AI Glasses Program Description
REVISION HISTORY
| Revision No. | Description |
Date |
|---|---|---|
| 1.0 | 12/11/2025 | |
| 1.1 | 01/26/2026 | |
| 1.2 | -noeis parameter to disable EIS |
02/10/2026 |
| 1.3 | 03/31/2026 |
1. Introduction
AI glasses are a wearable device integrated with AI photography, video recording, voice assistant, Bluetooth headset, translation, navigation, sunglasses, chat services, and other functions. With the growing demand from consumers for lightweight and portable smart devices, smart glasses, as a hands-free device, have significant market potential. As AI technology matures and hardware technology improves, smart glasses have a broad application prospect in socialization, entertainment, office work, and daily use. In the future, smart glasses will possess more powerful functions and a lighter design, forming a more unified intelligent ecosystem to provide users with a smarter and more convenient experience.
This demo showcases the process of taking photos and recording videos using an AI glasses low power consumption scheme and introduces the method for previewing on the PC side via Wi-Fi.
- Photography function
- Video recording function
- Wi-Fi preview function
Keyword Explanation
-
STR (Suspend to RAM)
STR is an energy-saving state wherein the system enters this state, the SoC will power down while retaining only the DRAM self-refresh, significantly reducing power consumption. The system can be quickly restored through configured interrupt wake-up sources. STR not only accelerates application recovery time but also reduces the energy consumption for system power-up, enhancing overall efficiency.
2. Compilation Environment Description
Note
The board has the test program pre-packaged by default: /customer/sample_code/bin/prog_ai_glasses_sample.
If you do not need to modify the test program, you can skip this section.
If you wish to modify this demo independently, please refer to the following steps.
Step 1: Complete compiling the SDK.
# 1. Download SDK
# 2. Set environment variables
export PATH=/tools/toolchain/gcc-sigmastar-9.1.0-2019.11-x86_64_arm-eabi/bin:/tools/toolchain/gcc-11.1.0-20210608-sigmastar-glibc-x86_64_arm-linux-gnueabihf/bin:$PATH
export CROSS_COMPILE=arm-linux-gnueabihf-
# 3. Complete compilation
cd <project root directory>/project
make ipc_iford.emmc.glibc-11.1.0-ext4fs.ssc029d.256.bga8_lpddr4x_d2_full_defconfig
make clean -j16;
make image -j16;
Step 2: Compile the demo separately.
cd <project root directory>/sdk/verify/sample_code
make clean -j16 && make demo/ai_glasses/sample -j16
Path of the generated product after compilation: <project root directory>/sdk/verify/sample_code/out/arm/app/prog_ai_glasses_sample
Step 3: Copy the generated product to the board.
# Copy to the board directory
/customer/sample_code/bin/
# Run on the board
chmod 777 /customer/sample_code/bin/prog_ai_glasses_sample
3. Runtime Environment Description
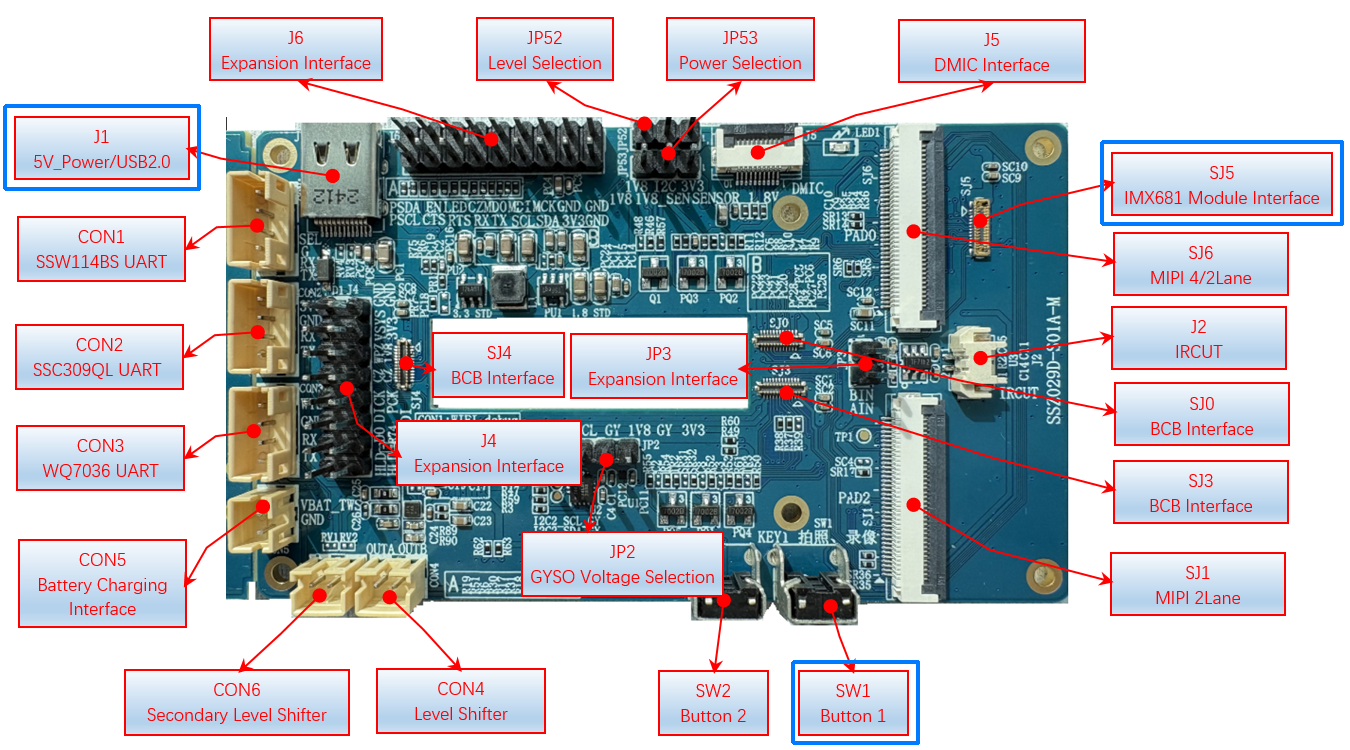
- Connect Sensor: Connect IMX681 Sensor to SJ5.
-
Connect Power: Connect 5V power supply to J1.
4. Execution Instructions
prog_demo_switcher is used to switch the working mode between SoC and TWS. The default working mode at boot is IDLE(2). Before running this demo, you need to switch to AI_GLASSES(0) mode first.
cd /customer/sample_code/bin/
./prog_demo_switcher -m 0
./prog_ai_glasses_sample [-noeis]
-
-noeis: Disable Electronic Image Stabilization (EIS) feature
By default (without this parameter), EIS is enabled.
After running the demo, the SoC will enter the suspend state; if there is no input on the SoC serial port, it indicates successful execution. Continue to perform different functions by operating SW1 or through voice wake-up, refer to the next section for details.
5. Execution Result Description
5.1 Photography Function
Short press (more than 20 milliseconds, less than 500 milliseconds) SW1 on the expansion board to take a photo. After the photo is taken, the system will automatically enter STR sleep mode. The photo is saved in the /customer/ai_glasses directory.
Example
/customer/ai_glasses/ss_photo_1717672.jpg
5.2 Video Recording Function
Long press (more than 500 milliseconds, less than 2 seconds) SW1 on the expansion board to start recording. After recording starts, short press (more than 20 milliseconds, less than 500 milliseconds) SW1 once to stop recording. After the recording is completed, the system will automatically enter STR sleep mode. The video is saved in the /customer/ai_glasses directory.
Example
/customer/ai_glasses/ss_movie_1646461.es
5.3 Voice Wake-up Function
Note
This feature requires the audio module to go through TWS. Please refer to V1.0 and V2.0 Hardware Difference Description to confirm hardware support first.
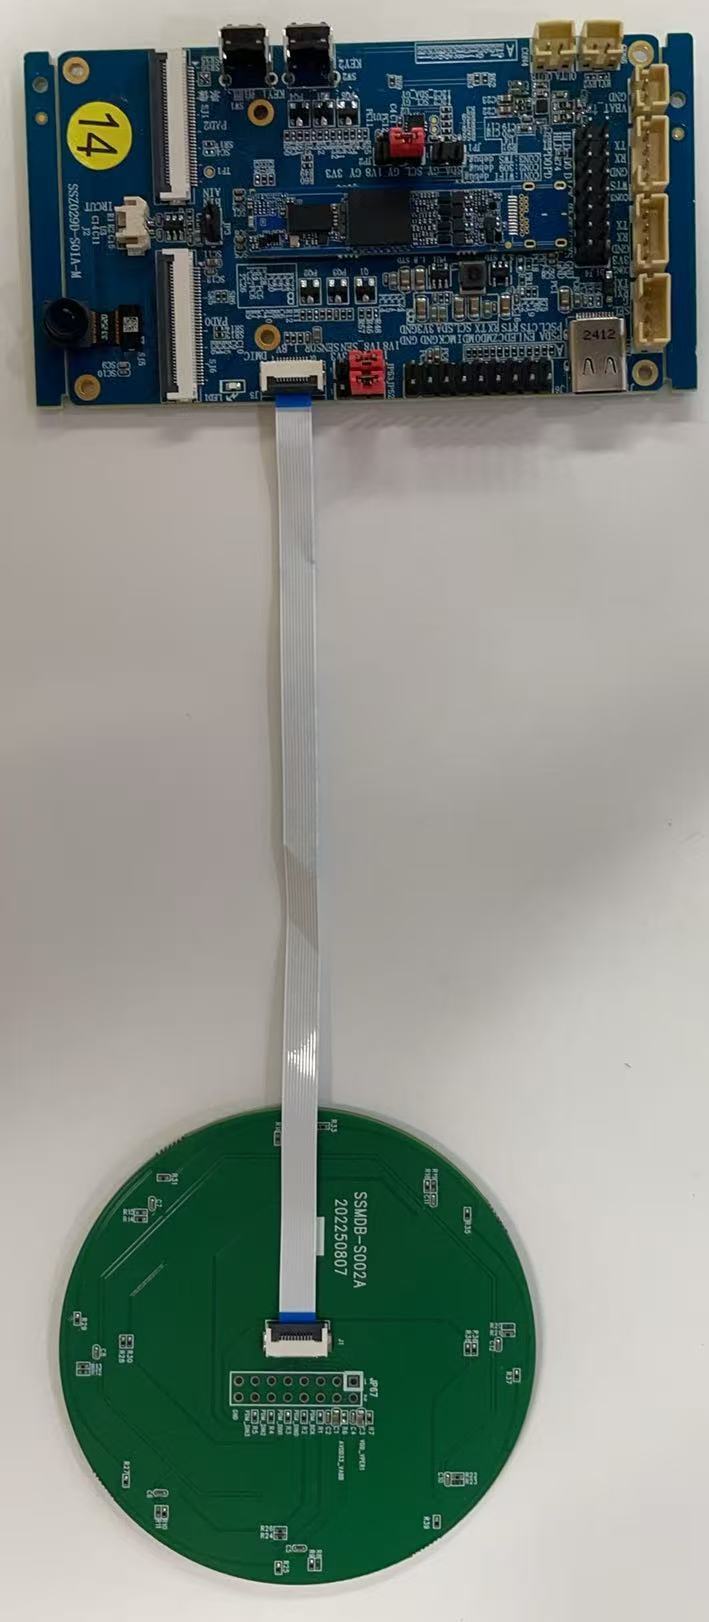
In addition to operating SW1, this demo also supports taking photos or recording videos through voice wake-up. Please connect the DMIC as shown in the figure below. The left side of the figure shows the old bottom board, and the right side shows the new bottom board. The new bottom board adds DMIC power supply pins. Please confirm that the jumper cap in the red box is properly installed.
5.3.1 Voice Photography Function
Speak the wake word take a photo to the DMIC, and the program will automatically take a photo and save it to the /customer/ai_glasses directory.
5.3.2 Voice Video Recording Function
Note: This feature will automatically stop recording. You do not need to press SW1.
Speak the wake word record a video to the DMIC, and the program will automatically record a 15-second video and save it to the /customer/ai_glasses directory.
5.4 Image Stabilization Function
This demo enables Electronic Image Stabilization (EIS) by default. This function relies on the Inertial Measurement Unit (IMU) (containing gyroscope and accelerometer) to obtain the device's physical orientation, and accordingly crops and reconstructs image frames. Therefore, before the first test, please refer to the documentation to verify that the gyroscope is functioning properly.
5.4.1 Zero Bias Calibration
The EIS algorithm relies on high-precision inertial data. After starting recording, the demo will first perform zero bias calibration to eliminate the gyroscope's initial error. The calibration result will be automatically saved to the configuration file /customer/zero_param_file.
- Stabilize the device: After powering on the development board, place the device horizontally on a stable surface and avoid manual shaking.
- Trigger calibration: Run the demo and start recording, and the program will automatically enter the calibration process.
- Confirm log: If calibration is successful, the demo will output the following log on the SoC serial port:
(SGS_GLASSES_EIS_ImuCalib 168)exec function pass
Persistence Mechanism of Calibration File
- Save path: After successful calibration, zero bias data will be persistently saved in
/customer/zero_param_file. - Reuse logic: The system will read this file by default on subsequent startups. As long as this file exists, the system will not perform automatic calibration.
- Reset method: If the stabilization effect is poor due to device shaking during calibration, you must manually delete this file to trigger recalibration:
rm /customer/zero_param_file
reboot
5.4.2 Simulate Shaking
After calibration is complete, hold the development board and perform walking, head turning simulation, or random shaking to simulate real-world usage scenarios and verify stabilization performance.
5.5 Wi-Fi Preview Function
Download Link: PC-side Preview Tool
Source Code Path:
sdk/verify/sample_code/demo/ai_glasses/tools/SstarAiGlasses
This demo provides a PC-side tool for previewing the photos and videos generated in the /customer/ai_glasses/ directory. The PC and board connect via Wi-Fi, using the FTP protocol to transfer files, and the specific operation steps are as follows:
Step 1: Extra long press (more than 2 seconds) SW1 on the expansion board to power on the Wi-Fi module. If you have connected the Wi-Fi serial port and see the following output, it indicates successful power-up.
#######################################################
#                                            #
#         SIGMASTAR IOT  WIFI                #
#                                            #
#######################################################
...
linux Output 5|5 slow
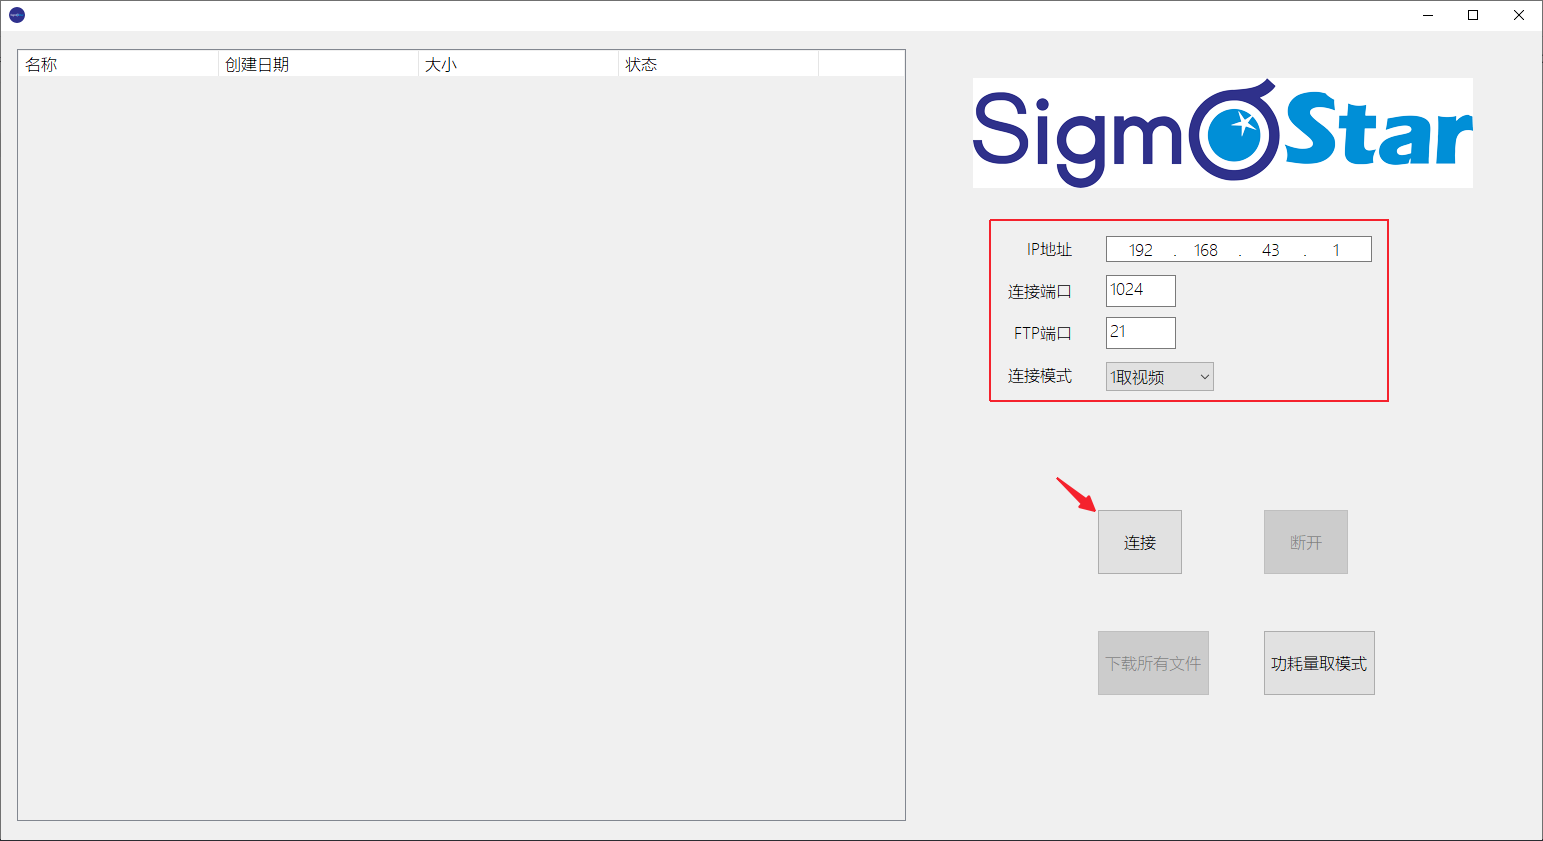
Step 2: On the PC side, turn on Wi-Fi and search for the hotspot named AI_GLASSES, uncheck Connect Automatically, then enter the password to connect.
Hotspot
Wi-Fi Name: AI_GLASSES_6dc4
Wi-Fi Password: 12345678
Default PC IP Address: 192.168.43.200
Note: Wi-Fi hotspot name format is AI_GLASSES_XXXX, where the last four digits are the device MAC address. Each device has a different Wi-Fi name to prevent name conflicts.

Step 3: Open SstarAiGlasses.exe on the PC, and click the Connect button on the tool to establish an FTP connection.
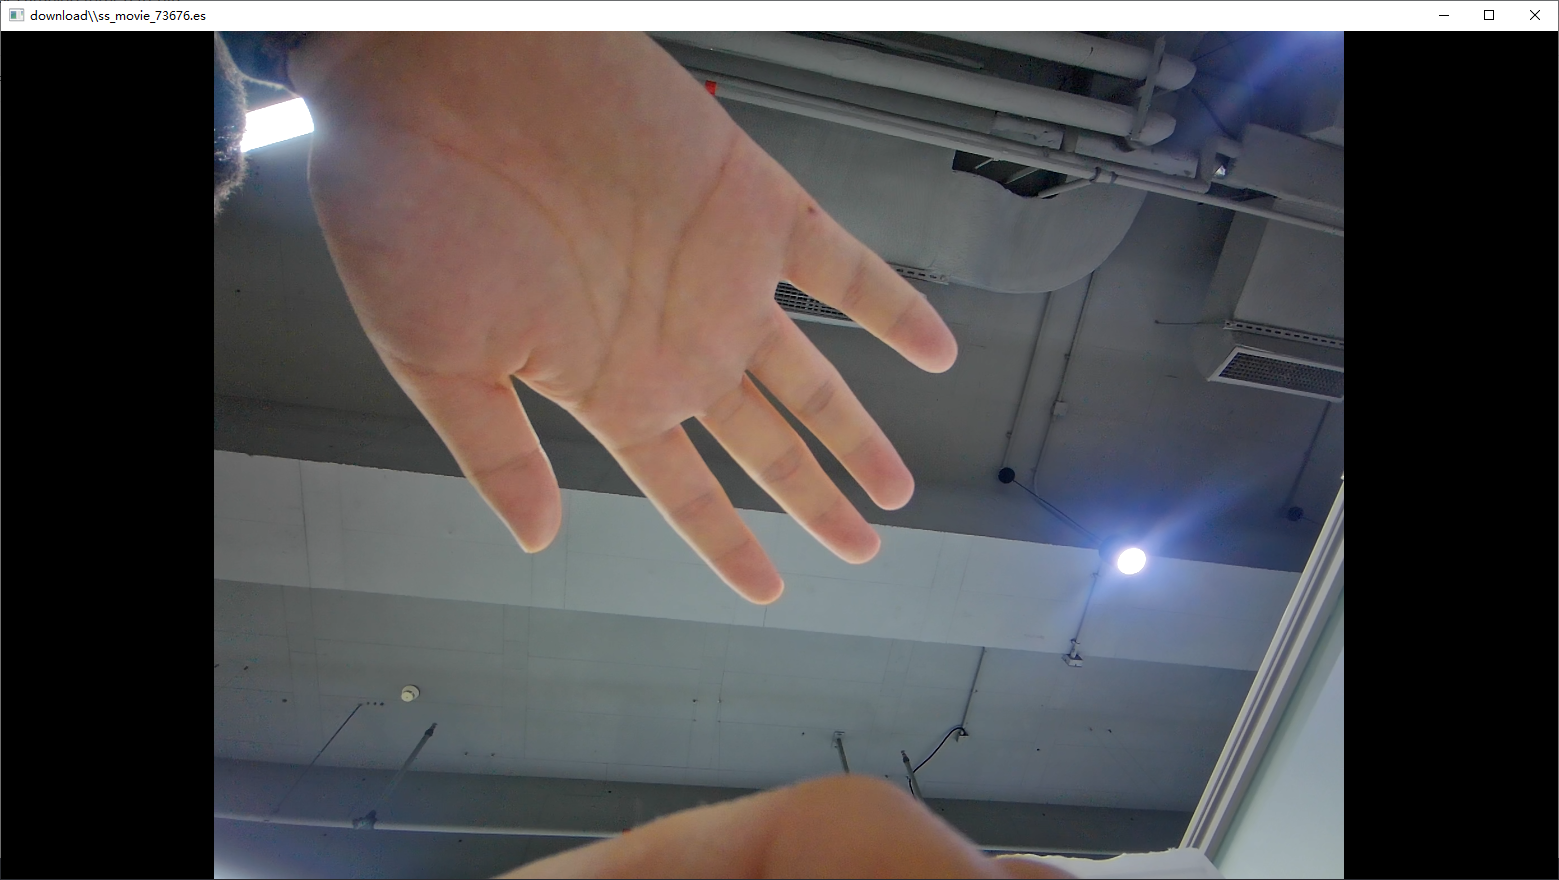
Step 4: Once connected successfully, the left side will list the downloadable resources, which can be downloaded individually by clicking on the files or all files at once (the files are saved in the download folder in the same directory as SstarAiGlasses.exe).
Note
The download time for video files may be longer; a prompt will indicate when the download is complete.

Image preview effect

Video preview effect
Step 5: Clicking the Disconnect button on the PC tool will disconnect the Wi-Fi connection, and the SoC will automatically enter STR sleep mode.

6. FAQ
Q: I cannot connect to Wi-Fi, how can I resolve this issue?
A: Please refer to WLAN Basic Function Usage Guide to check whether you have previously configured Wi-Fi AP name and password via command line. The Wi-Fi chip source code will automatically start a Wi-Fi hotspot named AI_GLASSES on boot, which conflicts with command line configuration.
Solution:
- Connect to the Wi-Fi serial port
- Send AT command:
AT+WIFI_SET_MODE STA_MODE - Set Wi-Fi to STA mode
- Clear the AP information configured via command line
- Power cycle the device
- Run the demo again and attempt to connect to Wi-Fi
Q: If I have purchased multiple devices, how do I get the Wi-Fi name of the current device?
A: If you have connected the Wi-Fi serial port, you can send the AT command AT+GET_SYS_STATUS:
> AT+GET_SYS_STATUS

# Execution result
=IOT=RF=Ares_AX e641e7a8 2GHZ Nov  3 2025 11:22:46
sstar_iot SDK version 2.1.1
flash map size 4Mbyte
OS  : freeRTOS
wifi    : 11AX 1X1 20M
[AP mode]
mac :50:7b:91:c9:6d:c4
channel :7
# The ssid corresponds to the Wi-Fi name
ssid:[AI_GLASSES_6dc4]

cpu : 1899756hz
memory total: 243172 byte
memory free: 191836 byte
TCPIP   : LWIP
lwip config: lwipopts.h
If you have connected the SoC serial port, you can execute the following commands:
# Note: Please restart the device after executing this command, otherwise it will affect the demo execution process.
cd customer/sample_code/bin/wifi/
./insmod_wifi.sh
./Sstar_iot_cli status

# Execution result
cmd_line: status
[Sstar_log]:Sstar_sdio_tx_bh:cmd free(16),used(1)
wifi_mode=AP
wpa_state=ACTIVE
# The ssid corresponds to the Wi-Fi name
ssid=AI_GLASSES_6dc4
ip_address=192.168.43.1
mac_address=50:7b:91:c9:6d:c4
ip_mask=255.255.255.0
gate_way=192.168.43.1
OK
Q3: When verifying the image stabilization function, I found an error in the gyroscope check. How to troubleshoot?
A3: Please execute cat /sys/class/sstar/gyro0/self_check to check the gyroscope status. If the log unknow device type[2] appears, it indicates that the gyroscope model on the bottom board is ICM40607, but the driver is configured for ICM42607 by default.
Solution:
- Modify kernel config by navigating to
Device Drivers→Sstar SoC platform drivers→Sstar Gyro Driver Support, uncheck ICM42607 and check ICM40607 instead. -
Choose one of the following methods to apply the driver:
Method 1: Quick replacement (no flashing required) - Compile driver separately and replace on board:
cd kernel
make modules -j32
arm-linux-gnueabihf-sigmastar-11.1.0-strip --strip-debug modules/gyro.ko
Then execute on board:
rmmod gyro
insmod /config/modules/5.10/gyro.ko
Method 2: Full flashing - Recompile SDK and flash the image.
If you want to know more technical details, click Learn More.