AOV Demo Program Instructions
1. AOV Function Introduction
1.1 Terminology Explanation
STR (Suspend to RAM), when entering this state after suspend, the SOC will power down, retaining only DRAM self-refresh, thereby achieving power consumption reduction. The system can be resumed through configured interrupt wake-up sources. The STR function enables faster application recovery time, reducing the overhead of system reboot and loading.
AOV (Always On Video) implements 24-hour low-frame-rate continuous recording based on sleep/wake functionality, capable of switching back to normal frame-rate mode when events occur, such as AI detection, PIR trigger, WIFI wake-up, etc. The current AOV is implemented based on STR.
PIR (Passive infrared sensor) is a passive infrared sensor that can be used to measure infrared light radiated from objects within its field of view. In this scenario, it is used to generate interrupts when detecting living beings.
1.2 Demo Introduction
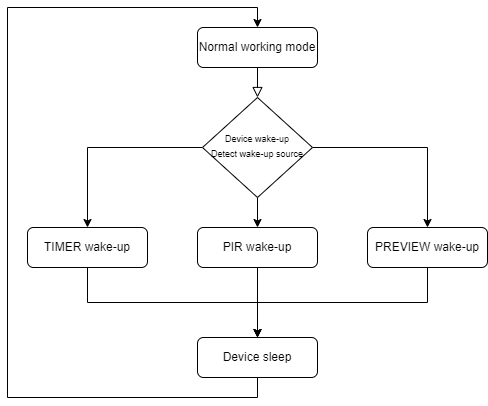
As shown in the figure, this demo sets up three wake-up methods: TIMER wake-up, PIR wake-up, and user preview PREVIEW wake-up. TIMER wake-up defaults to once every 1 second. Since the D2 development board does not have a PIR, and the demo does not have a fixed implementation method for PREVIEW user preview, these two methods are simulated by button triggers in this demo.
This demo mainly showcases the complete implementation of the Always On Video (AOV) 24-hour video monitoring solution. The AOV solution is specifically designed for outdoor monitoring scenarios, capable of achieving continuous intelligent monitoring under low-power conditions, specifically supporting the following functions:
-
Functional Scenario: Implement low-power 24-hour video monitoring, capable of long-term operation in battery-powered environments
-
Video Stream Processing: sensor→vif→isp→scl→venc→file storage, supporting H.264/H.265 encoding
-
Intelligent Detection: Integrated AI object detection functionality, supporting multi-object recognition such as human figures, vehicles, etc.
-
Adaptive Frame Rate: Intelligently switch between 1 FPS (low power) and 15 FPS (event recording) based on detection results
2. Compilation Environment Instructions
Note
Generally, the corresponding programs are already packaged on the board by default, so program compilation is not mandatory. You can directly find the executable file in /customer/sample_code/bin/prog_aov_aov_demo on the board. If you cannot find the file or have needs to modify the program, you can refer to the following steps.
2.1. Environment Configuration
Please configure the compilation toolchain as follows:
export PATH=/tools/toolchain/gcc-sigmastar-9.1.0-2019.11-x86_64_arm-eabi/bin:/tools/toolchain/gcc-11.1.0-20210608-sigmastar-glibc-x86_64_arm-linux-gnueabihf/bin:$PATH
export CROSS_COMPILE=arm-linux-gnueabihf-
export ARCH=arm
2.2. Full Package Compilation
In the project path, select defconfig for full package compilation according to the board configuration. Taking the SSZ029D-S01A-M model board as an example:
# Enter project directory
cd ./project

# Configure defconfig
make ipc_iford.emmc.glibc-11.1.0-ext4fs.ssc029d.256.bga8_lpddr4x_d2_full_defconfig

# Clean old compilation content
make clean -j8

# Execute full package compilation
make image -j8
2.3. Individual Compilation
If you want to manually compile the demo separately, you can enter the sample_code directory and execute:
cd sdk/verify/sample_code
make clean && make source/iford/aov/aov_demo
After compilation, the executable file is located at:
sdk/verify/sample_code/out/arm/app/prog_aov_aov_demo
2.4. Resource File Description
2.4.1. AI Detection Model
- File Location:
project/board/iford/dla_file/ipu_net/det/ - Available Models:
spdy48.img(human detection) - Package Location: Automatically packaged to
/config/dla/directory on the board after full package compilation - Usage Method: Specify model path through
modelparameter when running the program
2.4.2. IQ File
- File Location:
project/board/iford/iqfile/ - imx681 related files:
imx681_3m_comake_1201_30fps.bin - Package Location: Automatically packaged to
/config/iqfile/directory on the board after full package compilation - Usage Method: Specify path through
iqbin_bparameter when running the program
3. Runtime Environment Instructions
3.1. Hardware Connection
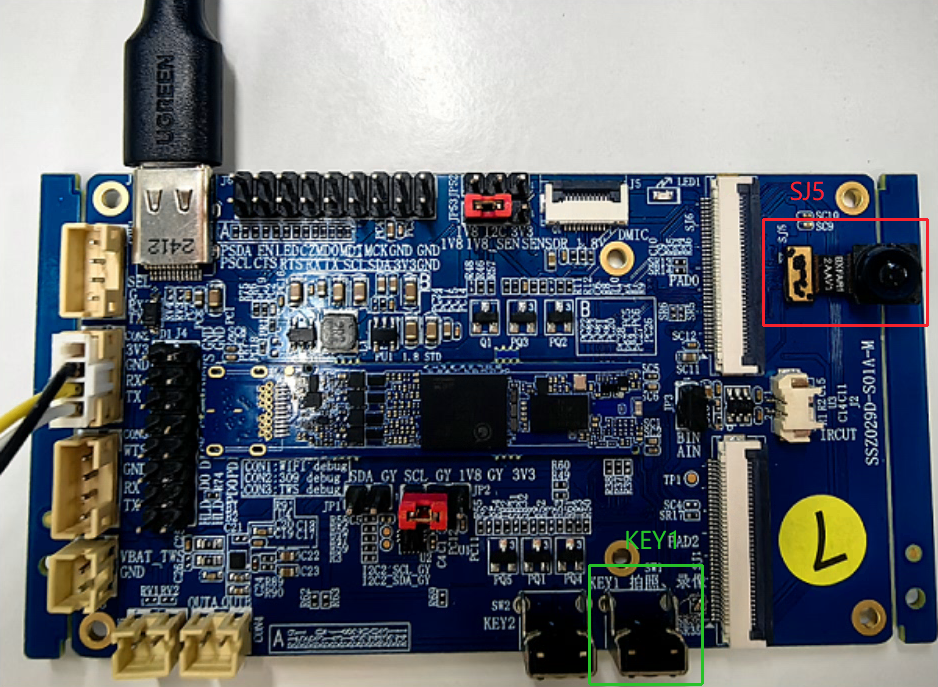
Connect the imx681 camera to the SJ5 interface.
Note the location of KEY1 on the development board. The demo needs to control KEY1 to complete the simulation of some functions.
3.2. System Configuration
The system has already configured the following components by default:
- Sensor Driver:
imx681_mipi.kois loaded by default
4. Runtime Instructions
4.1. Runtime Directory
Enter the program directory, and switch to AOV mode:
prog_demo_switcher is used to switch the working mode between SoC and TWS. The default working mode at boot is IDLE(2). Before running this demo, you need to switch to AOV(1) mode first.
cd /customer/sample_code/bin
./prog_demo_switcher -m 1
4.2. Parameter Description
4.2.1. Basic Parameters
- index: Specify Sensor resolution parameters
index 1  # 3840x2160@21fps
index 2  # 2016x1512@30fps
index 3  # 1920x1080@30fps
index 4  # 3264x2448@30fps
index 6  # 3840x2160@30fps
4.2.2. Recognition Model Parameters
- model: Specify AI detection model path, default value:
/config/dla/spdy48.imgmodel ./spdy48.img
4.2.3. Encoding and Storage Parameters
-
dump: Specify video file storage path, default value: current directory
dump ./video # Save to video directory -
time: Set program running time (seconds), default value: 0 (unlimited)
time 3600 # Exit after running for 1 hour
4.2.4. Image Quality Parameters
-
iqbin_b: Specify IQ file path for bright scenes, no default value
iqbin_b ./bright_api.biniqbin is packaged to
/config/iqfilepath on the board by default. You can also manually copy it from the sdk's/project/board/iford/iqfile/imx681path to the board.The iqbin selection here should correspond to the selected index number. The correspondence is as follows:
index 1  # imx681_8m_comake_1201_30fps.bin
index 2  # imx681_3m_comake_1201_30fps.bin
index 3  # imx681_3m_comake_1201_30fps.bin
index 4  # imx681_8m_comake_1201_30fps.bin
index 6  # imx681_8m_comake_1201_30fps.bin
4.3. Runtime Examples
4.3.1. Basic Single Sensor Monitoring
./prog_aov_aov_demo index 3 model /config/dla/spdy48.img iqbin_b /config/iqfile/imx681_3m_comake_1201_30fps.bin
4.4. Runtime Control
During program execution, different characters can be typed to simulate system events:
- 'q': Safely exit the program
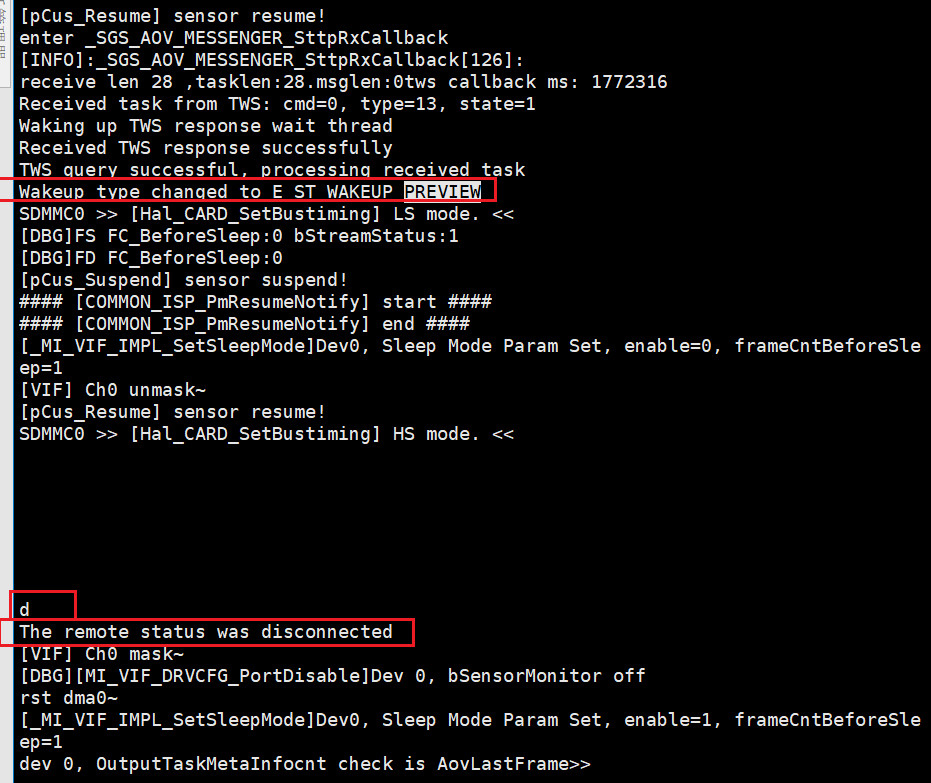
- 'd': Simulate remote disconnection (disconnect in PREVIEW mode)
5. Runtime Results
-
TIMER Wake-up
When the program runs, it enters TIMER wake-up mode by default, waking up once every 1 second and recording at 1fps after wake-up. As shown in the figure below.
At this time, the device alive duration is approximately 100ms.
After the device records, if there is no human figure in the sensor image, the device cannot detect a human figure and will continue to sleep until the next TIMER wake-up.
After the device records, if there is a human figure in the sensor image, the device will detect the human figure and switch to 15fps mode. The device will remain in the alive phase. At the same time, the printing of the box in the figure will stop.
After there is no human figure in the image, it will re-enter 1fps mode and sleep until the next TIMER wake-up.
-
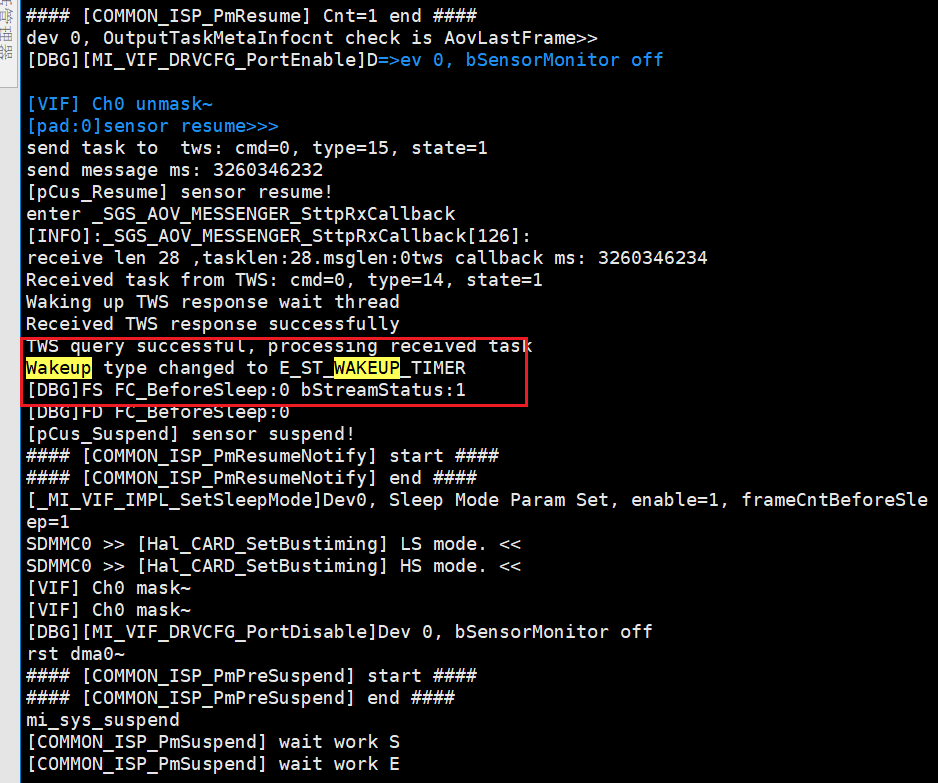
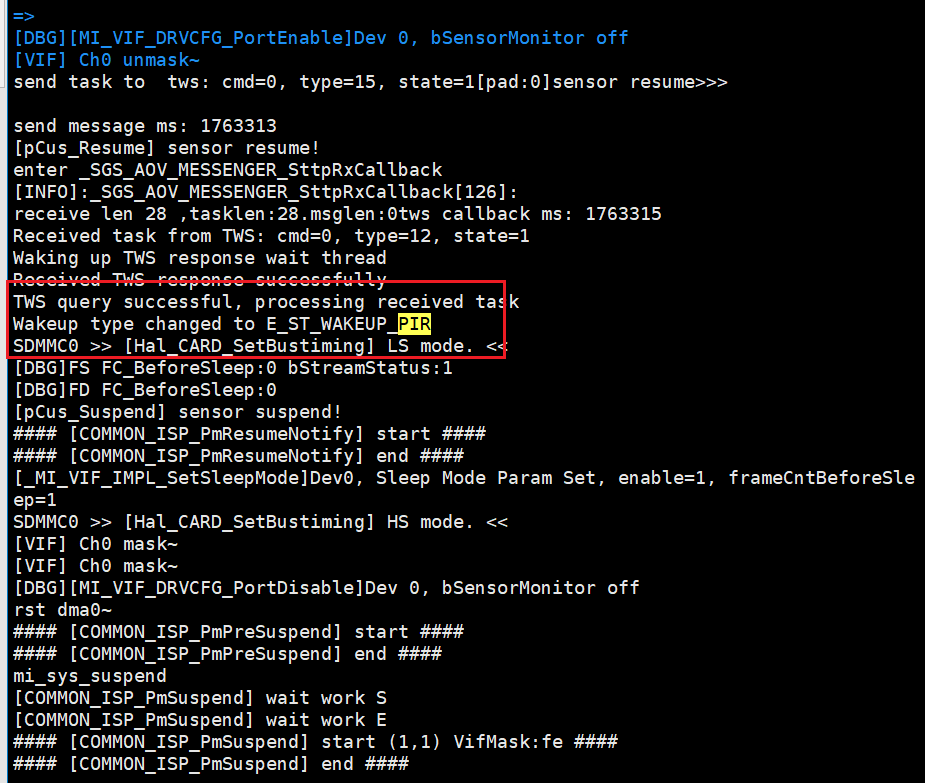
PIR Wake-up
Briefly press KEY1 (20ms-500ms) to simulate PIR wake-up. At this time, the system will enter the alive phase and have the following print:
After there is no human figure in the image, the system will re-enter sleep and enter TIMER wake-up mode.
-
PREVIEW Wake-up
Long press (500ms-2s) the KEY1 button to simulate user preview wake-up. At this time, the system will remain in the alive phase, regardless of whether there is a human figure in the image, and the printing of the box in the figure will stop.
Type character "d" to exit user preview mode.
-
Recording File Storage
Recording files will be saved to the set storage directory (default is the same directory as the program). Files are stored in the naming format
{serial_number}_snr{sensor_id}_st{frame_rate}fps.esand can be viewed with tools like potplayer.The serial number will increase every time the frame rate changes. The final saved files may be in the following form:
1_snr0_st_15fps.es
2_snr0_st_1fps.es
3_snr0_st_15fps.es
4_snr0_st_1fps.es
...
Connect the development board with a USB cable, then run
/customer/sample_code/bin/resource/setup_rndis.shto connect to the network with the development board, and then you can mount and export files to view.*_snr0_st_1fps.es are images recorded in 1fps mode. There should be no human figures in the image and no boxes.
*_snr0_st_15fps.es are images recorded in 15fps mode. There should be human figures in the image, marked with boxes. Or it may be a high-frame-rate mode entered from PREVIEW mode. There may be no human figures in the image because in PREVIEW mode, even without human figures, it will enter high-frame-rate recording until PREVIEW mode is exited.
When first entering, the system will default to 15fps mode, and then switch modes based on the judgment conditions. For example:
Start the demo, initially there are no human figures on the screen. After 3 seconds, a human figure enters the screen, and after another 3 seconds, the human figure leaves the screen, ending the demo. The generated files should be in the following format:
1_snr0_st_15fps.es  // Default to 15fps
2_snr0_st_1fps.es   // Judged no human figures, switched to 1fps mode
3_snr0_st_15fps.es  // Human figure enters the screen
4_snr0_st_1fps.es   // Human figure leaves the screen
...
6. AOV Function Details
The functionality of the AOV Demo goes beyond this. The above is only a brief introduction to the basic usage of the Demo. For a more detailed understanding of AOV functions, please see AOV Function Guide.