TrustZone Application
REVISION HISTORY
| Revision No. | Description |
Date |
|---|---|---|
| 1.0 | 05/22/2023 |
1. Building a Chain of Trust for the Startup Process
1.1. Signature and Encryption of Images at each Stage
Security boot requires the developer to use a private key to sign the image at each stage. The corresponding public key is burned into the OTP of the SGS chip, and the OTP is burned to enable the security boot function of the chip, as described in the chip startup process set out in TrustZone overview section 1.4, by checking and verifying the signature of the next-level software at each stage to ensure the software throughout the boot process is trusted, thus preventing malware injection and unauthorized modification.
For details on the complete security boot principle and SOP, please refer to "Security Boot User Guide".
1.1.1 Burning OTP
Generate Private Key:
- openssl genrsa -out private.pem 2048
Generate Public Key:
- openssl rsa -in private.pem -out public.pem -outform PEM -pubout
Generate U-Boot command scripts through Tool (key_proc.py):
- ./key_proc.py --exportkey_reverse --rsa=public.pem
Burn Public Key to OTP under the boot command according to teh rsaKey.txt generated in the previous step, for example:
-
otpctrl -w 0x0 0x0 0x58653431;otpctrl -w 0x0 0x4 0x06ba8f4a;otpctrl -w 0x0 0x8 0x5caee61a;otpctrl -w 0x0 0xc 0x1912648d;otpctrl -w 0x0 0x10 0xb3b77f1c;otpctrl -w 0x0 0x14 0xd116e973;otpctrl -w 0x0 0x18 0x74f82967;otpctrl -w 0x0 0x1c 0xf85d78e8;otpctrl -w 0x0 0x20 0x55a92d7a;otpctrl -w 0x0 0x24 0xf807ef92;otpctrl -w 0x0 0x28 0xeaca7ab8;otpctrl -w 0x0 0x2c 0x2d33149a;otpctrl -w 0x0 0x30 0xc47f6cfb;otpctrl -w 0x0 0x34 0x99d0fb2b;otpctrl -w 0x0 0x38 0xb94e529f;otpctrl -w 0x0 0x3c 0x09d1e66a;
-
otpctrl -w 0x0 0x40 0x93614b62;otpctrl -w 0x0 0x44 0x40db5115;otpctrl -w 0x0 0x48 0x4d37ec4c;otpctrl -w 0x0 0x4c 0xd7ac36da;otpctrl -w 0x0 0x50 0x8bbef7bb;otpctrl -w 0x0 0x54 0x459ffe82;otpctrl -w 0x0 0x58 0xea5aa7ed;otpctrl -w 0x0 0x5c 0x979ac988;otpctrl -w 0x0 0x60 0xd9ad7843;otpctrl -w 0x0 0x64 0xb086c544;otpctrl -w 0x0 0x68 0x75248853;otpctrl -w 0x0 0x6c 0xd0c61f34;otpctrl -w 0x0 0x70 0xd4fd028a;otpctrl -w 0x0 0x74 0x93037bd3;otpctrl -w 0x0 0x78 0x2b3cd0e2;otpctrl -w 0x0 0x7c 0x12b49f2d;
-
otpctrl -w 0x0 0x80 0x72fc0405;otpctrl -w 0x0 0x84 0xc1fb6cfd;otpctrl -w 0x0 0x88 0xb42fb860;otpctrl -w 0x0 0x8c 0xa06e8c6e;otpctrl -w 0x0 0x90 0x43870bc3;otpctrl -w 0x0 0x94 0xb97ebe88;otpctrl -w 0x0 0x98 0x45113bd1;otpctrl -w 0x0 0x9c 0xb7974436;otpctrl -w 0x0 0xa0 0x47c3d001;otpctrl -w 0x0 0xa4 0x3611716d;otpctrl -w 0x0 0xa8 0x67abc2d5;otpctrl -w 0x0 0xac 0x773ac1cd;otpctrl -w 0x0 0xb0 0x7d1ee609;otpctrl -w 0x0 0xb4 0xc72e97ee;otpctrl -w 0x0 0xb8 0x91af8bd5;otpctrl -w 0x0 0xbc 0xd516243d;
-
otpctrl -w 0x0 0xc0 0x949b2522;otpctrl -w 0x0 0xc4 0x3d73c4d7;otpctrl -w 0x0 0xc8 0xcf2fde53;otpctrl -w 0x0 0xcc 0xbd35d242;otpctrl -w 0x0 0xd0 0x2362de0f;otpctrl -w 0x0 0xd4 0x8d9f7418;otpctrl -w 0x0 0xd8 0x861f69d5;otpctrl -w 0x0 0xdc 0x0736f5ff;otpctrl -w 0x0 0xe0 0x7655b44e;otpctrl -w 0x0 0xe4 0x06198429;otpctrl -w 0x0 0xe8 0xe0975a88;otpctrl -w 0x0 0xec 0x6fcec320;otpctrl -w 0x0 0xf0 0x49480b57;otpctrl -w 0x0 0xf4 0xea4a5ee3;otpctrl -w 0x0 0xf8 0x6502ddee;otpctrl -w 0x0 0xfc 0xd6d17ae2;
-
otpctrl -w 0x1 0x0 0x00010001
Enable secure boot:
- otpctrl -w 0x2 0x0 0xFFFFFFFF
It is recommended to use the debug mode first during the development process, and program all the OTPs at one time after confirming the security boot flow. Otherwise, the IC may have to be scrapped after OTP programming due to incorrect operations.
1.1.2 Compiling Alkaid to Automatically Sign all Images
The project source code package provided by SGS includes tools for automatically signing system images, placed at project/image/security_boot_tools. The automatic signing steps are:
-
Use the vim command vim project/image/security_boot_tools/config/config.ini, to configure the private key file, specify the key length, configure whether or not to use the debug mode, and so on.
-
Re-compile the system image according to Section 2.2. After the image is generated under project/image/out/images/, run
cd project/image/security_boot_tools;make;to sign the images with the private key and re-burn the images onto the development board. -
Modify bootcmd, to allow the boot to verify the signature of the kernel during the kernel loading process.
setenv bootcmd ‘ nand read.e 0x23000000 KERNEL ${kernel_file_size};bootm start 0x23000000;bootm loados; bootm prep; sigauth xzdec 0x22000000; bootm go;sav;
1.2. TA Image Signature
After the original TA image file is generated, the file will be signed to generate the final xxx.ta file, which will be saved in the REE file system. The original TA image file is signed by calling optee_os/scripts/sign_encrypt.py, using the RSA2048 private key in the optee_os/keys/ directory. The developer needs to use the self-generated private key to sign the TA, and replace the corresponding public key in the optee_os/keys/ directory for signature verification during the running process. Note that optee_os needs to be recompiled.
-
openssl genrsa -out /path/to/private_key.pem 2048
-
openssl rsa -in /path/to/private_key.pem -pubout -out /path/to/public_key.pem
-
vim optee_os/mk/config.mk modification
-
TA_SIGN_KEY is the specified /path/to/private_key.pem path name and file name
-
TA_PUBLIC_KEY is the specified /path/to/public_key.pem path name and file name
-
sign_encrypt.py digest --key /path/to/private_key.pem --uuid $(user-ta-uuid) --in $(user-ta-uuid).stripped.elf (generate $(user-ta-uuid).dig)
-
base64 --decode $(user-ta-uuid).dig | openssl pkeyutl -sign -inkey /path/to/private_key.pem -pkeyopt digest:sha256 -pkeyopt rsa_padding_mode:pss -pkeyopt rsa_pss_saltlen:digest -pkeyopt rsa_mgf1_md:sha256 | base64 > $(user-ta-uuid).sig (generate $(user-ta-uuid).sig)
-
sign_encrypt.py stitch --key /path/to/public_key.pem --uuid $(user-ta-uuid) --in $(user-ta-uuid).stripped.elf (generate $(user-ta-uuid).ta)
1.3. TA Image Encryption
TA can encrypt the content during the compilation phase. When loading TA, if it is found to be encrypted TA, it will decrypt it.
1.3.1 TA encyption option
-
In the TA's Makefile, add CFG_ENCRYPT_TA=y. Take Hello world example as an example, add a line CFG_ENCRYPT_TA=y in optee_examples/hello_world/ta/Makefile. The compiled TA content will be encrypted.
-
It is not necessary to add the CFG_ENCRYPT_TA=y option in OPTEE's Makefile.
1.3.2 Key assignment
- TA_ENC_KEY: The key used to encrypt TA during TA compilation. Specified in optee_os/ta/arch/arm/link.mk, this key will be generated by tee_otp_get_ta_enc_key() in the system, and the default tee_otp_get_ta_enc_key() behavior is to generate TA_ENC_KEY with HUK. The TA_ENC_KEY in Figure. 1 is generated with the default HUK. Please note that this part of the native code is only for demonstration purposes, please replace your own key.
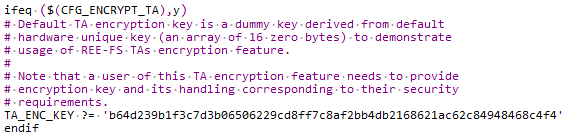
Figure 1: TA key assignment
1.4. Secure storage
1.4.1 Secure storage introduction
Secure storage is the way TEE stores data, which can only be accessed by TA. The stored content includes:
- Key
- Normal data
OPTEE contains two kinds of secure storage:
- REE-FS
- use REE file system as storage
- CFG_REE_FS=y
- Replay Protected Memory Block (RPMB)
- a partition with security attributes in eMMC
- CFG_RPMB_FS=y
SGS chip supports REE-FS by default and REE-FS will be used as the introduction here.
1.4.2 Basic file operation process
- TA calls the GP Trusted Storage API to write a persistent object
- Calling system calls in TEE Trusted Storage service
- Then call TEE file operation, encrypt the data, and send REE file operation and encrypted data to TEE supplicant
- After receiving the encrypted data, TEE supplicant stores it in the REE file system
1.4.3 Secure storage key management
When OP-TEE initializing, it will first generate an SSK and store it in secure memory. The process is as follows:
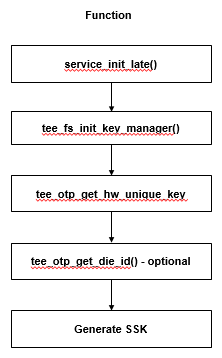
Figure 2: SSK generating process when booting
Secure storage uses 3 kinds of keys:
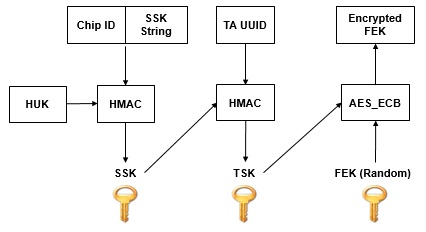
Figure 3: secure storage keys
- Secure storage key (SSK)
- An unique key on each OPTEE secure storage device
- Generated at boot time and stored in secure memory
- SSK is generated by HMAC-SHA256 of hardware unique key(HUK) and Chip ID/SSK String
- SSK String is used to prevent other systems on the device from generating the same SSK at the same time
- TA storage key (TSK)
- An unique key of TA on each device
- Generated by HMAC-SHA256 of SSK and TA UUID
- File encryption key (FEK)
- An unique key of each file
- Used to encrypt and decrypt files
- Generated with PRNG, encrypted by TSK and stored in meta file
1.4.4 Secure storage porting
- Store method of HUK and chip ID in SGS OTP
- There are eight keys (128-bits) from OTP_Key1 to OTP_Key8. You can select any one of them as the storage field of HUK
- There are two fields (64-bits) UUID and UUID2. You can use any field as the storage field for Chip ID
- Compile options related to key management in OP-TEE
- CFG_CORE_HUK_SUBKEY_COMPAT (default value is y), set whether the SSK generation is compatible with HUK, Chip ID and SSK String
- CFG_CORE_HUK_SUBKEY_COMPAT_USE_OTP_DIE_ID (default value is n), set whether the Chip ID can be obtained by OTP die ID
- Customizable API in key management
- tee_otp_get_hw_unique_key(): how platform obtains HUK. It must be implemented
- tee_otp_get_die_ie(): how platform obtains Chip ID
1.4.5 Secure storage performance test
OPTEE xtest provides secure storage performance benchmark tests
- ./xtest –t benchmark 1001 (test write)
- ./xtest –t benchmark 1002 (teest read)
- ./xtest –t benchmark 1003 (test re-write)
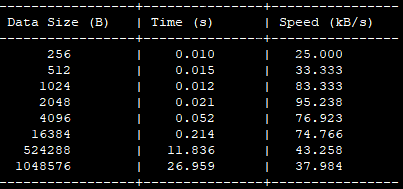
Figure 4: secure storage performance test