Security Boot User Guide
REVISION HISTORY
| Revision No. | Description |
Date |
|---|---|---|
| 1.0 | 07/20/2023 | |
| 1.1 | 01/04/2024 | |
| 1.2 | 01/31/2024 | |
| 1.3 | 02/02/2024 | |
| 1.4 | 05/26/2025 | |
| 1.5 | 08/18/2025 | |
| 1.6 | 10/10/2025 | |
| 1.7 | 10/11/2025 |
1. Overview
In order to prevent the firmware of user products from being copied or flashed, the SGS firmware automatically performs signature verification (or signature verification + decryption) during the startup process. Signature verification is to prevent the image content loaded by the software from being maliciously tampered with. Encryption and decryption are optional. Generally, image encryption is to prevent the information in the image from being leaked, while image verification is to prevent the image information from being tampered with. Users can choose according to their own needs. There are two core steps in using Security Boot: artificially signing (or encrypting + signing) the image file, and burning the corresponding key used for the signature in the chip OTP.

The common way to burn chip OTP is to use otpctrl cmd under uboot (See 6. OTP Field chapter for details). Please note that OTP burning cannot be reversed. In order to prevent misoperation from causing the system to fail to start or even the IC to become invalid, it is generally recommended that developers first use the debugging process to confirm that the key content is correct. The common way to sign an image is to use security_boot_tools to automatically process the alkaid image package (see 5. Security_boot_tools Tool Usage chapter for details). If the customer has special needs, you can also choose the manual signing method "Manual Signature User Guide".
Security Boot also provides an Anti-rollback mechanism to ensure that the image version that can be loaded and started normally must be higher than the version number stored by the user in the OTP (For details, see 3. Anti-rollback Principle), users can use it according to their own needs. There are two core steps to turning on Anti-rollback: using the security_boot_tools signing process to embed the version number in the image, and saving the intercepted image version number in the chip OTP.
The SGS chip also provides hardware design to prevent error injection and signal analysis (Multiple Round, SCA, key2sha1) to prevent new cryptanalysis methods from interfering with or analyzing the chip encryption and decryption process, effectively increasing the difficulty of system cracking (For details, see 4. The principles of preventing error injection and signal analysis), users can use it according to their own needs. Enabling (Multiple Round, SCA, key2sha1) functions has nothing to do with the image itself. The core work is only one step: burning OTP to enable specified functions.
The signature verification algorithms supported by Security Boot include: RSA2048/RSA4096, the SM2 algorithm, and ECC256/ECC384/ECC512 algorithms. Since the principles of the SM2 and ECC algorithms are similar, the following description will categorize the SM2 algorithm under the ECC series.
The mhera platform's Secureboot supports RSA2048/RSA4096/SM2/ECC256/ECC384 algorithms, and does not support other algorithms
2. Security Boot Principles
2.1. Enable Security Boot
After burning the OTP Key, to actually start Security Boot, you need to burn the corresponding fields of OTP_Secure_Boot in the OTP (For details on the OTP burning method, see 6.2 OTP Fields Related to Security Boot), burn this field to 0xFFFFFFFF, the Security Boot of OTP will be activated. (Note: It cannot be turned off after it is enabled, and the Security Boot flow will be forced every time it is started).
2.2. Single Image Signature and Security Boot Process
Generate Signature is generally completed by executing the security_boot_tools script on the local side. The process is as follows:
- security_boot_tools calculates SHA-256 on the Image file and generates Digest
- Perform signature through RSA2048 to generate a 256Bytes signature, RSA4096 generate 512Bytes signature, SM2/ECC256 generate 64Bytes signature, ECC384 generate 96Bytes signature, ECC512 generate 128Bytes signature.
- Embed signature at the end of Image
- Burn the Image and start it in the system memory.
Verify Signature is executed in the firmware boot flow. The process is as follows:
- The boot code at each stage will perform SHA-256 calculation on the next image and generate Digest
- Take out the signature embedded in the tail according to the header information to decrypt RSA2048/RSA4096 to generate Digest'
- Compare Digest and Digest'. If the comparison is consistent, Verify succeeds, otherwise Verify fails.
If the ECC signature verification process does not follow the above steps, it will directly verify the signature in the next segment of the Image and provide the verification result immediately.
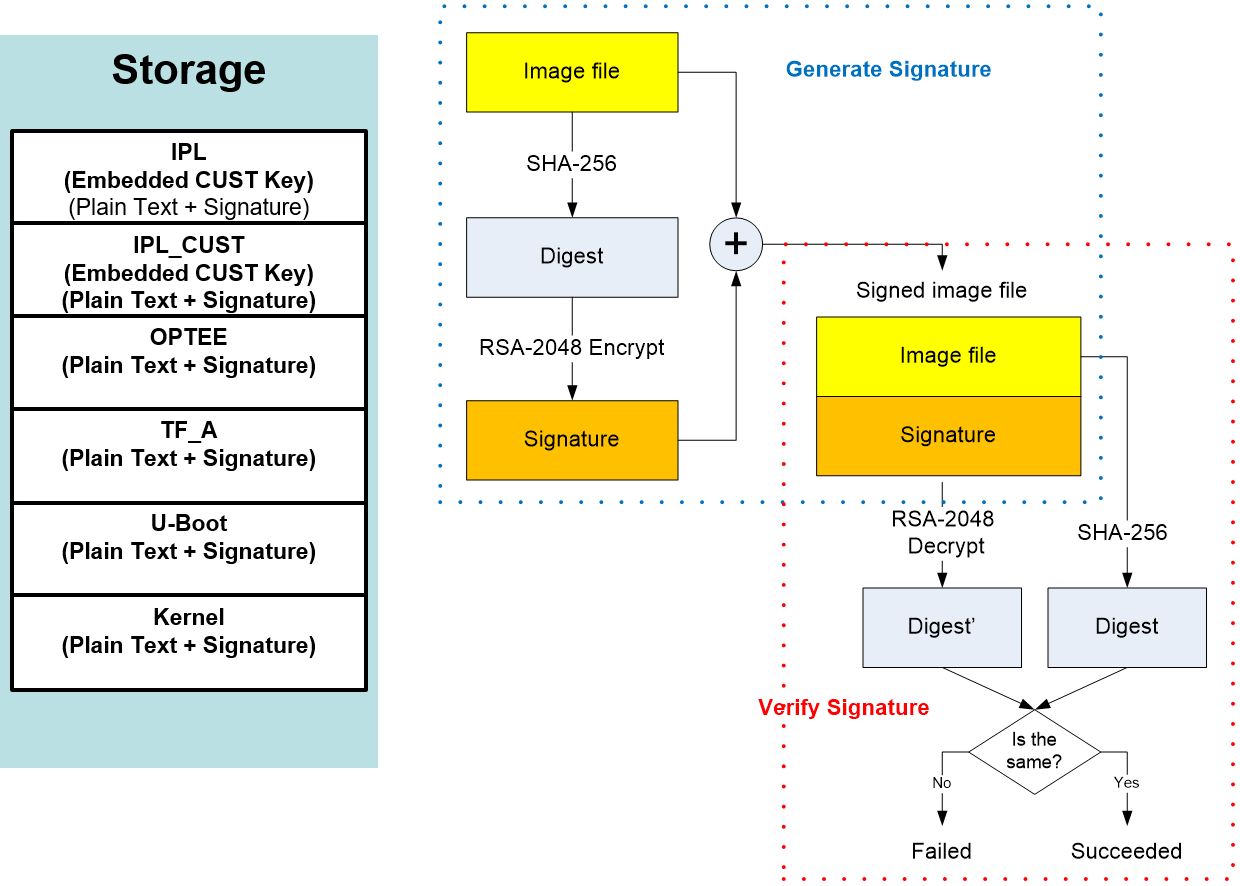
Figure 2.1: RSA2048/RSA4096 signature verification process.
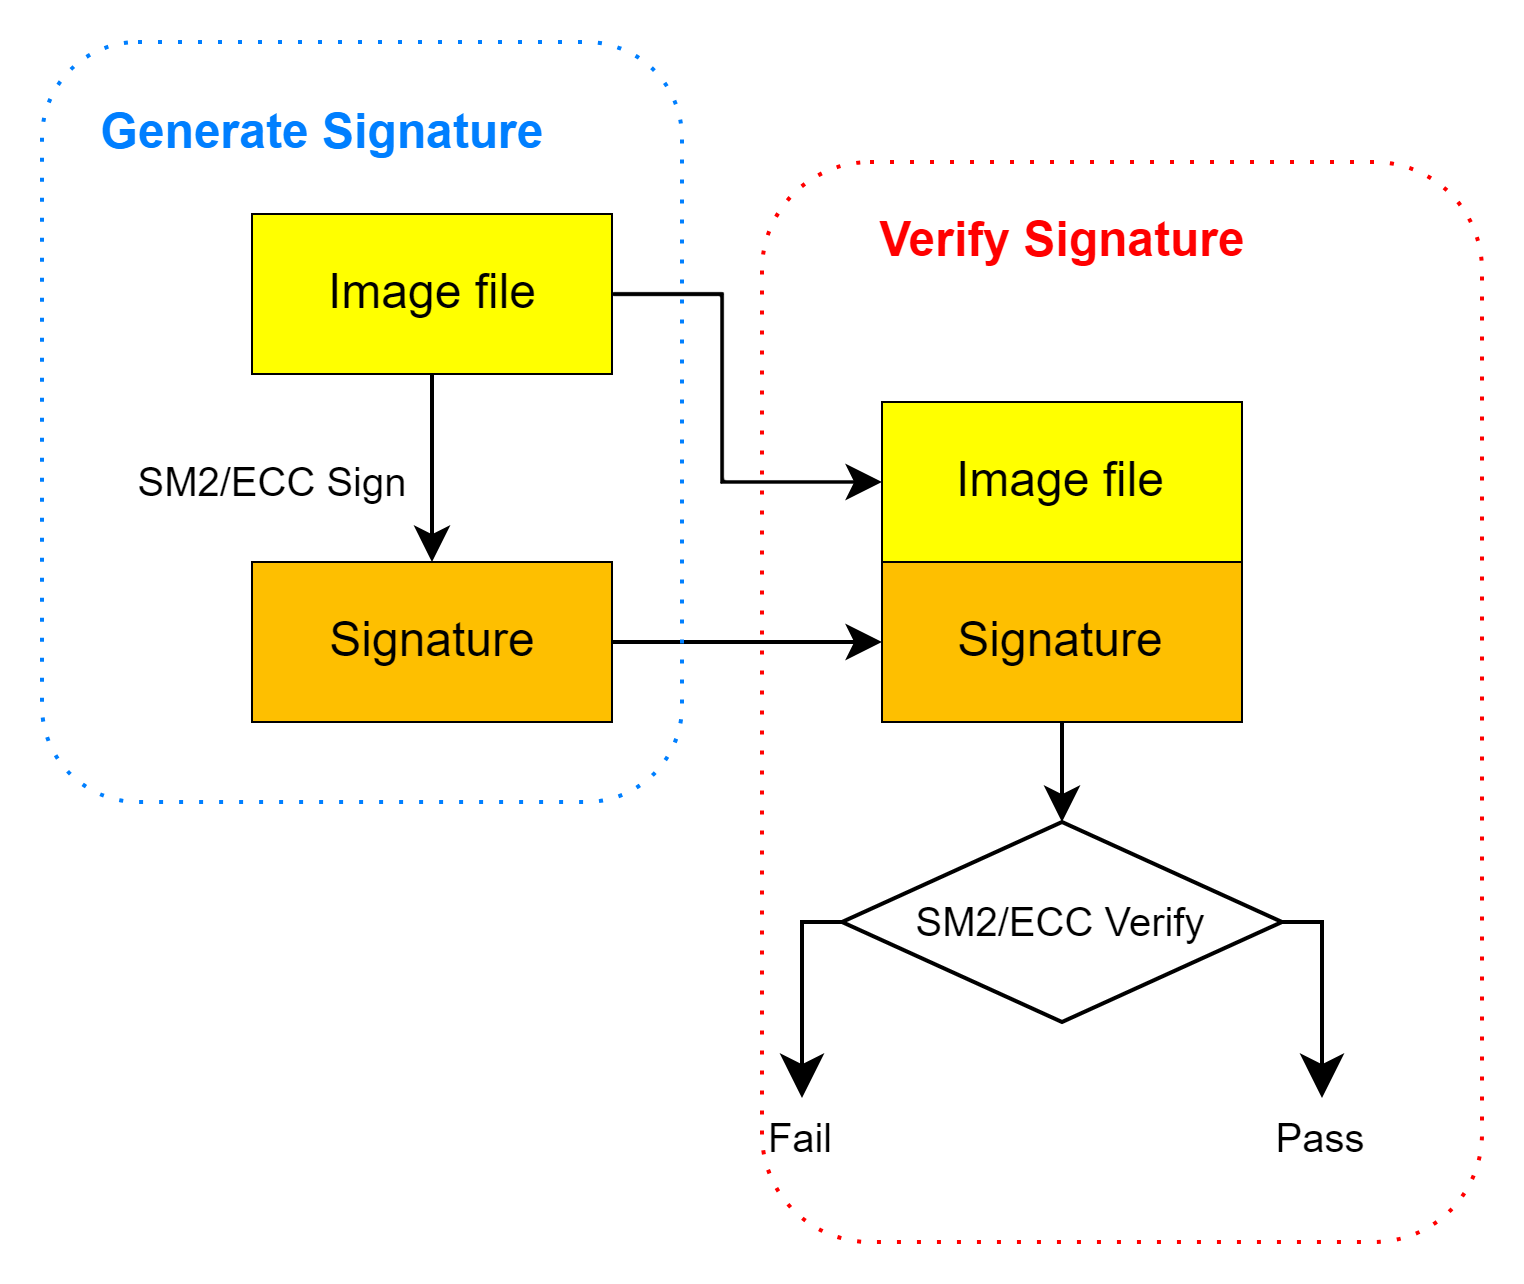
Figure 2.2: ECC signature verification process.
2.3. Single Image Signature + Encryption and Security Boot Process
For the RSA2048 or RSA4096 process:
Generate Signature is generally completed by executing the security_boot_tools script on the local side: security_boot_tools first encrypts the Image into a Cipher file through AES, then performs SHA-256 calculation on the Cipher file to generate a Digest, and then performs encryption actions through RSA-2048 to generate a 256Bytes signature. Then embed the signature into the Image backend, and finally burn the Image and start it in the system memory.
The Verify Signature step occurs in the boot flow, where the boot code at each stage calculates the SHA-256 of the next segment of the Image to generate a Digest. It retrieves the Signature based on the header information, decrypts the Signature using RSA-2048 to generate Digest', and finally compares Digest and Digest'. If the comparison is successful, it performs AES decryption on the Cipher file, ultimately decrypting it into a bootable image.
For the ECC series process:
The Generate Signature is generally executed on the local end using the security_boot_tools script. The security_boot_tools first encrypts the Image into a Cipher file using AES, then performs encryption using the ECC series algorithms to generate signature data. This signature is then embedded at the end of the Image, which is finally burned into the system memory for booting.
The Verify Signature step occurs in the boot flow, where the boot code at each stage retrieves the embedded Signature from the end of the next segment of the Image based on the header information, and then performs the corresponding ECC series signature verification. If the verification passes, it performs AES decryption on the Cipher file, ultimately decrypting it into a bootable image.
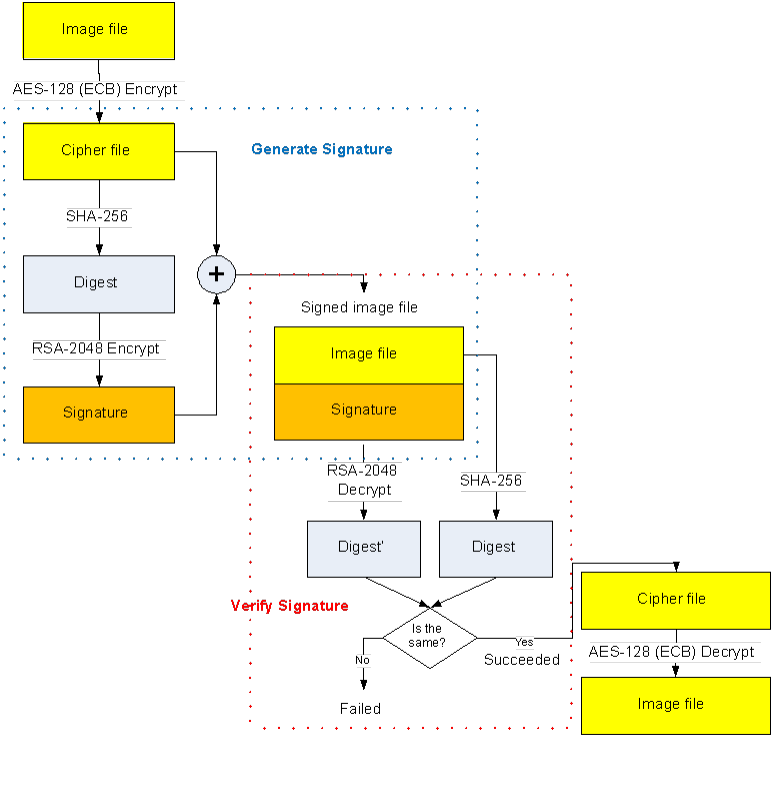
Figure 3: Signature + Encryption Security Boot Process
Notes:
IPL only supports AES-CBC encryption, while IPL_CUST does not support encryption.
Other images support AES (ECB/CBC/CTR encryption). When using CBC/CTR mode, the corresponding IV key will be made into a 32-byte append paragraph by security_boot_tools and embedded in the image information (For details, see 3.1. Append data chapter).
2.4. Key Introduction
From the perspective of key usage, the same image signature and verification must use a pair of RSA/ECC Private Key and RSA/ECC Public Key, and the same AES Key is used for encryption and decryption.
2.4.1. RSA/ECC Public Key
Up to 3 groups of RSA/ECC Public Key are used in the signature verification process.
The first one is OTP Key. This Key will be automatically loaded from the OTP by the Hardware after the system is powered on. It is used to verify the reliability of the IPL. Software cannot intervene in the loading and verification process. The content of the OTP Key can be burned to the designated address of the OTP through U-Boot's Command Line. Once the OTP KEY is locked and read, the CPU or other debugging tools can no longer access rsakey (the same is true for the OTP aes key). At this time, only the aesdma engine can access.
The second key is CUST Key. This Key will be embedded in the bin file of IPL and used to verify the reliability of IPL_CUST in the entire boot flow through Software. Because the reliability of IPL is guaranteed, therefore the verification of IPL_CUST/TF -A/OPTEE process is also reliable. As for the content of CUST KEY, you usually use the security_boot_tools tool to insert the key file into the specified location of the bin file content of the IPL.

The third key is Image Key. This Key will be embedded in the bin file of IPL_CUST and used by Software to verify the reliability of UBOOT/VMM/RTOS/LINUX/ROOTFS in the entire boot flow, because the reliability of IPL_CUST has guaranteed, so the process of verifying all subsequent images is also reliable. As for the content of the Image Key, the security_boot_tools tool is generally used to insert the key file into the specified location of the bin file content of IPL_CUST.

If the ECC series process is followed, the position of the Key is the same as described above, but the size of the Public Key is different.
The Public Key sizes are as follows:
ECC256/SM2 Public Key is 64 bytes;
ECC384 Public Key is 96 bytes;
ECC512 Public Key is 128 bytes.
2.4.2. AES KEY
Up to 8 AES Key are used in the decryption process.
During the bootflow process of the SGS firmware, the Hardware loads the AES key specified in the OTP to the crypto engine for image decryption. As for which of the eight AES keys to use for the image, you generally use the security_boot_tools tool to embed the specified AES key information in the image (See 3.1. Append Data for details). Except that IPL only supports CBC mode and IPL_CUST does not support encryption, other images support ECB/CBC/CTR mode. Generally, the security_boot_tools tool is used to embed IV information in the image.
All AES Keys used for decryption by the bootload image need to be burned into the OTP storage unit. The OTP storage unit can store up to 8 128-bit AESKEYs or 4 256-bit AESKEYs. All bootload images can arbitrarily specify any one of the eight keys, and even all bootload images share one of the keys.
2.5. Security Boot System Flow
The following figure shows the Security Boot Flow structure from ROM to Linux Kernel, where Signature is the signature data part. The Signature of each Flow will be embedded at the end of the corresponding bin file. Each Flow includes the actions of Get Key and Authenticate until Linux Kernel and some flows support decryption (whether to enable decryption depends on the requirements).
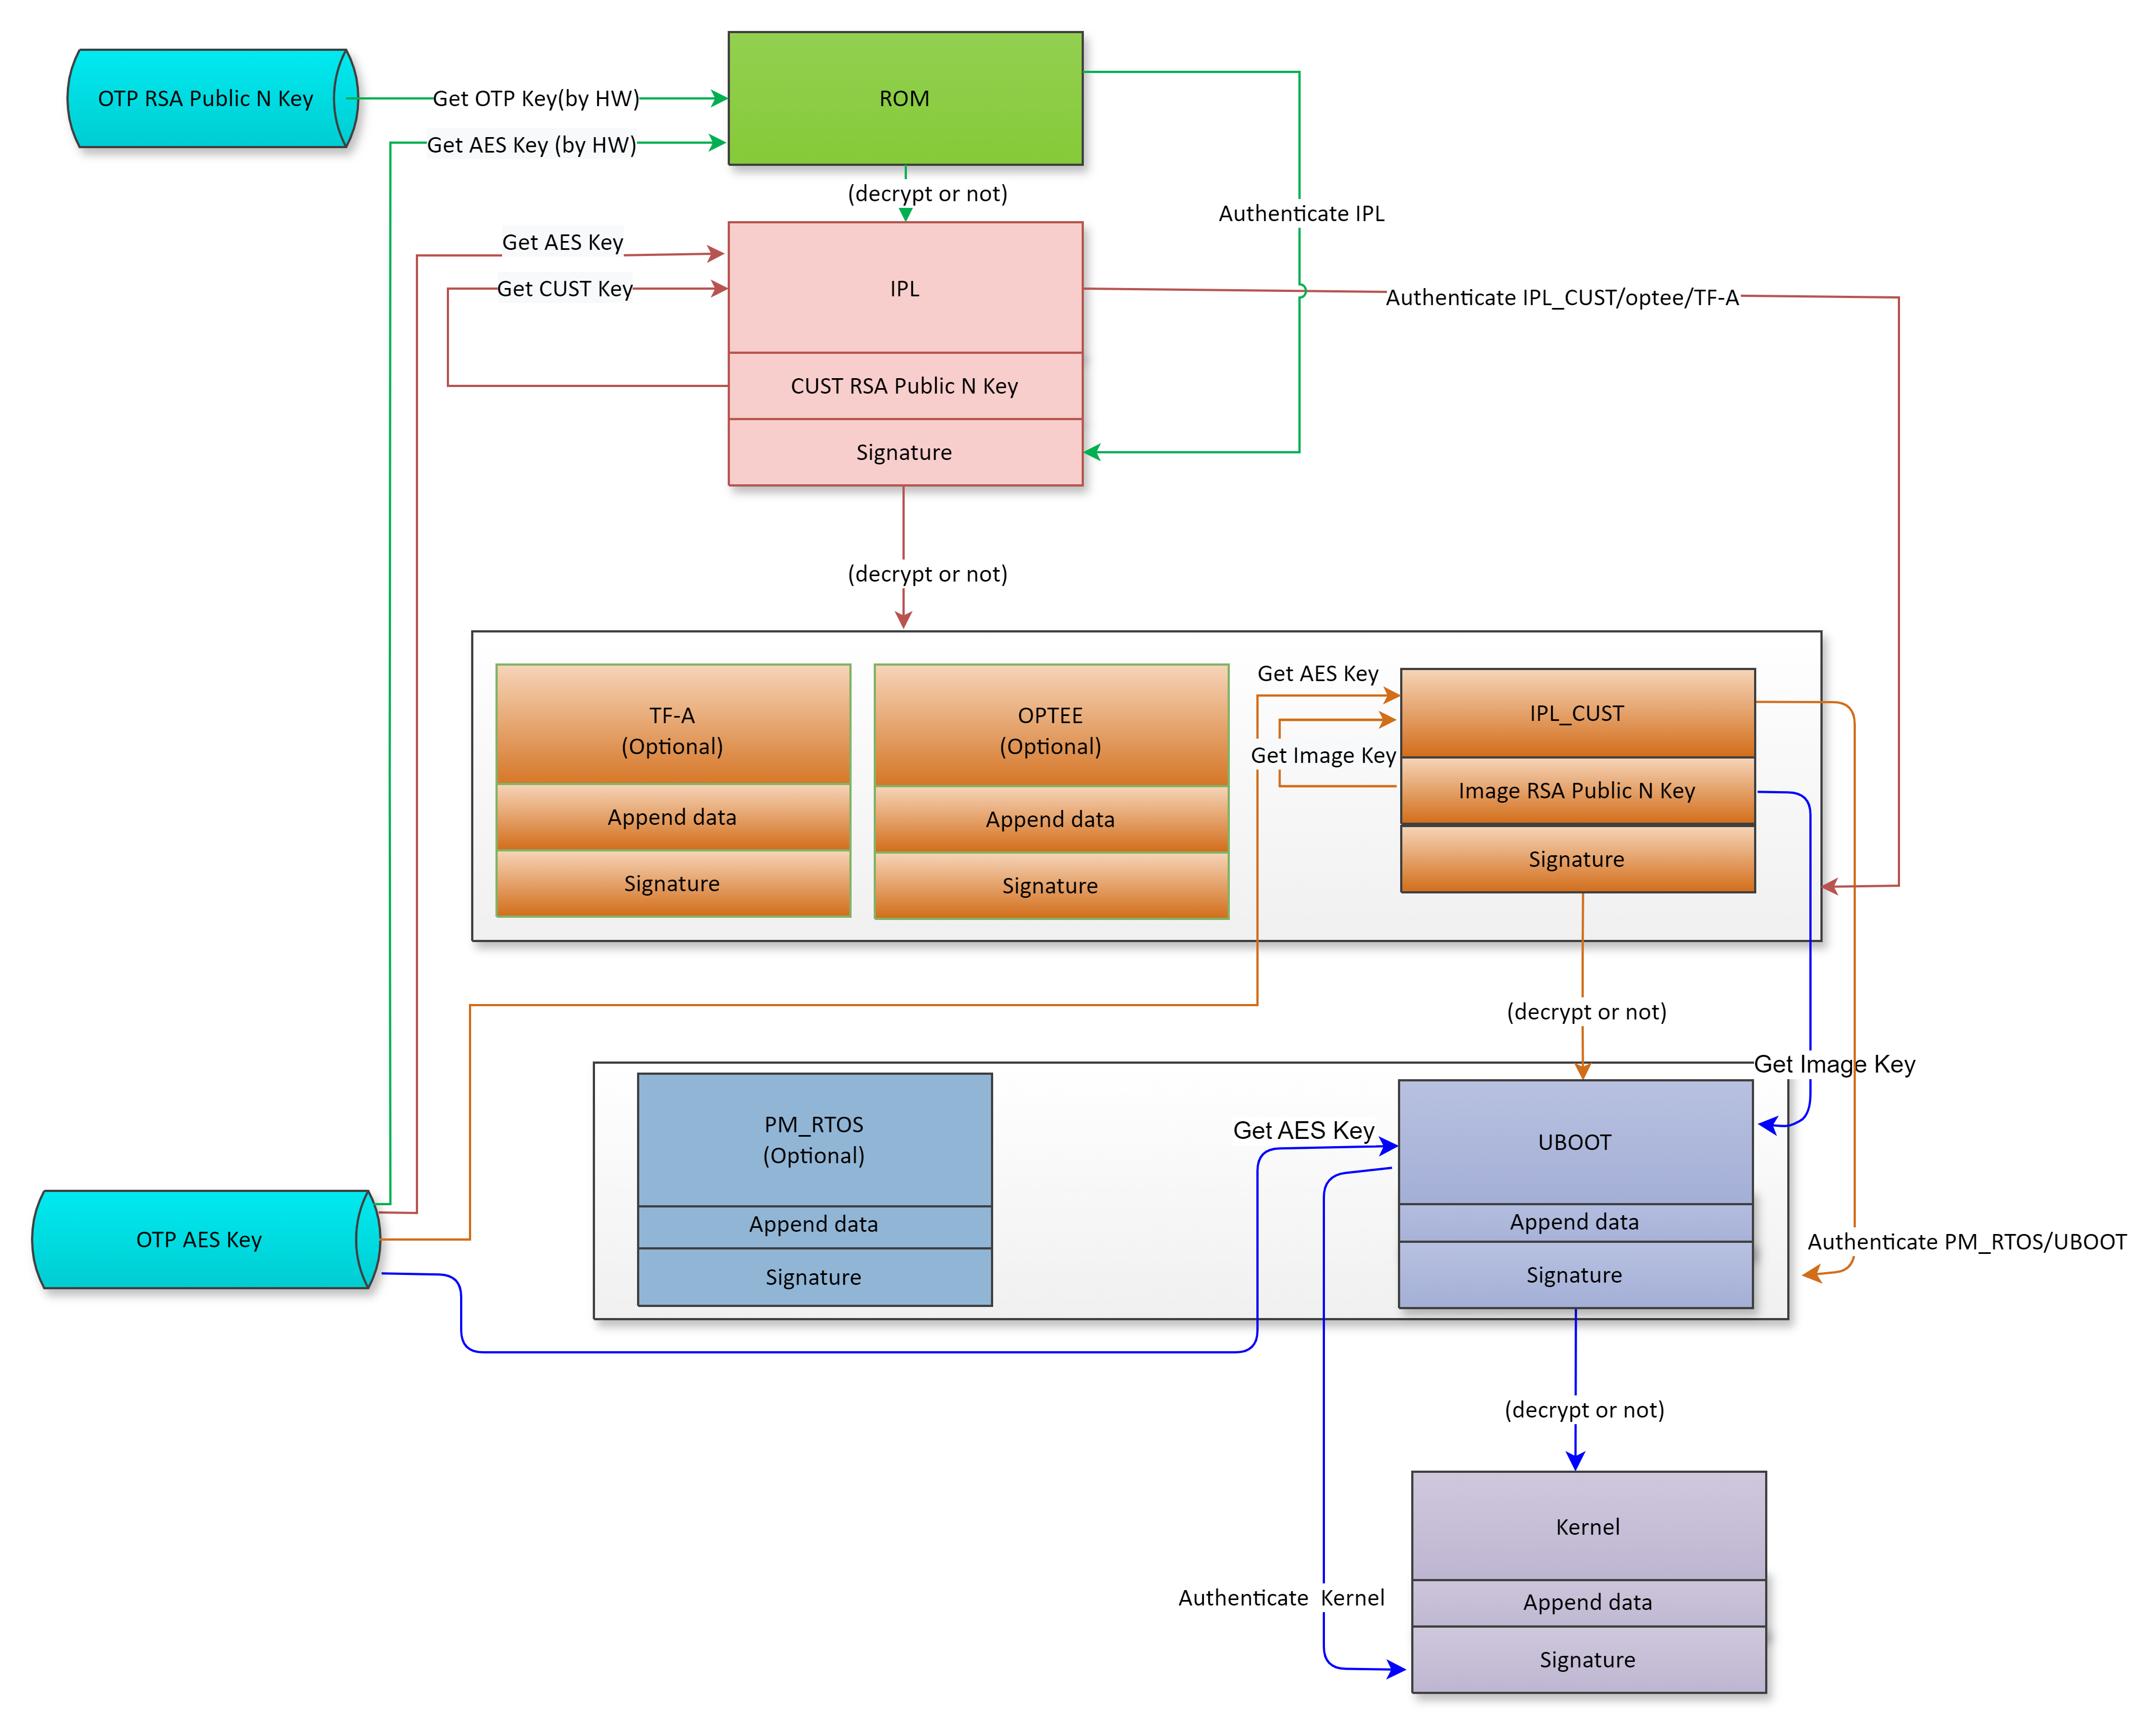
Figure 6: Boot Flow Structure
-
Authenticate IPL by OTP Key-RSA
This process is for the ROM code to read the RSA/ECC Public Key from the OTP and then verify the signature of the IPL. Since the RSA/ECC Public Key of OTP can perform Write Lock action (which will be mentioned in detail in the following chapters) to prevent it from being written or read again, the RSA/ECC Public Key of OTP can not be replaced, thus ensuring that the IPL will not be tampered with. If the encryption mechanism is enabled, the ROM code continues to read the AES key from the OTP to decrypt the IPL based on OTP_ROM_SEL_AESKEY.
-
Authenticate TF-A by IPL's CUST Key-RSA
This process is for IPL to read the CUST RSA/ECC Public Key embedded in IPL in advance and then verify the signature of TF-A. If the encryption mechanism is enabled, IPL continues to read the AES key from the OTP to decrypt TF-A based on the IV and aes_keynum information in the append data in the TF-A image.
-
Authenticate OP-TEE by IPL's CUST Key-RSA
This process is for IPL to read the CUST RSA/ECC Public Key embedded in IPL in advance and then verify the signature of OP-TEE. If the encryption mechanism is enabled, IPL continues to read the AES key from the OTP to decrypt the OP-TEE based on the IV and aes_keynum information in the append data in the OP-TEE image.
-
Authenticate IPL_CUST by IPL's CUST Key-RSA
This process is for IPL to read the CUST RSA/ECC Public Key embedded in IPL in advance and then verify the signature of IPL_CUST. Since IPL cannot be tampered with, it is guaranteed that the CUST RSA/ECC Public Key embedded in IPL will not be tampered with, thus ensuring that IPL_CUST will not be tampered with. IPL_CUST does not support encryption.
-
Authenticate U-Boot by IPL_CUST's Image Key-RSA
This process is for IPL_CUST to read the Image RSA/ECC Public Key embedded in IPL_CUST in advance and then verify the signature of U-Boot. If the encryption mechanism is enabled, IPL_CUST continues to read the AES key from the OTP to decrypt U-Boot based on the IV and aes_keynum information in the append data in the U-Boot image.
-
Authenticate Kernel/ramdiskfs by IPL_CUST's Image Key-RSA
This process is for U-Boot bootcmd to read the Image RSA/ECC Public Key embedded in IPL_CUST in advance and then verify the signature of kernel/ramdiskfs. If the encryption mechanism is enabled, bootcmd continues to read the AES key from the OTP to decrypt the kernel/ramdiskfs based on the IV and aes_keynum information in the append data in the kernel/ramdiskfs image .
3. Anti-rollback Principle
The anti-rollback mechanism is designed to prevent IPL/IPL_CUST/TF-A/OPTEE/UBOOT/KERNEL from being downgraded to previous versions. The boot code at each stage is compared with the corresponding OTP Version saved in the OTP by checking the Image Version in the image information of the next stage boot code (IPL/IPL_CUST/TF-A/OPTEE/UBOOT/KERNEL). If:
Image Version >= OTP Version ==> Load and start the next stage of boot code image normally
Image Version < OTP Version ==> Prompts that the system is stuck and does not start the next stage of boot code image
This is to ensure that the version of IPL/IPL_CUST/TF-A/OPTEE/UBOOT/KERNEL is the latest.
The following is the number of available jump versions for each Image (For details on otp version burning, please see 6.3. Anti-rollback Related OTP Fields).
| Name | Maximum number of editions | otp name | otp cmd offset range |
|---|---|---|---|
| IPL | 64 | OTP_VERSION_CTL | 0x0 ~ 0x100 |
| IPL_CUST | 16 | OTP_VERSION2_CTL | 0x0 ~ 0x40 |
| tfa | 24 | OTP_VERSION2_CTL | 0x40 ~ 0xA0 |
| optee | 24 | OTP_VERSION2_CTL | 0xA0 ~ 0x100 |
| uboot | 24 | OTP_VERSION2_CTL | 0x100 ~ 0x160 |
| kernel | 24 | OTP_VERSION2_CTL | 0x160 ~ 0x1C0 |
Notes:
- In OTP Version, 4 bytes are used to represent the upgraded version. Taking IPL as an example, when the IPL OTP Version is upgraded from 0 to 1, you need to use the OTP_VERSION_CTL command to burn 0x0-0x4 into 0xFFFF FFFF; when the IPL OTP Version needs to be upgraded to 2 again, you need to use the OTP_VERSION_CTL command to burn 0x4-0x8 into 0xFFFFFFFF;
- Image Version is the version number of the current image. For IPL and IPL_CUST, the Image Version is stored in the header data; for TF-A/OPTEE/UBOOT/KERNEL, the Image Version is stored in the appended data; other than that Although image (VMM/RTOS/PM_RTOS/ROOTFS) will also append appended data, it does not support the anti-rollback function.
- otp version can have automatic update function (off by default). When the header version is greater than the otp version, the otp version will be updated to be consistent with the header version.
3.1. Append Data
As long as the securityboot function is used , except for IPL/IPL_CUST, security_boot_tools will process every other Image (UBOOT/TF-A/VMM/KERNEL/OPTEE/RTOS, etc.) in the same way: first append 32byte appended data to the end, and then append 256 /512 byte signature data.

The following is the description of 32byte appended data:
| Member | Description |
|---|---|
| magic | Retrieval flag |
| pend_version | Software version of Secure append |
| pend_size | The length of Secure append, fixed at 32Byte |
| aes_msg | bit 0 - decrypt_enable. bit [1:2] - 00:ecb; 01: ctr; 10:cbc. bit [3] - 0:aes; 1:sm4 |
| AntiRollback_version | uImage version number |
| IV1&IV2 | The IV value required for CBC/CTR decryption |
| aes_keynum | 0000 ==> Not encrypted by AES 0100 ==> AES256 with {Key1[127:0], Key2[127:0] 0101 ==> AES256 with {Key3[127:0], Key4[127:0] 0110 ==> AES256 with {Key5[127:0], Key6[127:0] 0111 ==> AES256 with {Key7[127:0], Key8[127:0] 1000 ==> AES128 with Key1[127:0] 1001 ==> AES128 with Key2[127:0] 1010 ==> AES128 with Key3[127:0] 1011 ==> AES128 with Key4[127:0] 1100 ==> AES128 with Key5[127:0] 1101 ==> AES128 with Key6[127:0] 1110 ==> AES128 with Key7[127:0] 1111 ==> AES128 with Key8[127:0] |
It can be seen that the image information: such as the Image Version of the anti-rollback function, whether the Image is AES encrypted, which type of AES (CBC/CTR/ECB, 128/256) encryption is used, the IV value used for encryption, and which OTP is used. An AES key is stored in this 32-byte appended data. During the system startup process, the boot code at each stage performs corresponding version check and decryption image based on the appended data in the boot code image of the next stage.
4. The principles of preventing error injection and signal analysis
Features to prevent error injection and signal analysis such as Multiple Round, SCA, key2sha1. This function is turned off by default and needs to be turned on by configuring OTP (See6.4. OTP Fields Related to Preventing Error Injection and Signal Analysis Functions for details).
-
Multiple Round, indicating that AES internal encryption and decryption needs to be performed N (1~4) times, and the results of N times are consistent and then output.
The hardware adds the function of Multiple Rounds. If this function is turned on, after the hardware completes one AES encryption and decryption, it will record the result and internally re-do AES encryption and decryption ½/3 times (depending on the Register settings), and compare N results. If one result is inconsistent, it is determined that the result is wrong, and the AESDMA Engine does not output the result, thereby preventing hacker attacks. It has been measured that after this function is turned on, the AES encryption rate will drop slightly, and it can be turned on by configuring OTP.
-
SCA adds random num to aes encryption and decryption to disrupt aes timing to prevent SCA attacks.
Side Channel Analysis (SCA) is a new cryptanalysis method that breaks through the traditional cryptanalysis thinking mode and uses various physical information (such as power consumption, electromagnetic radiation, sound, visible light, etc.) leaked during the chip cryptographic operation and the correlation between encryption and decryption operations to crack the cryptographic system.
AESDMA Engine can increase the complexity of AES encryption and decryption by adding redundant operations when performing AES encryption and decryption, making it impossible for attackers to use tools to infer and analyze the number of rounds of encryption and decryption based on the principles of AES encryption and decryption. This function is transparent to the software and can be enabled by configuring OTP.
-
key2sha1
The HW Flow and principle of this solution are as follows:
-
When burning the OTP of AESKEY/RSAKEY/PASSWORD, the user needs to calculate SHA1 of AESKEY/RSAKEY/PASSWORD respectively, and XOR the SHA1 result into 32-bit data and write it into OTP_KeyX_chk/OTP_RSA_KEY_N_CHK/OTP_PassWord_chk.
-
During the system startup process, HW Auto Load AESKEY into the AESDMA Engine and RSAKey into the SRAM of RSA_ENG, and then start the AES/RSA operation. If OTP_RSA_KEY_N_CHK_ENABLE/OTP_OTP_KEY_CHK_ENABLE/OTP_PASSWORD_CHK_ENABLE is turned on, the ROM code will perform sha1&xor action on rsakey/aeskey/pwd, and the result will be consistent with the SHA1&XOR' result saved by the user in OTP, which proves that the key has not been modified.
The specific behavior of ROM code is as follows:

Figure 6: key2sha1 schematic diagram- OTP_PROTECT_ENABLE is the main switch, sub-switches RSA_N_CHK_ENABLE, AES_CHK_ENABLE, PWD_CHK_ENABLE
- When the pre-switch is satisfied, the ROM code performs a SHA1 operation on PWD/AESKEY/RSAKEY, and then performs 5 sets of XOR operations on the results of the sha1 operation (160bit) to obtain the final result of 32bit data.
- The 32 bits in step 2 will be compared with the value stored in the OTP. If they are consistent, the verification is considered to be passed, otherwise it will be Halt.
5. Security_boot_tools Usage
The main steps to use Security_boot_tools to sign an alkaid image are as follows:
- Compile and package first to generate an unsigned complete image burning package.
- Manually make the RSA/ECC key and aes Key and replace the default RSA/ECC key and aes Key in the Security_boot_tools directory.
- Compile the configuration file sign_image.config and specify the Image version/rsa key/aes key/aes encryption mode (CBC/CTR/ECB)/aes IV value and other information of the boot Image at each stage.
- Execute Security_boot_tools to automatically complete the unpacking, signing, embedding CUST Key, appended data, packaging, compression, etc. of the complete image burning package based on the configuration information, and output the signed complete image burning package.
5.1. Make RSA/ECC key and aes Key
5.1.1 Make RSA/ECC Key
The production method is suitable for RSA/ECC Key in OTP Key/CUST Key/Image Key. According to customer needs, multiple images can use the same Key or multiple Images can use different RSA/ECC Keys. For security reasons, it is recommended to use multiple different RSA/ECC keys.
For the RSA2048/4096 algorithm, it is necessary to generate RSA private.pem and public.pem.
For the SM2/ECC256/ECC384/ECC512 algorithms, it is necessary to generate ECC private.der and public.der.
Please use the following commands to generate RSA private.pem and public.pem.
The E key value generated by the following command defaults to 0x10001, and security boot flow does not support custom E key values.
RSA2048:
-
Generate RSA2048 private key
openssl genrsa -out private.pem 2048 -
Generate RSA2048 public key
openssl rsa -in private.pem -out public.pem -outform PEM -pubout
RSA4096:
-
Generate RSA4096 private key
openssl genrsa -out private.pem 4096 -
Generate RSA4096 public key
openssl rsa -in private.pem -out public.pem -outform PEM -pubout
Please use the following commands to generate ECC private.der and public.der.
SM2:
-
Generate the SM2 private key and convert it to DER format.
openssl ecparam -genkey -name SM2 -out private.pem openssl ec -in private.pem -outform DER -out private.der -
Generate the SM2 public key and convert it to DER format.
openssl ec -in private.pem -pubout -out public.pem
openssl ec -in public.pem -pubin -outform DER -out public.der
ECC256 :
-
Generate the ECC256 private key and convert it to DER format.
openssl ecparam -genkey -name prime256v1 -out private.pem openssl ec -in private.pem -outform DER -out private.der -
Generate the ECC256 public key and convert it to DER format.
openssl ec -in private.pem -pubout -out public.pem
openssl ec -in public.pem -pubin -outform DER -out public.der
ECC384 :
-
Generate the ECC384 private key and convert it to DER format.
openssl ecparam -genkey -name secp384r1 -out private.pem openssl ec -in private.pem -outform DER -out private.der -
Generate the ECC384 public key and convert it to DER format.
openssl ec -in private.pem -pubout -out public.pem
openssl ec -in public.pem -pubin -outform DER -out public.der
ECC512 :
-
Generate the ECC512 private key and convert it to DER format.
openssl ecparam -genkey -name brainpoolP512r1 -out private.pem openssl ec -in private.pem -outform DER -out private.der -
Generate the ECC512 public key and convert it to DER format.
openssl ec -in private.pem -pubout -out public.pem
openssl ec -in public.pem -pubin -outform DER -out public.der
Replace the generated pairs of RSA/ECC keys in the corresponding directories under project/image/security_boot_tools/ rsa2048/rsa4096/sm2/ecc256/ecc384/ecc512 with the required key binary files.
key type Description private-otp.pem Used by security_boot_tools to sign IPL public-otp.pem Needs to be manually burned into OTP for startup process ROM code verification IPL private-cust.pem Used by security_boot_tools to sign IPL_CUST/TF_A/OPTEE public-cust.pem Embedded into IPL by security_boot_tools, used for IPL verification during startup IPL_CUST/TF_A/OPTEE private-image.pem Used by security_boot_tools to sign other images except IPL/IPL_CUST/TF_A/OPTEE public-image.pem Embedded into IPL_CUST by security_boot_tools, used for startup process IPL_CUST verification other than IPL/IPL_CUST/TF_A/OPTEE Image
5.1.2. Making AES Key
Here, xxd tool is used to generate
AES key binary file. The production method is suitable for 8 aes-128 keys or 4 aes-256 keys in OTP. According to customer needs, multiple images can use the same aes key or multiple images can use different aes keys. For security reasons, it is recommended to use multiple different aes keys.-
AES-128 Key
echo '00102030405060708090A0B0C0D0E0FF' | xxd -r -ps > aesKey_128.bin -
AES-256 Key
echo '000102030405060708090A0B0C0D0E0F101112131415161718191A1B1C1D1E1F' | xxd -r -ps > aesKey_256.bin -
IV
echo '303132333435363738393A3B3C3D3E3F' | xxd -r -ps > IV.bin
Just replace the n AES keys generated above with the corresponding key binary files that need to be used in the aesKey directory under project/image/security_boot_tools/.
5.2. sign_image.config
Enter project/image/security_boot_tools/ and modify the sign_image.config file.
Parameter description in sign_image.config file:
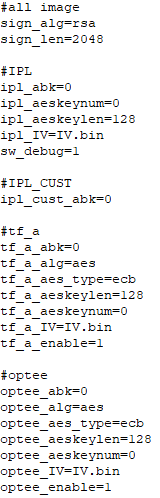
Name Description sign_alg The value of sign_alg is rsa or ecc or sm2. The boot code of each stage is specified by this parameter, RSA2048/RSA4096 or ECC/SM2 sign_len If sign_alg is set to rsa, then the value of sign_len should be 2048 or 4096, meaning that RSA2048 or RSA4096 will be used for signature verification throughout the entire Secure Boot process. If sign_alg is set to ecc, then the value of sign_len should be 256, 384, or 512, indicating that ECC256, ECC384, or ECC512 will be used for signature verification throughout the entire Secure Boot process. If sign_alg is set to sm2, then the value of sign_len should be a non-zero value, meaning that the SM2 algorithm will be used for signature verification throughout the entire Secure Boot process. padding_type The padding_type value is pkcs or pss, which specifies the padding method used in the RSA signing process. ipl_abk IPL image version number, anti-rollback func used, when ipl_abk=0 means antirollback is not used ipl_aeskeynum IPL encryption function. There are 8 aes128 and 4 aes256 in the aeskey directory. You can choose to use one of the 4 aes256 and 8 aes128, and use it with aeskeylen. When ipl_aeskeynum=0, it means that aes encryption is not used. Taking ipl_aeskeylen=128&&ipl_aeskeynum=1 as an example, it shows that IPL will use security_boot_tools/aeskey/aesKey128_1.bin as aes-key for encryption ipl_aeskeylen IPL encryption function. There are 8 aes128 and 4 aes256 in the aeskey directory, and the value of aeskeylen is 128 or 256. When ipl_aeskeylen=0, it means that aes encryption is not used and is used in conjunction with ipl_aeskeynum. ipl_IV The IPL encryption method must be cbc. If encrypted, fill in this item with the name of the IV’s binary sw_debug Used instead of OTP_Secure_boot during testing, debug mode ipl_cust_abk IPL_CUST version number, antirollback func used tf_a_abk TF_A version number, antirollback func used tf_a_aes_type tf_a encryption method (supports ecb cbc ctr), if you select CBC or CTR, you need an IV value tf_a_aeskeylen The value of aeskeylen is 128 or 256. When tf_a_aeskeylen=0, it means that aes encryption is not used, and it is used in conjunction with tf_a_aeskeynum tf_a_aeskeynum The valid range of aeskeynum under aeskeylen=128 is [1-8].
The valid range of aeskeynum under aeskeylen=256 is [1-4]. When tf_a_aeskeynum=0, it means that aes encryption is not usedtf_a_IV IV value required by CBC or CTR file name tf_a_enable Whether to enable the above parameters, if it is 0, the image parameters will be used by default optee_abk OPTEE version number, antirollback func used optee_aes_type Optee encryption method (supports ecb cbc ctr), if you choose CBC or CTR, you need an IV value optee_aeskeylen The value of aeskeylen is 128 or 256. When optee_aeskeylen=0, it means that aes encryption is not used, and it is used in conjunction with optee_aeskeynum optee_aeskeynum The valid range of aeskeynum under aeskeylen=128 is [1-8].
The valid range of aeskeynum under aeskeylen=256 is [1-4]. When optee_aeskeynum=0, it means that aes encryption is not usedoptee_IV IV value filename required by CBC or CTR optee_enable Whether to enable the above parameters, if it is 0, the image parameters will be used by default 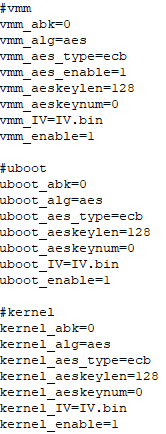
Name Description vmm_abk VMM version number, antirollback func used, version control is not supported yet vmm_aes_type Encryption method (supports ecb cbc ctr), if you select CBC or CTR, you need an IV value vmm_aes_enable Whether VMM uses AES encryption. If it is 0, it means aes encryption is not applicable vmm_aeskeylen The value of aeskeylen is 128 or 256. When vmm_aeskeylen=0, it means that aes encryption is not used, and it is used in conjunction with vmm_aeskeynum vmm_aeskeynum The valid range of aeskeynum under aeskeylen=128 is [1-8].
The valid range of aeskeynum under aeskeylen=256 is [1-4]. When vmm_aeskeynum=0, it means that aes encryption is not usedvmm_IV IV value file name required by CBC or CTR vmm_enable Whether to enable the above parameters, if it is 0, the image parameters will be used by default uboot_abk uboot version number, antirollback func used uboot_aes_type Encryption method (supports ecb cbc ctr), if you select CBC or CTR, you need an IV value uboot_aeskeylen The value of aeskeylen is 128 or 256. When uboot_aeskeylen=0, it means that aes encryption is not used, and it is used in conjunction with uboot_aeskeynum uboot_aeskeynum The valid range of aeskeynum under aeskeylen=128 is [1-8].
The valid range of aeskeynum under aeskeylen=256 is [1-4]. When uboot_aeskeynum=0, it means that aes encryption is not useduboot_IV IV value file name required by CBC or CTR uboot_enable Whether to enable the above parameters, if it is 0, the image parameters will be used by default kernel_abk kernel version number, antirollback func used kernel_aes_type Encryption method (supports ecb cbc ctr), if you select CBC or CTR, you need an IV value kernel_aeskeylen The value of aeskeylen is 128 or 256. When kernel_aeskeylen=0, it means that aes encryption is not used, and it is used in conjunction with kernel_aeskeynum kernel_aeskeynum The valid range of aeskeynum under aeskeylen=128 is [1-8].
The valid range of aeskeynum under aeskeylen=256 is [1-4]. When kernel_aeskeynum=0, it means that aes encryption is not usedkernel_IV IV value file name required by CBC or CTR kernel_enable Whether to enable the above parameters, if it is 0, the image parameters will be used by default 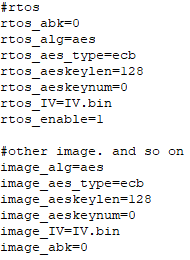
Name Description rtos_abk RTOS version number, antirollback func used, version control is not supported yet rtos_aes_type Encryption method (supports ecb cbc ctr), if CBC or CTR is selected, IV value is required rtos_aeskeylen The value of aeskeylen is 128 or 256. When rtos_aeskeylen=0, it means that aes encryption is not used, and it is used in conjunction with rtos_aeskeynum rtos_aeskeynum The valid range of aeskeynum under aeskeylen=128 is [1-8].
The valid range of aeskeynum under aeskeylen=256 is [1-4]. When rtos_aeskeynum=0, it means that aes encryption is not usedrtos_IV IV value required by CBC or CTR file name rtos_enable Whether to enable the above parameters, if it is 0, the image parameters will be used by default image_aes_type Encryption method (supports ecb cbc ctr), if CBC or CTR is selected, IV value is required image_aeskeylen The value of aeskeylen is 128 or 256. When image_aeskeylen=0, it means that aes encryption is not used, and it is used in conjunction with image_aeskeynum image_aeskeynum The valid range of aeskeynum under aeskeylen=128 is [1-8].
The valid range of aeskeynum under aeskeylen=256 is [1-4]. When image_aeskeynum=0, it means that aes encryption is not used. Currently, only aeskey128_1 decryption is supportedimage_IV IV value required by CBC or CTR file name image_abk Pre-reserved, if using the anti rollback function, fill in the abk of the corresponding image
5.3. Run Security_boot_tools
The actual steps are as follows:
-
Enter the project directory, make xxx_defconfig; make clean -j32; make image -j32;
-
Enter project/image/security_boot_tools/ and run
make clean;make; to generate the security_boot_tools/image_secure directory (Image in the directory has been signed)If the signing action needs to be done in another directory or on a different computer, please run
make image_preparein Step 2, copy the complete security_boot_tools to another location, and then runmake.
Note: For images generated by security_boot_tools, estar will automatically configure bootcmd to verify (or decrypt + verify) the kernel. By default, rootfs will be signed, but bootcmd will not verify the signature (or decrypt + verify the signature) of the rootfs. If you need to verify the rootfs signature, please manually modify the bootcmd and add the signature verification rootfs step.
5.4. Signature cmd
In the Uboot stage, the environment variable bootcmd needs to be modified to verify the binary such as Linux Kernel/rtos/vmm/ramdiskfs. The principle is to use the sigauth command to verify and decrypt the binary:
sigauth <Binary_Addr>

<Binary_Addr>: The loading address of the binary that needs to be verified (or encrypted) in ddr.
U-boot starts pure linux, before signature verification:
EX:
setenv bootcmd ' dcache on; loados nand 0x23000000 KERNEL ${kernel_file_size}; bootm 0x23000000; dcache on; loados nand 0x23000000 RECOVERY ${recovery_file_size}; bootm 0x23000000;
U-boot starts pure linux, after signature verification:
EX:
setenv bootcmd ' dcache on; loados nand 0x23000000 KERNEL ${kernel_file_size}; sigauth 0x23000000; bootm 0x23000000; dcache on; loados nand 0x23000000 RECOVERY ${recovery_file_size}; bootm 0x23 000000;
If the image uses encryption, please add --aes at the end of the sigauth command in the corresponding startup mode.
U-boot starts dualos, before signature verification:
EX:
setenv bootcmd ' loados nand by_header MISC by_header; loados nand by_header RTOS by_header;bootm start ${loados_addr};bootm loados;bootm prep;wakeupcpu 3 s 0x2ef08000; loados nand by_header RAMDISK by_header; loados nand by_header KERNEL by_header;dcache off;bootm $ {loados_addr};
U-boot starts dualos, after signature verification:
EX:
setenv bootcmd ' loados nand by_header MISC by_header; loados nand by_header RTOS by_header;sigauth ${loados_addr};bootm start ${loados_addr};bootm loados;bootm prep;wakeupcpu 3 s 0x2ef08000; loados nand by_header RAMDISK by_header;igauth ${ loados_addr } 0x21000000; loados nand by_header KERNEL by_header;sigauth ${loados_addr};dcache off;bootm ${loados_addr};
6. OTP Field
If you want to use the otpctrl function under uboot, you need to ensure that uboot has CONFIG_ARM_SMCCC enabled!
When compiling the UBOOT, the configurations that need to be selected are as follows:
    ARM architecture-->
        [*] Support for ARM SMC Calling Convention(SMCCC)
Each bit of OTP can only be programmed once. Once set to 1, it cannot be set to 0. Please perform the programming action when necessary!
Writing the same data to the same position in OTP may lead to damage of the OTP content, and duplicate writes of the same data are not allowed.
6.1. OTP Command Format
The OTP field of the chip is usually programmed using otpctrl under uboot. After the OTP is burned, it usually takes effect next time it is started.
As shown in the figure below, the two COMMANDs used to perform OTP burning under UBOOT are listed, and they can respectively read and write OTP.
WRITE COMMAND:

READ COMMAND:
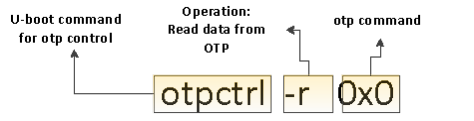
ERROR CODE:
FF01: Invalid COMMAND
FF02: Invalid OTP address
FF03: Invalid OTP execution license
It supports the use of the otpfactor command in U-Boot for automatic programming. For more details, please refer to 6.6. Automatic Programming of OTP using the otpfactor Command.
6.2. OTP Fields Related to Security Boot
If customers use the security boot function, they need to pay attention to the following OTP contents:
OTP command ID length(byte) Description OTP_RSA_N 0X00 512 Save the N value of the RSA public key used to verify the IPL. When you go to the ecc256 process, save the public key value OTP_RSA_E 0X01 4 Save the E value of the RSA public key used to verify the IPL. When you go to the ecc256 process, you can't burn the value OTP_SECURITY_BOOT 0X02 4 Enable the security boot function switch. You need to confirm that the RSA/AES key has been burned correctly before turning it on OTP_RSA_KEY_LOCK 0X03 4 Perform LOCK action on the RSA Public Key field in OTP. It cannot be modified after LOCK. Customers can use it according to their needs OTP_RSA_KEY_BLOCK 0X04 4 BLOCK the RSA Public Key field in the OTP. After BLOCK, the CPU cannot read the RSA Public Key in the OTP. Customers can use it according to their needs OTP_KEY1 0X05 16 The 1st AES128 key OTP_KEY2 0X06 16 The second AES128 key can also be combined with OTP_KEY1 to form the first AES256 key OTP_KEY3 0X07 16 The third AES128 key OTP_KEY4 0X08 16 The fourth AES128 key can also be combined with OTP_KEY3 to form the second AES256 key OTP_KEY5 0X09 16 The fifth AES128 key OTP_KEY6 0X0A 16 The sixth AES128 key can also be combined with OTP_KEY5 to form the 3rd AES256 key OTP_KEY7 0X0B 16 The seventh AES128 key OTP_KEY8 0X0C 16 The eighth AES128 key can also be combined with OTP_KEY7 to form the 4th AES256 key OTP_AES_KEY1_LOCK 0X0D 4 It cannot be modified after LOCK, that is, the 16byte OTP content cannot be set to 0 or set to 1. Customers can use it according to their needs. OTP_AES_KEY1_BLOCK 0X0E 4 BLOCK cannot be modified. Only HW aesdma can access it but not the CPU. Customers can use it according to their needs. OTP_AES_KEY2_LOCK 0X0F 4 It cannot be modified after LOCK, that is, the 16byte OTP content cannot be set to 1 if it is not 0 bit. Customers can use it according to their needs. OTP_AES_KEY2_BLOCK 0X10 4 BLOCK cannot be modified. Only HW aesdma can access it but not CPU. Customers can use it according to their needs. OTP_AES_KEY3_LOCK 0X11 4 It cannot be modified after LOCK, that is, the 16byte OTP content cannot be set to 0 or 1. Customers can use it according to their needs. OTP_AES_KEY3_BLOCK 0X12 4 BLOCK cannot be modified. Only HW aesdma can access it but not CPU. Customers can use it according to their needs. OTP_AES_KEY4_LOCK 0X13 4 It cannot be modified after LOCK, that is, the 16byte OTP content cannot be set to 0 or set to 1. Customers can use it according to their needs. OTP_AES_KEY4_BLOCK 0X14 4 BLOCK cannot be modified. Only HW aesdma can access it but not CPU. Customers can use it according to their needs. OTP_AES_KEY5_LOCK 0X15 4 It cannot be modified after LOCK, that is, the 16byte OTP content cannot be set to 0 or 1. Customers can use it according to their needs. OTP_AES_KEY5_BLOCK 0X16 4 BLOCK cannot be modified. Only HW aesdma can access it but not the CPU. Customers can use it according to their needs. OTP_AES_KEY6_LOCK 0X17 4 It cannot be modified after LOCK, that is, the 16byte OTP content cannot be set to 0 or set to 1. Customers can use it according to their needs. OTP_AES_KEY6_BLOCK 0X18 4 BLOCK cannot be modified. Only HW aesdma can access it but not CPU. Customers can use it according to their needs. OTP_AES_KEY7_LOCK 0X19 4 It cannot be modified after LOCK, that is, the 16byte OTP content cannot be set to 0 or set to 1. Customers can use it according to their needs. OTP_AES_KEY7_BLOCK 0X1A 4 BLOCK cannot be modified. Only HW aesdma can access it but not the CPU. Customers can use it according to their needs. OTP_AES_KEY8_LOCK 0X1B 4 It cannot be modified after LOCK, that is, the 16byte OTP content cannot be set to 0 or 1. Customers can use it according to their needs. OTP_AES_KEY8_BLOCK 0X1C 4 BLOCK cannot be modified. Only HW aesdma can access it but not CPU. Customers can use it according to their needs. OTP_ROM_SELECT_AES_KEY 0X24 4 Select which AESKey in the OTP to decrypt the IPL. Once this OTP is written, the IPL must be encrypted using CBC OTP_ROM_SELECT_AES_KEY_LOCK 0X25 4 OTP_ROM_SELECT_AES_KEY cannot be modified after LOCK. OTP_RSA_KEY_LEN 0X2F 4 The RSA2048 signing method does not require burning; other signing methods require burning. OTP_PSS_PKCS_SELECT 0X52 1(bit) When using RSA signing, selecting the PSS filling method requires burning, while selecting the PKCS filling method does not require burning. The burning method of each OTP field is explained as follows.
6.2.1. OTP_RSA_N (0x0) / OTP_RSA_E (0x1)
Follow the RSA2048 or RSA4096 process:
For the generated rsa-public.pem file, you need to convert the pem format into a format that can be used for burning. Use the following cmd to generate rsaKey.txt. The command in rsaKey.txt is used to burn the OTP under UBOOT.
./key_proc.py --exportkey_reverse --rsa=private.pemFor example, the content of rsaKey.txt after conversion using a ready-made pem file is as follows, just copy and paste it into the uboot menu command line to execute:
####### RSA N-Key ########
otpctrl -w 0x0 0x0 0x58653431;otpctrl -w 0x0 0x4 0x06ba8f4a;otpctrl -w 0x0 0x8 0x5caee61a;otpctrl -w 0x0 0xc 0x1912648d;otpctrl -w 0x0 0x10 0xb3b7 7f1c;otpctrl -w 0x0 0x14 0xd116e973;otpctrl -w 0x0 0x18 0x74f82967;otpctrl -w 0x0 0x1c 0xf85d78e8;otpctrl -w 0x0 0x20 0x55a92d7a;otpctrl -w 0x0 0x24 0xf807ef92;otpctrl -w 0x0 0x28 0xeaca7ab8;otpctrl -w 0x0 0x2c 0x2d3314 9a;otpctrl -w 0x0 0x30 0xc47f6cfb;otpctrl -w 0x0 0x34 0x99d0fb2b;otpctrl - w 0x0 0x38 0xb94e529f;otpctrl -w 0x0 0x3c 0x09d1e66a;
otpctrl -w 0x0 0x40 0x93614b62;otpctrl -w 0x0 0x44 0x40db5115;otpctrl -w 0x0 0x48 0x4d37ec4c;otpctrl -w 0x0 0x4c 0xd7ac36da;otpctrl -w 0x0 0x50 0x 8bbef7bb;otpctrl -w 0x0 0x54 0x459ffe82;otpctrl -w 0x0 0x58 0xea5aa7ed;otpctrl -w 0x0 0x5c 0x979ac988;otpctrl -w 0x0 0x60 0xd9ad7843;otpctrl -w 0x0 0x64 0xb086c544;otpctrl -w 0x0 0x68 0x75248853;otpctrl -w 0x0 0x6c 0xd0c6 1f34;otpctrl -w 0x0 0x70 0xd4fd028a;otpctrl -w 0x0 0x74 0x93037bd3;otpctrl - w 0x0 0x78 0x2b3cd0e2;otpctrl -w 0x0 0x7c 0x12b49f2d;
otpctrl -w 0x0 0x80 0x72fc0405;otpctrl -w 0x0 0x84 0xc1fb6cfd;otpctrl -w 0x0 0x88 0xb42fb860;otpctrl -w 0x0 0x8c 0xa06e8c6e;otpctrl -w 0x0 0x90 0 x43870bc3;otpctrl -w 0x0 0x94 0xb97ebe88;otpctrl -w 0x0 0x98 0x45113bd1;otpctrl -w 0x0 0x9c 0xb7974436;otpctrl -w 0x0 0xa0 0x47c3d001;otpctrl -w 0x0 0xa4 0x3611716d;otpctrl -w 0x0 0xa8 0x67abc2d5;otpctrl -w 0x0 0xac 0x773ac1cd ;otpctrl -w 0x0 0xb0 0x7d1ee609;otpctrl -w 0x0 0xb4 0xc72e97ee;otpctrl - w 0x0 0xb8 0x91af8bd5;otpctrl -w 0x0 0xbc 0xd516243d;
otpctrl -w 0x0 0xc0 0x949b2522;otpctrl -w 0x0 0xc4 0x3d73c4d7;otpctrl -w 0x0 0xc8 0xcf2fde53;otpctrl -w 0x0 0xcc 0xbd35d242;otpctrl -w 0x0 0xd0 0x 2362de0f;otpctrl -w 0x0 0xd4 0x8d9f7418;otpctrl -w 0x0 0xd8 0x861f69d5;otpctrl -w 0x0 0xdc 0x0736f5ff;otpctrl -w 0x0 0xe0 0x7655b44e;otpctrl -w 0x0 0xe4 0x06198429;otpctrl -w 0x0 0xe8 0xe0975a88;otpctrl -w 0x0 0xec 0x6fcec 320;otpctrl -w 0x0 0xf0 0x49480b57;otpctrl -w 0x0 0xf4 0xea4a5ee3;otpctrl - w 0x0 0xf8 0x6502ddee;otpctrl -w 0x0 0xfc 0xd6d17ae2;
####### RSA E-Key ########
otpctrl -w 0x1 0x0 0x00010001
Note: Because the buf cache length of the uboot menu command line is limited, the 64 otpctrl commands cannot be directly run as a copy, paste and press Enter. It is recommended to divide the execution into at least 4 times.
If following the signature verification process of the ECC series algorithms:
For the generated PEM format ECC keys, you need to first use the following command to convert the keys to DER format:
openssl ec -in private.pem -outform DER -out private.derThen use the following command to convert the DER format into a format that can be used for programming. After execution, rsaKey.txt will be generated. Use the commands in rsaKey.txt to program the OTP in U-Boot.
SM2:
./key_proc.py --exportkey_ecc --ec=private-otp.der --curves=SM2ECC256:
./key_proc.py --exportkey_ecc --ec=private-otp.der --curves=secp256r1ECC384:
./key_proc.py --exportkey_ecc --ec=private-otp.der --curves=secp384r1ECC512:
./key_proc.py --exportkey_ecc --ec=private-otp.der --curves=brainpoolP512r1For example, the contents of rsaKey.txt after converting an existing ECC256 PEM file are as follows. You can directly copy and paste this into the U-Boot command line to execute:
####### ECC PX ########
otpctrl -w 0x0 0x0 0xb73a3460;otpctrl -w 0x0 0x4 0x0eb47647;otpctrl -w 0x0 0x8 0x4c9d7ce7;otpctrl -w 0x0 0xc 0x681eb04d;otpctrl -w 0x0 0x10 0xd7d5f581;otpctrl -w 0x0 0x14 0x4be74af8;otpctrl -w 0x0 0x18 0x4acf2678;otpctrl -w 0x0 0x1c 0x4cdaae72;
####### ECC PY ########
otpctrl -w 0x0 0x20 0x74b17388;otpctrl -w 0x0 0x24 0x699da51e;otpctrl -w 0x0 0x28 0x839b3a07;otpctrl -w 0x0 0x2c 0xf57cca01;otpctrl -w 0x0 0x30 0x0da38989;otpctrl -w 0x0 0x34 0xc5eb0a46;otpctrl -w 0x0 0x38 0x1cd03251;otpctrl -w 0x0 0x3c 0xc63407cf;
Check whether the RSA/ECC keys have been successfully written:
6.2.2. OTP_SECURE_BOOT (0x2)
After confirming that the RSA/AES keys are burned, start the security boot function (it will not take effect until the next startup):
Check whether the security boot function is turned on:
A result of 0xFFFFFFFF indicates that it is enabled, and the changes will take effect after a reboot.
6.2.3. OTP_RSA_KEY_LOCK (0x3) / OTP_RSA_KEY_BLOCK (0x4)
Non-essential operations, customers can use it according to their needs.
Confirm LOCK and BLOCK rsa key (will not take effect until next startup):
Check if LOCK and BLOCK are turned on:
A result of 0xFFFFFFFF indicates that it is enabled, and the changes will take effect after a reboot.
6.2.4. OTP_AES128_KEY (0x5~0xC)
If the customer uses the signature + encryption function of security boot, burning the AES KEY is a necessary operation.
If you are making AES128 KEY:
echo '000102030405060708090A0B0C0D0E0F' | xxd -r -ps > aesKey128_1.binExample of programming the AES key:
The OTP can store up to 8 AES128 keys, with each key occupying 16 bytes of OTP space. After setting this command, it will take effect on the next boot.
ALL AESKEY WRITE COMMAND:
-
KEY1
WRITE COMMAND:
otpctrl -w 0x5 offset writedataREAD COMMAND:
otpctrl -r 0x5Example:
making AES KEY: echo '000102030405060708090A0B0C0D0E0F' | xxd -r -ps > aesKey1.bin otpctrl -w 0x5 0x0 0x03020100 otpctrl -w 0x5 0x4 0x07060504 otpctrl -w 0x5 0x8 0x0B0A0908 otpctrl -w 0x5 0xC 0x0F0E0D0C -
KEY2
WRITE COMMAND:
otpctrl -w 0x6 offset writedataREAD COMMAND:
otpctrl -r 0x6Example:
making AES KEY: echo '00112233445566778899AABBCCDDEEFF' | xxd -r -ps > aesKey2.bin otpctrl -w 0x6 0x0 0x33221100 otpctrl -w 0x6 0x4 0x77665544 otpctrl -w 0x6 0x8 0xBBAA9988 otpctrl -w 0x6 0xC 0xFFEEDDCC -
KEY3
WRITE COMMAND:
otpctrl -w 0x7 offset writedataREAD COMMAND:
otpctrl -r 0x7Example:
making AES KEY: echo '030102030405060708090A0B0C0D0E0F' | xxd -r -ps > aesKey3.bin otpctrl -w 0x7 0x0 0x03020103 otpctrl -w 0x7 0x4 0x07060504 otpctrl -w 0x7 0x8 0x0B0A0908 otpctrl -w 0x7 0xC 0x0F0E0D0C -
KEY4
WRITE COMMAND:
otpctrl -w 0x8 offset writedataREAD COMMAND:
otpctrl -r 0x8Example:
making AES KEY: echo '04112233445566778899AABBCCDDEEFF' | xxd -r -ps > aesKey4.bin otpctrl -w 0x8 0x0 0x33221104 otpctrl -w 0x8 0x4 0x77665544 otpctrl -w 0x8 0x8 0xBBAA9988 otpctrl -w 0x8 0xC 0xFFEEDDCC -
KEY5
WRITE COMMAND:
otpctrl -w 0x9 offset writedataREAD COMMAND:
otpctrl -r 0x9Example:
making AES KEY: echo '05112233445566778899AABBCCDDEEFF' | xxd -r -ps > aesKey5.bin otpctrl -w 0x9 0x0 0x33221105 otpctrl -w 0x9 0x4 0x77665544 otpctrl -w 0x9 0x8 0xBBAA9988 otpctrl -w 0x9 0xC 0xFFEEDDCC -
KEY6
WRITE COMMAND:
otpctrl -w 0xA offset writedataREAD COMMAND:
otpctrl -r 0xAExample:
making AES KEY: echo '06112233445566778899AABBCCDDEEFF' | xxd -r -ps > aesKey6.bin otpctrl -w 0xA 0x0 0x33221106 otpctrl -w 0xA 0x4 0x77665544 otpctrl -w 0xA 0x8 0xBBAA9988 otpctrl -w 0xA 0xC 0xFFEEDDCC -
KEY7
WRITE COMMAND:
otpctrl -w 0xB offset writedataREAD COMMAND:
otpctrl -r 0xBExample:
making AES KEY: echo '07112233445566778899AABBCCDDEEFF' | xxd -r -ps > aesKey7.bin otpctrl -w 0xB 0x0 0x33221107 otpctrl -w 0xB 0x4 0x77665544 otpctrl -w 0xB 0x8 0xBBAA9988 otpctrl -w 0xB 0xC 0xFFEEDDCC -
KEY8
WRITE COMMAND:
otpctrl -w 0xC offset writedataREAD COMMAND:
otpctrl -r 0xCExample:
making AES KEY: echo '08112233445566778899AABBCCDDEEFF' | xxd -r -ps > aesKey8.bin otpctrl -w 0xC 0x0 0x33221108 otpctrl -w 0xC 0x4 0x77665544 otpctrl -w 0xC 0x8 0xBBAA9988 otpctrl -w 0xC 0xC 0xFFEEDDCC -
KEY256_1
WRITE COMMAND:
otpctrl -w 0x5 offset writedata
otpctrl -w 0x6 offset writedata
READ COMMAND:
otpctrl -r 0x5
otpctrl -r 0x6
Example:
making AES KEY: echo '000102030405060708090A0B0C0D0E0F101112131415161718191A1B1C1D1E1F' | xxd -r -ps > aesKey256_1.bin

otpctrl -w 0x5 0x0 0x03020100
otpctrl -w 0x5 0x4 0x07060504
otpctrl -w 0x5 0x8 0x0B0A0908
otpctrl -w 0x5 0xC 0x0F0E0D0C

otpctrl -w 0x6 0x0 0x13121110
otpctrl -w 0x6 0x4 0x17161514
otpctrl -w 0x6 0x8 0x1B1A1918
otpctrl -w 0x6 0xC 0x1F1E1D1C
The programming methods for KEY256_2, KEY256_3, and KEY256_4 are similar to that of KEY256_1.
6.2.5. OTP_AES128_KEY1~8_LOCK (0xD,0xF,0x11,0x13,0x15,0x17,0x19,0x1B) / OTP_AES128_KEY1~8_BLOCK (0xE,0x10,0x12,0x14,0x16,0x18,0x1A,0x1 C)
Non-essential operations, customers can use it according to their needs.
Confirm the first AES128 key of LOCK and BLOCK (it will not take effect until the next startup):
The first AES128 key checks whether LOCK and BLOCK are turned on:
Confirm the first AES256 key of LOCK and BLOCK (it will not take effect until the next startup):
otpctrl -w 0xD 0x0 0xFFFFFFFF
otpctrl -w 0xF 0x0 0xFFFFFFFF
otpctrl -w 0xE 0x0 0xFFFFFFFF
otpctrl -w 0x10 0x0 0xFFFFFFFF
The first AES256 key checks whether LOCK and BLOCK are turned on:
LOCK and BLOCK operate in the same way with 8 AES128 keys or 4 AES256 keys.
6.2.6. OTP_ROM_SEL_AESKEY (0x24)
If the customer uses the signature + encryption function of security boot, it is necessary to burn OTP_ROM_SEL_AESKEY to select which AESKey in the OTP to decrypt the IPL.
If the customer only uses the signature of the security boot without the encryption and decryption process, then OTP_ROM_SEL_AESKEY cannot be programmed.
Read cmd:
otpctrl -r 0x24Example:
-
Select AESKEY128_1
otpctrl -w 0x24 0x0 0xFF000000A read value of 0xFF000000 indicates that the write operation was successful.
-
Select AESKEY128_2
otpctrl -w 0x24 0x0 0xFF0000FFA read value of 0xFF0000FF indicates that the write operation was successful.
-
Select AESKEY128_3
otpctrl -w 0x24 0x0 0xFF00FF00A read value of 0xFF00FF00 indicates that the write operation was successful.
-
Select AESKEY128_4
otpctrl -w 0x24 0x0 0xFF00FFFFA read value of 0xFF00FFFF indicates that the write operation was successful.
-
Select AESKEY128_5
otpctrl -w 0x24 0x0 0xFFFF0000A read value of 0xFFFF0000 indicates that the write operation was successful.
-
Select AESKEY128_6
otpctrl -w 0x24 0x0 0xFFFF00FFA read value of 0xFFFF00FF indicates that the write operation was successful.
-
Select AESKEY128_7
otpctrl -w 0x24 0x0 0xFFFFFF00A read value of 0xFFFFFF00 indicates that the write operation was successful.
-
Select AESKEY128_8
otpctrl -w 0x24 0x0 0xFFFFFFFFA read value of 0xFFFFFFFF indicates that the write operation was successful.
In addition, IPL can be decrypted using AES256. AESKEY256 in OTP is actually a combination of two AES128 in OTP. Examples of combination and settings are as follows:
-
Select AESKEY256_1 (Composition mode: AES128key1 + AES128key2)
otpctrl -w 0x24 0x0 0x00FF0000A read value of 0x00FF0000 indicates that the write operation was successful.
-
Select AESKEY256_2 (Composition mode: AES128key3 + AES128key4)
otpctrl -w 0x24 0x0 0x00FF00FFA read value of 0x00FF00FF indicates that the write operation was successful.
-
Select AESKEY256_3 (Composition mode: AES128key5 + AES128key6)
otpctrl -w 0x24 0x0 0x00FFFF00A read value of 0x00FFFF00 indicates that the write operation was successful.
-
Select AESKEY256_4 (Composition mode: AES128key7 + AES128key8)
otpctrl -w 0x24 0x0 0x00FFFFFFA read value of 0x00FFFFFF indicates that the write operation was successful.
6.2.7. OTP_ROM_SEL_AESKEY_LOCK (0x25)
Non-essential operations, customers can use it according to their needs.
Confirm the contents of LOCK and BLOCK OTP_ROM_SEL_AESKEY (it will not take effect until the next startup):
Check if LOCK and BLOCK are turned on:
A result of 0xFFFFFFFF indicates that it is enabled, and the changes will take effect after a reboot.
6.2.8. OTP_RSA_KEY_LEN(0x2F)
This command is used to configure the length of RSA_KEY. The default length is 2048 bits.
After setting this command, it will take effect only at the next boot.
To set for RSA4096 signature verification, please program this OTP.
WRITE COMMAND:
READ COMMAND:
Read at 0xff, 0xff, 0xff, 0xff, 0x00, 0x00, 0x00, 0x00, 0x00, 0x00, 0x00, 0x00, to express the success of the burn
If you want to set it to ECC256 signature verification, please burn this OTP
WRITE COMMAND:
READ COMMAND:
Read at 0x00, 0x00, 0x00, 0x00, 0xff, 0xff, 0xff, 0xff, 0x00, 0x00, 0x00, 0x00, to express the success of the burn
If you want to set it to ECC384 signature verification, please burn this OTP
WRITE COMMAND:
READ COMMAND:
Read at 0xff, 0xff, 0xff, 0xff, 0xff, 0xff, 0xff, 0xff, 0x00, 0x00, 0x00, 0x00, to express the success of the burn
If you want to set it to SM2 signature verification, please burn this OTP
WRITE COMMAND:
READ COMMAND:
Read at 0x00, 0x00, 0x00, 0x00, 0x00, 0x00, 0x00, 0x00, 0xff, 0xff, 0xff, 0xff, to express the success of the burn
6.2.9. OTP_PSS_PKCS_SELECT(0x52)
When using RSA signing, the default is PKCS filling method. If you choose PSS filling method, you need to burn this OTP:
Check if the programming was successful:
Reading 0x08, 0x00, 0x00, 0x00, indicates successful programming (the least significant byte, BIT3, is 1), and the changes will take effect after a reboot.
6.3. Anti-rollback Related OTP Fields 
If the customer does not use the anti-rollback function, just keep all Image versions in security_boot_tools/sign_image.config as 0 by default.
If the customer uses the anti-rollback function, only the following contents of the OTP need to be paid attention to:
OTP command ID length(byte) Description OTP_IPL_ANTI_ROLLBACK 0x2B 256 Stores the OTP version of the IPL, with each 4 bytes representing an advancement version, allowing for a maximum of 64 upgrades. OTP_IPL_CUST_ANTI_ROLLBACK 0x2C 64 Stores the OTP version of the IPL_CUST, with each 4 bytes representing an advancement version, allowing for a maximum of 16 upgrades. OTP_TF_A_ANTI_ROLLBACK 0x2C 64 Stores the OTP version of TF_A, with each 4 bytes representing an advancement version, allowing for a maximum of 16 upgrades. OTP_OPTEE_ANTI_ROLLBACK 0x2C 64 Stores the OTP version of OPTEE, with each 4 bytes representing an advancement version, allowing for a maximum of 16 upgrades. OTP_VMM_ANTI_ROLLBACK 0x2C 64 Stores the OTP version of VMM, with each 4 bytes representing an advancement version, allowing for a maximum of 16 upgrades. OTP_UBOOT_ANTI_ROLLBACK 0x2C 64 Stores the OTP version of BOOT, with each 4 bytes representing an advancement version, allowing for a maximum of 16 upgrades. OTP_KERNEL_ANTI_ROLLBACK 0x2C 64 Stores the OTP version of KERNEL, with each 4 bytes representing an advancement version, allowing for a maximum of 16 upgrades. OTP_RTOS_ANTI_ROLLBACK 0x2C 64 Stores the OTP version of RTOS, with each 4 bytes representing an advancement version, allowing for a maximum of 16 upgrades. The burning methods of each OTP field are explained below with examples.
6.3.1. OTP_IPL_ANTI_ROLLBACK (0x2B)
The Image version of IPL is specified in security_boot_tools/sign_image.config by modifying the parameter 'ipl_abk'. It is necessary to confirm that the Image version is greater than the burned OTP Version.
Example of burning OTP Version of IPL:
IPL OTP Version = 1
IPL OTP Version = 2
IPL OTP Version = 3
And so on.
6.3.2 OTP_IPL_CUST_ANTI_ROLLBACK (0x2C,OFFSET 0X0~0X40)
The Image version of IPL_CUST is specified in security_boot_tools/sign_image.config by modifying the parameter 'ipl_cust_abk'. It is necessary to confirm that the Image version is greater than the burned OTP Version.
Example of burning OTP Version of IPL_CUST:
IPL_CUST OTP Version = 1
IPL_CUST OTP Version = 2
IPL_CUST OTP Version = 3
And so on.
6.3.3 OTP_TF_A_ANTI_ROLLBACK (0x2C,OFFSET 0X40~0XA0)
The Image version of TF_A is specified in security_boot_tools/sign_image.config by modifying the parameter 'tf_a_abk'. It is necessary to confirm that the Image version is greater than the burned OTP Version.
Example of burning OTP Version of TF_A:
TF_A OTP Version = 1
TF_A OTP Version = 2
TF_A OTP Version = 3
And so on.
6.3.4 OTP_OPTEE_ANTI_ROLLBACK (0x2C,OFFSET 0XA0~0X100)
The Image version of OPTEE is specified in security_boot_tools/sign_image.config by modifying the parameter 'optee_abk'. It is necessary to confirm that the Image version is greater than the burned OTP Version.
Example of burning OTP Version of OPTEE:
OPTEE OTP Version = 1
OPTEE OTP Version = 2
OPTEE OTP Version = 3
And so on.
6.3.5 OTP_UBOOT_ANTI_ROLLBACK (0x2C,OFFSET 0X100~0X160)
The Image version of UBOOT is specified in security_boot_tools/sign_image.config by modifying the parameter 'uboot_abk'. It is necessary to confirm that the Image version is greater than the burned OTP Version.
Example of burning UBOOT OTP Version:
UBOOT OTP Version = 1
UBOOT OTP Version = 2
UBOOT OTP Version = 3
And so on.
6.3.6 OTP_KERNEL_ANTI_ROLLBACK (0x2C,OFFSET 0X160~0X1C0)
KERNEL's Image version is specified in security_boot_tools/sign_image.config by modifying the parameter 'kernel_abk'. It is necessary to confirm that the Image version is greater than the burned OTP Version.
Example of burning KERNEL OTP Version:
KERNEL OTP Version = 1
KERNEL OTP Version = 2
KERNEL OTP Version = 3
And so on.
6.4. OTP Fields Related to Preventing Error Injection and Signal Analysis Functions
If customers use error injection prevention and signal analysis functions (Multiple Round, SCA, key2sha1), they need to pay attention to the following OTP contents:
OTP command ID length(byte) Description OTP_PROTECT_ENABLE 0x30 4 Master switch for rsa2sha1 and pwd2sha1 and aes2sha1 OTP_RSA_KEY_N_CHK_ENABLE 0x31 4 Enable the sub-switch of rsa2sha1, which means enabling the check function of rsa public key OTP_PASSWORD_CHK_ENABLE 0x32 4 Enable the sub-switch of pwd2sha1, which means enabling the password check function OTP_OTP_KEY_CHK_ENABLE 0x33 4 Enable the sub-switch of aes2sha1, indicating to enable the check function of AES key OTP_AES_MULTIPLE_NUM 0x34 8 Enable the switch of aes multiple num, which means that AES internal encryption and decryption need to be done N (1~4) times, and the results of N times are consistent and then output OTP_SCA_PROTECT_ENABLE 0x35 4 The switch to enable SCA PROTECT means that random num is added to each HW aes encryption and decryption to disrupt the aes timing and prevent signal analysis OTP_PASSWORD_CHK 0x36 4 Save the SHA1&XOR operation value of PASSWORD, which is used to verify the reliability of OTP PASSWORD during the startup process OTP_KEY1_CHK 0x37 4 Save the SHA1&XOR operation value of the first AES128, which is used to verify the reliability of OTP AESKEY during the startup process OTP_KEY2_CHK 0x38 4 Save the SHA1&XOR operation value of the second AES128, which is used to verify the reliability of OTP AESKEY during the startup process OTP_KEY3_CHK 0x39 4 Save the SHA1&XOR operation value of the third AES128, which is used to verify the reliability of OTP AESKEY during the startup process OTP_KEY4_CHK 0x3A 4 Save the SHA1&XOR operation value of the fourth AES128, which is used to verify the reliability of OTP AESKEY during the startup process OTP_KEY5_CHK 0x3B 4 Save the SHA1&XOR operation value of the fifth AES128, which is used to verify the reliability of OTP AESKEY during the startup process OTP_KEY6_CHK 0x3C 4 Save the SHA1&XOR operation value of the 6th AES128, which is used to verify the reliability of OTP AESKEY during the startup process OTP_KEY7_CHK 0x3D 4 Save the SHA1&XOR operation value of the 7th AES128, which is used to verify the reliability of OTP AESKEY during the startup process OTP_KEY8_CHK 0x3E 4 Save the SHA1&XOR operation value of the 8th AES128, which is used to verify the reliability of OTP AESKEY during the startup process OTP_RSA_KEY_N_CHK 0x3F 4 Save the SHA1&XOR operation value of RSA public N key, which is used to verify the reliability of OTP RSAKEY during the startup process The burning methods of each OTP field are explained below with examples.
6.4.1. OTP_PROTECT_ENABLE(0x30)
Turn on the main switch of aes2sha1 pwd2sha1 rsa2sha1 check. After burning, it will not take effect until the next startup.
Check whether the main switch is on:
A result of 0xFFFFFFFF indicates that it is enabled, and the changes will take effect after a reboot.
6.4.2. OTP_RSA_KEY_N_CHK_ENABLE(0x31) / OTP_RSA_KEY_N_CHK(0x3F)
Non-essential operations, customers can use it according to their needs. Note that turning on OTP_RSA_KEY_N_CHK_ENABLE requires burning OTP_RSA_KEY_N_CHK.
For the ready-made rsa-public.pem file, the method of making key-SHA1 is as follows:
./key_proc.py --key2sha1 -f rsa2048/public-otp.pem

-------------------------------------------------- ---->public-otp.pem_sha1.txt
For example, the content of pem_sha1.txt after conversion using a ready-made pem file is as follows:

Then enable the rsa2sha1 subswitch:
A read value of 0xFFFFFFFF indicates that it is enabled, and the changes will take effect after a reboot.
If using the ECC series algorithm process, the method to create key-SHA1 for the ecc public.der file is as follows:
For SM2:
./key_proc.py --key2sha1 -f public-otp.der --curves SM2For ECC256:
./key_proc.py --key2sha1 -f public-otp.der --curves secp256r1For ECC384:
./key_proc.py --key2sha1 -f public-otp.der --curves secp384r1For ECC512:
./key_proc.py --key2sha1 -f public-otp.der --curves brainpoolP512r1This will generate the file public-otp.der_sha1.txt.
The other programming steps are the same as described above.
6.4.3. OTP_PASSWORD_CHK_ENABLE(0x32) / OTP_PASSWORD_CHK(0x36)
Non-essential operations, customers can use it according to their needs. Note that turning on OTP_PASSWORD_CHK_ENABLE requires burning OTP_PASSWORD_CHK.
For the ready-made pwd.bin file, the method of making key-SHA1 is as follows:
./key_proc.py --pwd2sha1 -f pwd.bin

-------------------------------------------------- ---->pwd.bin_sha1.txt
For example, the content of bin_sha1.txt after conversion using the ready-made pwd.bin file is as follows:

Then enable the sub-switch of pwd2sha1:
A result of 0xFFFFFFFF indicates that it is enabled, and the changes will take effect after a reboot.
6.4.4. OTP_OTP_KEY_CHK_ENABLE(0x33) / OTP_Key1~8_CHK (0x37-0x3E)
Non-essential operations, customers can use it according to their needs. Note that turning on OTP_OTP_KEY_CHK_ENABLE requires burning the OTP_Key_chk corresponding to the nth AES key specified by OTP_ROM_SELECT_AES_KEY.
For the ready-made aesKey.bin file, the method of making key-SHA1 is as follows:
./key_proc.py --key2sha1 -f aeskey/aesKey1.bin

------------------------------------------------------>aesKey1.bin_sha1.txt
For example, the content of bin_sha1.txt after conversion using the ready-made aesKey.bin file is as follows:

If the AESKey used by AESDMA specified by OTP_ROM_SELECT_AES_KEY is the first one, burn the contents of bin_sha1.txt to OTP_KEY1_CHK
If the AESKey used by AESDMA specified by OTP_ROM_SELECT_AES_KEY is the second one, burn the contents of bin_sha1.txt to OTP_KEY2_CHK
If the AESKey used by AESDMA specified by OTP_ROM_SELECT_AES_KEY is the third one, burn the contents of bin_sha1.txt to OTP_KEY3_CHK
And so on.
Then enable the sub-switch of aes2sha1:
A result of 0xFFFFFFFF indicates that it is enabled, and the changes will take effect after a reboot.
6.4.5. OTP_AES_MULTIPLE_NUM(0x34)
Non-essential operations, customers can use it according to their needs. Indicates that AES internal encryption and decryption needs to be performed N (1~4) times, and the results of N times are consistent and then output. After setting this Command, it will not take effect until the next startup.
Example:
MULTIPLE_NUM=1:
otpctrl -w 0x34 0x0 0x00000000
otpctrl -w 0x34 0x4 0x00000000

MULTIPLE_NUM=2:
otpctrl -w 0x34 0x0 0xFFFFFFFF
otpctrl -w 0x34 0x4 0x00000000

MULTIPLE_NUM=3:
otpctrl -w 0x34 0x0 0x00000000
otpctrl -w 0x34 0x4 0xFFFFFFFF

MULTIPLE_NUM=4:
otpctrl -w 0x34 0x0 0xFFFFFFFF
otpctrl -w 0x34 0x4 0xFFFFFFFF
6.4.6. OTP_SCA_PROTECT_ENABLE(0x35)
Non-essential operations, customers can use it according to their needs. Indicates starting SCA PROTECT. SCA adds random num to aes encryption and decryption to disrupt the aes timing and prevent signal analysis. After the Command is set, it will not take effect until the next startup.
Example:
A result of 0xFFFFFFFF indicates that it is enabled, and the changes will take effect after a reboot.
6.5. OTP Fields Related to User-defined Data
8K bits are available in the OTP area for customers to save custom data.
OTP command ID length(byte) Description OTP_CUSTOMER_AREA 0XA0 1024 Can be used by users to freely burn custom data OTP_CUSTOMER_AREA_LOCK0 0XA1 4 After LOCK, 0-127Bytes custom data cannot be modified OTP_CUSTOMER_AREA_LOCK1 0XA2 4 After LOCK, 128-255Bytes custom data cannot be modified OTP_CUSTOMER_AREA_LOCK2 0XA3 4 After LOCK, 256-383Bytes custom data cannot be modified OTP_CUSTOMER_AREA_LOCK3 0XA4 4 After LOCK, 384-511Bytes custom data cannot be modified OTP_CUSTOMER_AREA_LOCK4 0XA5 4 After LOCK, 512-639Bytes custom data cannot be modified OTP_CUSTOMER_AREA_LOCK5 0XA6 4 After LOCK, 640-767Bytes custom data cannot be modified OTP_CUSTOMER_AREA_LOCK6 0XA7 4 After LOCK, 768-895Bytes custom data cannot be modified OTP_CUSTOMER_AREA_LOCK7 0XA8 4 After LOCK, 896-1023Bytes custom data cannot be modified The burning methods of each OTP field are explained below with examples.
6.5.1. OTP_CUSTOMER_AREA (0xA0)
Only 4byte can be written at a time. offset ranges from 0x0 - 0x3FF.
Example:
And so on.
Last 4byte WRITE COMMAND:
CUSTOMER_AREA reads:
6.5.2. OTP_CUSTOMER_AREA_LOCK(0xA1~0xA8)
LOCK 0k~1K bits data (will not take effect until next startup):
LOCK 1k~2K bits data (will not take effect until next startup):
LOCK 2k~3K bits data (will not take effect until next startup):
LOCK 3k~4K bits data (will not take effect until next startup):
LOCK 4k~5K bits data (will not take effect until next startup):
LOCK 5k~6K bits data (will not take effect until next startup):
LOCK 6k~7K bits data (will not take effect until next startup):
LOCK 7k~8K bits data (will not take effect until next startup):
6.6. Automatic Programming of OTP using the otpfactor Command
In U-Boot, the otpfactor command supports automatic programming of the OTP fields related to secure boot. You need to modify the data defined in the otpctrl.c file of U-Boot to the data that needs to be programmed into the OTP.
In the execution function do_otpfactor(), it will first check whether the Secure Boot enable has been programmed in the chip. If it has not been programmed, it will proceed to program other data. If this logic is not needed, you can modify or comment it out.
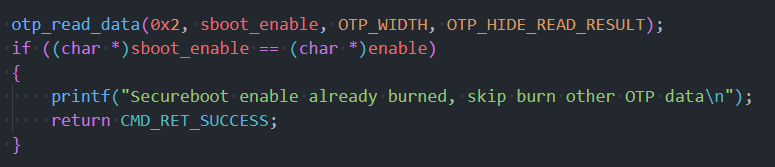
6.6.1. Burn OTP RSA/ECC Key
Due to the special requirements for the order of programming keys in OTP, you need to use the following method to define the data that needs to be programmed.
RSA2048/RSA4096
./key_proc.py --exportkey_reverse --rsa=private.pemSM2:
./key_proc.py --exportkey_ecc --ec=private.der --curves=SM2ECC256:
./key_proc.py --exportkey_ecc --ec=private.der --curves=secp256r1ECC384:
./key_proc.py --exportkey_ecc --ec=private.der --curves=secp384r1ECC512:
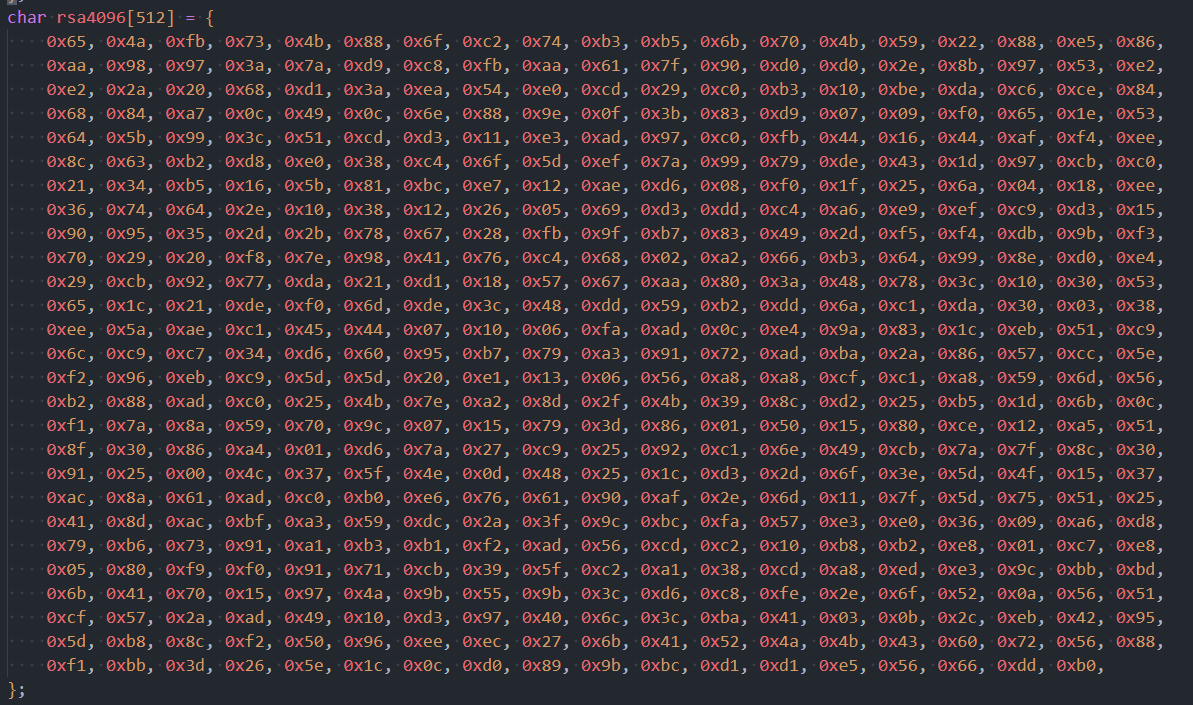
./key_proc.py --exportkey_ecc --ec=private.der --curves=brainpoolP512r1After executing the corresponding command, a file named rsaKey_c_array.txt will be generated. This file contains the C language format of the Public key data. Replace the contents of this file into the predefined arrays in otpctrl.c for rsa2048[256], rsa4096[512], sm2_key[64], ecc256[64], ecc384[96], and ecc512[128]. As shown in the figure below:
RSA2048:
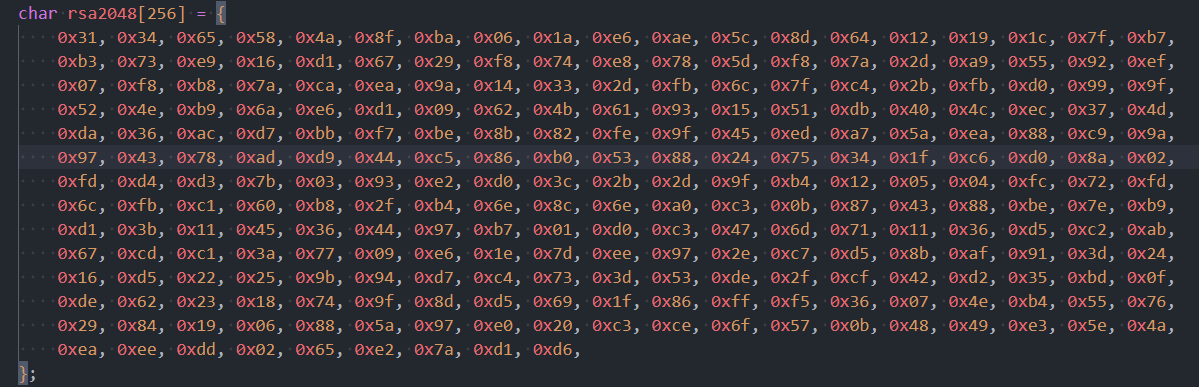
RSA4096:
SM2:

ECC256:

ECC384:

ECC512:

Modify the OTP_SIGN_ALG macro to the corresponding algorithm that needs to be used.

SIGN ALG ALG MICRO RSA2048 SIGN_ALG_RSA2048 RSA4096 SIGN_ALG_RSA4096 SM2 SIGN_ALG_SM2 ECC256 SIGN_ALG_ECC256 ECC384 SIGN_ALG_ECC384 ECC512 SIGN_ALG_ECC512 The do_otpfactor() function will execute the automatic programming of the corresponding keys, as shown in the code below:
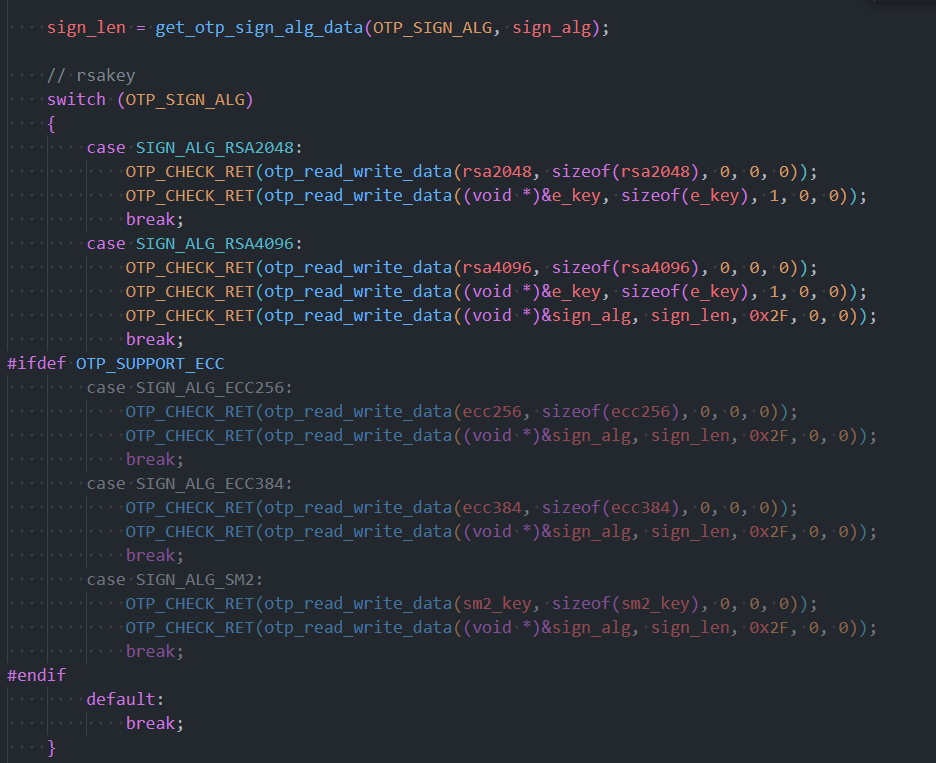
Additionally, the programming of the lock read and lock write bits for the RSA key can be done using the following code, which can be enabled as needed.

6.6.2. Burn OTP AES Key
Modify the data in the aeskey1 to aeskey8 arrays:
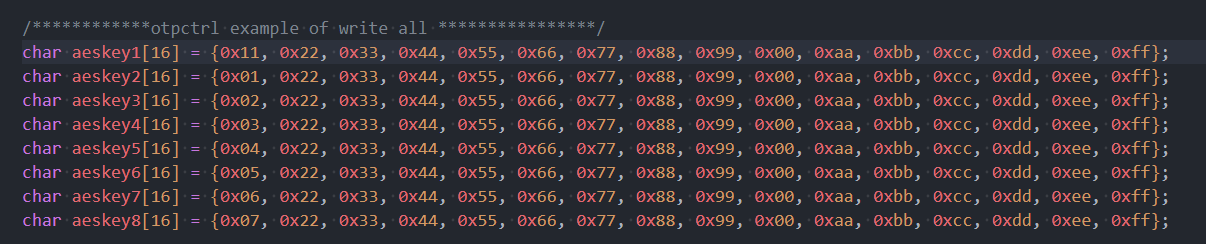
Modify the OTP_ROM_SELECT_AES macro to the corresponding AES KEY that needs to be used.
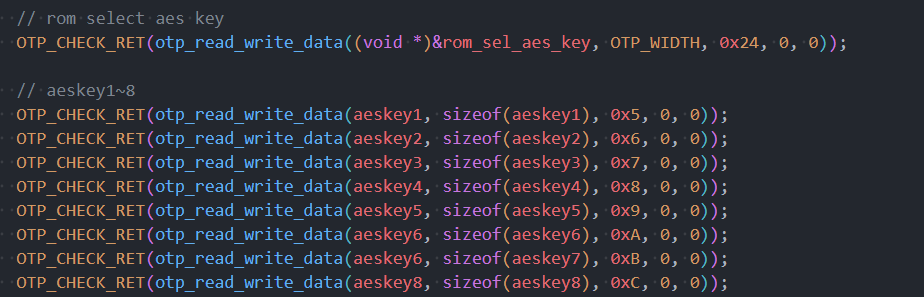
AES KEY AES KEY MICRO AES128_1 ROM_SELECT_AES128_KEY1 AES128_2 ROM_SELECT_AES128_KEY2 AES128_3 ROM_SELECT_AES128_KEY3 AES128_4 ROM_SELECT_AES128_KEY4 AES128_5 ROM_SELECT_AES128_KEY5 AES128_6 ROM_SELECT_AES128_KEY6 AES128_7 ROM_SELECT_AES128_KEY7 AES128_8 ROM_SELECT_AES128_KEY8 AES256_1 ROM_SELECT_AES256_KEY1 AES256_2 ROM_SELECT_AES256_KEY2 AES256_3 ROM_SELECT_AES256_KEY3 AES256_4 ROM_SELECT_AES256_KEY4 The do_otpfactor() function will execute the automatic programming of the corresponding ROM SELECT AESKEY and program 8 AES keys, as shown in the code below. If you do not need to program all 8 AES keys, you can comment out the relevant lines of code.
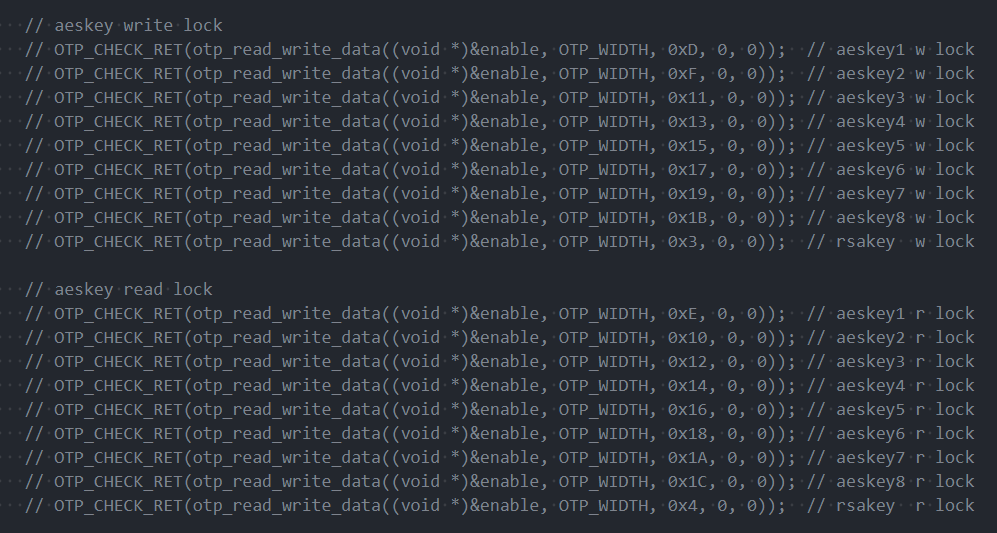
Additionally, the programming of the lock read and lock write bits for the AES keys can be done using the following code, which can be enabled as needed.
6.6.3. Burn Secureboot enable
At the end of do_otpfactor(), the Secure Boot enable will be burned.

7. Security BOOT Deployment Steps
OTP can only be programmed once. Once programmed, it cannot be cleared and re-flashed. In order to prevent misoperation from causing the system to fail to start or even the IC to become invalid, it is generally recommended to proceed with the formal OTP process only after the debugging process PASS. That is, first burn part of the OTP for testing, confirm the debugging process PASS, and then burn the remaining OTP later.
In debugging mode, Security_boot_tools will set the AUTH column position in the IPL header to 1, rom code loads IPL, IPL loads IPL_CUST/TF-A/OPTEE, IPL_CUST loads VMM/RTOS/LINUX, and the signature verification startup process is determined based on the AUTH mark.
In OTP official mode, rom code loads IPL, IPL loads IPL_CUST/TF-A/OPTEE, and IPL_CUST loads VMM/RTOS/LINUX. The signature verification startup process will be decided based on whether the OTP is burned with the OTP_SECURITY_BOOT mark.
7.1. Security Boot Debugging Process
Step 1: The user should generate three sets of RSA/ECC public/private keys and replace the key files in the directories security_boot_tools/aes/ and rsa2048/rsa4096/sm2/ecc256/ecc384/ecc512. For details, see 5.1. Making RSA/ECC key and aes Key.
Step 2: Use the U-Boot Command otpctrl to program the RSA/ECC Public NKey/Ekey (or AES Key). For details, see 6.2. OTP Fields Related to Security Boot.
- It is recommended to only burn OTP_RSA_N / OTP_RSA_E / OTP_RSA_KEY_LEN / OTP_KEY1~8 during the debugging phase.
- It is not recommended to burn the OTP_SECURITY_BOOT field. Even if the OTP content is burned by mistake during the debugging stage, the chip board cannot start the signed image, but it can still be used to start the unsigned image.
- It is not recommended to burn all OTP LOCK & BLOCK fields. Even if the OTP content is burned by mistake during the debugging stage, there is still a chance to check and modify the OTP content.
- It is not recommended to burn OTP_ROM_SELECT_AES_KEY. Even if the OTP AES-key content is mistakenly burned during the debugging stage, the ROM code can still start the unencrypted signed IPL.
Step 3: Configure the security_boot_tools configuration file sign_image.config according to customer needs, but the following configurations need to be noted during the debugging phase:
sw_debug=1 #Even if the OTP does not burn the OTP_SECURITY_BOOT field, the system startup process will also go through the security boot signature verification and decryption process.

ipl_aeskeynum=0 #Because OTP does not burn OTP_ROM_SELECT_AES_KEY, the system startup process will not decrypt IPL, so security_boot_tools is not used to encrypt IPL.

ipl_aeskeylen=0
Step 4: Check system printing
Check the system printout to confirm that ROM->IPL->IPL_CUST->U-Boot has progressed to the flow of SecurityBoot.
-
ROM->IPL confirms whether to use SecurityBoot method
If the ROM signature verification IPL is successful, there will be no log, but if the signature verification fails, AUTH ERR will be printed (the baud rate may need to be adjusted to 115200, otherwise garbled characters will be printed).
-
IPL->IPL_CUST->U-Boot confirms whether to use SecurityBoot method
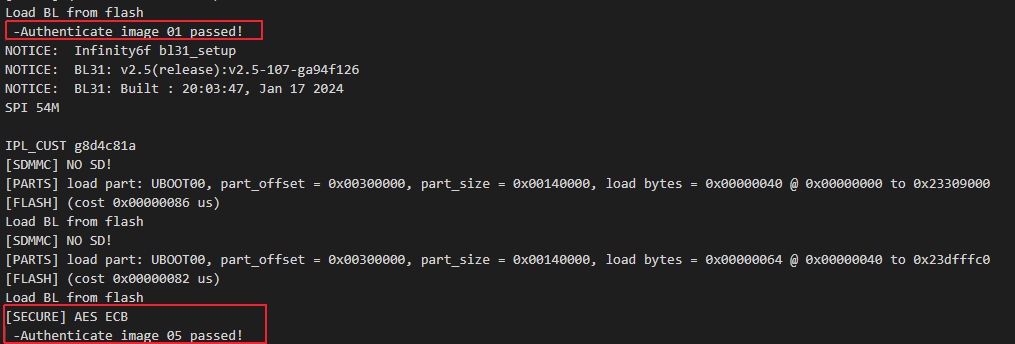
Just check the log. It usually contains the Authenticate image keyword. If the decryption process is enabled, there will also be the AES ECB keyword.
Examples are as follows:
-
U-Boot -> kernel confirms whether to use SecurityBoot method
Directly check whether bootcmd has a signature verification signature. For details, see 5.4. Signature cmd.
7.2. Security Boot Formal Process
After debugging mode can run normally after Security boot is started, it means that the steps of burning OTP RSA N/E KEY and AES KEY in the debugging stage are reliable. Subsequent chips can directly copy the OTP burning commands summarized in debugging mode.
The formal process only requires supplementary burning of some OTP fields.
Step 1: Use U-Boot Command otpctrl to burn OTP_SECURITY_BOOT, RSA KEY's LOCK and BLOCK, OTP_ROM_SELECT_AES_KEY, etc.
Step 2: Configure the security_boot_tools configuration file sign_image.config:
sw_debug = 0

ipl_aeskeynum = 1 #For example, use the first AES-128 KEY

ipl_aeskeylen = 128
Step 3: Check System Printing
- After burning, follow the same method as in 7.1 to confirm that ROM->IPL->IPL_CUST->U-Boot->Kernel has reached SecurityBoot and can boot to U-Boot. Then, ROM->IPL->IPL_CUST->U- Boot->Kernel's SecurityBoot flow and OTP related verification have been PASS.
-