NVR Demo User Guide
1. Feature Overview
1.1 Program Overview
sgs_demo_nvr is a sample program for demonstrating NVR (Network Video Recorder) functionality. The program supports multi-channel video decoding, display, recording, capture, and other features, and provides rich test cases.
1.2 Key Features
- Multi-channel video decoding and display
- Real-time video capture and recording
- Screen switching and resolution adjustment
- PIP (Picture-in-Picture) functionality
- Zoom and EPTZ (Electronic Pan-Tilt-Zoom)
- Mouse display and movement
- UI layer overlay
- Dual-layer UI blending
- Alpha blending and Color Key
- FB scaling
- Homologous/Heterologous switching
- Static frame function
1.3 Module Architecture
1.3.1 Data Flow
Main case pipeline:
When using rotate, SCL is required:
  +---------+      +---------+      +---------+
  |   VDEC  | ---> |   SCL   | ---> |   DISP  |
  +---------+      +---------+      +---------+
            framebase        framebase
1.3.2 Program Architecture
sgs_demo_nvr Architecture
├── Video Decoding Module (VDEC)
│   ├── H.264/H.265 Decoding
│   ├── Channel Management
│   └── Stream Sending
├── Display Module (DISP)
│   ├── Video Output Interfaces (HDMI/VGA/MIPI/TTL/BT1120)
│   ├── Resolution Support (720P/1080P/4K, etc.)
│   └── Screen Layout Management
├── Graphics Engine Module (GFX)
│   ├── Scaling and Rotation
│   ├── Alpha Blending
│   ├── Color Key
│   └── Quick Fill
├── Frame Buffer Module (FB)
│   ├── UI Layer Display
│   ├── Dual-layer UI Blending
│   └── Mouse Icon Display
├── Scaling Module (SCL)
│   ├── Screen Scaling
│   └── EPTZ Support
├── Virtual Display Module (VDISP)
│   ├── Software Tiling
│   └── Multi-channel Composition
└── Encoding Module (VENC)
    ├── Capture Encoding
    └── Zero-channel Encoding (WBC)
1.4 Test Case Description
| case id | Description |
|---|---|
| 0 | exit, exit program |
| 1 | Manual screen switching |
| 2 | Automatic cyclic random screen switching, switches every 5s |
| 3 | Manual resolution switching |
| 4 | Automatic cyclic random resolution switching, switches every 5s |
| 5 | Full-screen PIP display, vdec_0_0_0->scl_1_0_0->disp_0_64_0 |
| 6 | DISP zoom function |
| 7 | Capture, vdec_0_0_1->venc_8_0_0, if scaling is needed: vdec_0_0_1->scl_1_0_0->venc_8_0_0 |
| 8 | Static frame function, VDEC pauses channel decoding |
| 9 | VDISP Case, vdec->scl->vdisp->disp |
| 10 | Get all VDEC channel status |
| 11 | Set HDMI output device parameters, Csc: Color conversion information (including Contrast: contrast, Luma: brightness, Hue: hue, Saturation: saturation), Gain: signal intensity gain, Sharpness: sharpness |
| 12 | Mouse display and movement |
| 13 | Set VDEC frame sending interval time, unit: ms |
| 14 | Set alpha value, range: 0~ff, supports global and pixel, can be set through alphaType parameter in fbArgs_x in configuration file, 0: global; 1: pixel |
| 15 | Read specified UI file data, perform GFX operations and send to framebuffer for display. GFX operations include: 1. Scaling 2. Rotation (0°, 90°, 180°, 270°) 3. Mirror 4. Alpha blend |
| 16 | Read a YUV420SP data, perform GFX rotation (0°, 90°, 180°, 270°) operation and save to file |
| 17 | Read specified UI file data to framebuffer |
| 18 | scl stretch |
| 19 | Reserved |
| 20 | GFX quickfill to framebuffer, including drawrect to framebuffer and colorkey setting |
| 21 | FB scaling up, scale 1920x1080 to 4K for display |
| 22 | Homologous <-> Heterologous switching, supports hdmi&vga, hdmi&ttl, hdmi&mipi, hdmi&bt1120 switching |
| 23 | Zero-channel encoding, wbc->venc->file |
| 24 | EPTZ Case, 1 channel Pano (vdec->disp) + 5 channels eptz (vdec->scl->disp) |
| 25 | Set colorkey value, value is in argb8888 format, e.g.: ff00ff00 |
| 26 | Dual-layer UI blending display Case |
2. Build Environment
2.1 Build Environment Setup
Set up the arm64 compilation environment in the project root directory:
export PATH=/tools/toolchain/aarch64-unknown-linux-gcc-12.4.0-glibc-2.37-gnu/bin:$PATH
export CROSS_COMPILE=aarch64-unknown-linux-gnu-12.4.0-
export ARCH=arm64
cd project
make linux-comake_mhera.emmc.glibc-12.4.0-arm64-ext4.d3.4096.fccsp16_lpddr4x_defconfig
If using 2GB DDR, the defconfig can use linux-comake_mhera.emmc.glibc-12.4.0-arm64-ext4.d3.2048.fccsp16_lpddr4x_defconfig
2.2 Build Commands
# Build entire project
cd project
make clean;make image -j16

# Build NVR demo
cd sdk/verify/sample_code
make demo/nvr/nvr
2.3 Build Artifacts
The generated executable file is located at: sdk/verify/sample_code/out/arm64/app/sgs_demo_nvr
3. Runtime Environment
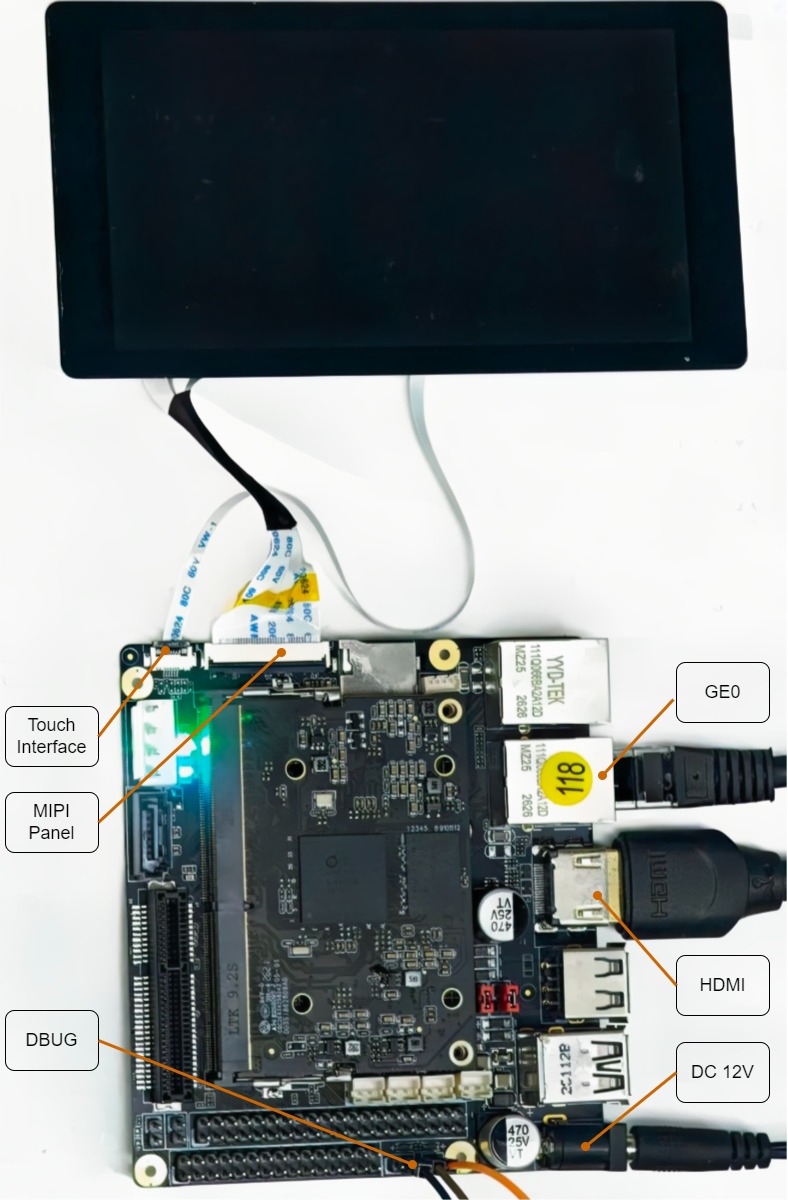
3.1 Hardware Environment
- SSM004A-S02A-S development board
- Power supply, network cable, serial cable
- Mouse
- HDMI cable and 4K display
- MIPI PANEL
┌────────────┐                    ┌────────────────┐                   ┌──────────┐
│ Display A  │◄──────────────────►│ Development    │◄─────────────────►│ Display B│
└────────────┘    HDMI direct     │   Board/EVB    │   MIPI PANEL  └──────────┘
└────────────────┘
│
│ Serial/Network
|
▼
┌─────────┐
│    PC   │
└─────────┘
See the diagram below for the specific connections.
3.2 DTS Configuration
No special requirements
3.3 Configuration File Description
The configuration file `config_nvr.json` mainly contains parameter settings for 3 modules: disp, fb, and vdec.
3.3.1 DISP Parameters
| Parameter | Description |
|---|---|
dispDevNum |
Number of disp devices, maximum is 2 |
dispArgs_0 |
Parameter configuration for disp0 |
dispArgs_1 |
Parameter configuration for disp1 |
dispArgs_x Parameter Description:
| Parameter | Description |
|---|---|
intfType |
Video output interface, supports hdmi, vga, mipi, ttl, bt1120. For dual-screen homologous display, supports hdmi&vga, hdmi&ttl, hdmi&bt1120,On the D3 development board, only the heterogeneous hdmi&mipi combination is supported. |
timing |
Supported timing, 720P_50, 720P_60, 1080P_50, 1080P_60, 1600x1200_60, 1440x900_60, 1280x1024_60, 1024x768_60, 1280x800_60, 1366x768_60, 2560x1440_30, 2560x1600_60, 3840x2160_30 |
chnNum |
Number of screens, disp0: 1~64, disp1: 1~32 |
rotate |
Rotation angle, 0: 0°, 1: 90°, 2: 180°, 3: 270°, 4: NO ROTAT |
3.3.2 FB Parameters
| Parameter | Description |
|---|---|
fbUiMix |
fb dual-layer UI blending test, 1: enable, 0: disable |
fbDevNum |
Number of fb devices, maximum is 2 |
fbArgs_0 |
Parameter configuration for fb0 |
fbArgs_1 |
Parameter configuration for fb1 |
fbArgs_x Parameter Description:
| Parameter | Description |
|---|---|
alphaType |
Alpha value type, 0: global; 1: pixel |
mouseIconFilePath |
Mouse icon file path, e.g.: ./cursor-arrow.dat |
mousePicWidth |
Width of mouse icon file |
mousePicHeight |
Height of mouse icon file |
gfxFilePath |
UI file path, argb1555 format |
gfxPicWidth |
Width of UI file, argb1555 format |
gfxPicHeight |
Height of UI file, argb1555 format |
gfxRotateType |
UI file rotation angle, 0: 0°, 1: 90°, 2: 180°, 3: 270° |
3.3.3 VDEC Parameters
| Parameter | Description |
|---|---|
vdecDevNum |
Number of vdec devices, maximum is 2. In NVR demo, only vdec0 is enabled, so can only be configured as 1 |
vdecArgs_0 |
Parameter configuration for vdec0 |
vdecArgs_0 Parameter Description:
| Parameter | Description |
|---|---|
chnNum |
Number of channels, 1~64 |
compressEn |
Whether to compress, 0: no compression, 1: LSYC0; LSYC 50% compression rate is lossy compression. Usage restrictions: 1. When compression is enabled, the downstream can only connect to disp, and disp supports LSYD. 2. When port0 enables LSYC function, port1/port2 must disable LSYC function; when port0 disables LSYC function, port1/port2 can each enable or disable LSYC function. 3. LSYC function does not support H265 streams using multi-Tile division (tiles_enabled_flag in PPS syntax is 1). If such streams are decoded, LSYC function will be forcibly disabled |
vdecAttr |
vdec chn parameter configuration |
vdecAttr Parameter Description:
| Parameter | Description |
|---|---|
chnId |
Channel id |
picWidth |
Stream width (can be left blank, program will obtain by parsing stream SPS information) |
picHeight |
Stream height (can be left blank, program will obtain by parsing stream SPS information) |
codecType |
Stream type, 0: h264, 1: h265 |
refFrameNum |
Maximum number of reference frames, takes effect when greater than 2 (can be left blank, program will obtain by parsing stream SPS information) |
esAddHead |
Whether to add header to stream, 0: no header, 1: add header |
filePath |
Stream file path |
3.4 Input Files
- Configuration file:
sdk/verify/sample_code/demo/nvr/nvr/config_nvr.json - Resource files located in
sdk/verify/sample_code/demo/nvr/nvr/resourcedirectory:- UI image:
1920x1080_argb1555.bin - Mouse icon:
cursor_argb1555.bin - Stream file:
720x576@30.h265
- UI image:
4. Running Instructions
4.1 Program Deployment
    1. Copy the compiled executable file `sgs_demo_nvr` to the board or NFS/CIFS mount directory, and modify permissions to 777.

    2. Copy the configuration file `config_nvr.json` and resource files (UI image, mouse icon, stream files) to the same directory as `sgs_demo_nvr`, as follows:

    sgs_demo_nvr                # nvr demo executable file
    config_nvr.json             # Configuration file
    720x576@30.h265             # Stream file used in configuration file
    1920x1080_argb1555.bin      # UI image used in configuration file
    cursor_argb1555.bin         # Mouse icon used in configuration file
4.2 Running Demo
./sgs_demo_nvr config_nvr.json
4.3 Test Case Operations
After the program runs, it will display a list of test cases. Enter different case test commands to run different cases, and follow the terminal prompts for input.
Command line waiting for input example:
[-------Test case list------]
|-> 0: exit
|-> 1: splite windows manually
|-> 2: splite windows automatically
|-> 3: change timing manually
|-> 4: change timing automatically
|-> 5: PIP
|-> 6: zoom
|-> 7: capture pic
|-> 8: pause
|-> 9: vdisp case
|->10: get vdec state
|->11: set CSC
|->12: show mouse
|->13: set send frame time interval(ms),default is 10ms
|->14: set fb alpha, default is 0x77
|->15: copy argb and rotate by gfx
|->16: copy yuv and rotate by gfx
|->17: draw argb to framebuffer directly
|->18: scl stretch test
|->19: resvered
|->20: gfx fill
|->21: ui scaling up 1080P to 4K
|->22: Homologous–heterologous switching
|->23: wbc
|->24: eptz
|->25: set colorkey
|->26: dual layer UI blending
Please input number:
4.3.1 Test Cases
| Case ID | Test Target | Operation Steps | Execute Command | Expected Result |
|---|---|---|---|---|
| NVR-01 | Multi-channel video decoding and display | 1. Start program 2. Wait for video auto-play 3. Verify screen layout |
Program auto-plays after startup | Multiple videos decode and display simultaneously, layout automatically allocated according to chnNum parameter in config file, display normal without artifacts |
| NVR-02 | Manual screen switching | 1. Enter 1 after program startup2. Enter screen switching mode according to prompt 3. Verify screen switch |
Enter 1 then follow prompts |
Screen switches according to user input mode, all screens display normally |
| NVR-03 | Automatic screen switching | 1. Enter 2 after program startup2. Wait for automatic switching 3. Verify switching effect |
Enter 2 |
Automatically switches screen layout randomly every 5 seconds, switching process is smooth without flicker |
| NVR-04 | Manual resolution switching | 1. Enter 3 after program startup2. Select resolution according to prompt 3. Verify display effect |
Enter 3 then select resolution |
HDMI output resolution switches to selected value, screen displays normally |
| NVR-05 | Automatic resolution switching | 1. Enter 4 after program startup2. Wait for automatic switching 3. Verify display effect |
Enter 4 |
Automatically switches resolution randomly every 5 seconds, switching process is normal |
| NVR-06 | PIP function | 1. Enter 5 after program startup2. Verify PIP display effect |
Enter 5 |
Full-screen PIP display effect, data flow: vdec_0_0_0->scl_1_0_0->disp_0_64_0 |
| NVR-07 | ZOOM function | 1. Enter 6 after program startup2. Select zoom parameters according to prompt 3. Verify zoom effect |
Enter 6 then follow prompts |
Screen scales according to specified ratio, can view screen details |
| NVR-08 | Capture function | 1. Enter 7 after program startup2. Select channel according to prompt 3. Verify capture file |
Enter 7 then follow prompts |
Generate capture file (JPEG format), capture content matches current display |
| NVR-09 | Static frame function | 1. Enter 8 after program startup2. Select channel to pause 3. Verify pause effect |
Enter 8 then select channel |
Specified channel screen stops updating, other channels continue normal playback |
| NVR-10 | Get VDEC status | 1. Enter 10 after program startup2. View status information |
Enter 10 |
Terminal outputs status information of all VDEC channels |
| NVR-11 | Set CSC parameters | 1. Enter 11 after program startup2. Adjust parameters according to prompt 3. Verify screen changes |
Enter 11 then adjust parameters |
HDMI output screen color changes in real-time (contrast, brightness, hue, saturation, etc.) |
| NVR-12 | Mouse display and movement | 1. Enter 12 after program startup2. Move mouse 3. Verify mouse display |
Enter 12 |
Screen displays mouse icon, icon follows mouse movement |
| NVR-13 | Set frame sending interval | 1. Enter 13 after program startup2. Enter interval time 3. Verify effect |
Enter 13 then enter interval value |
VDEC frame sending interval adjusts according to set value |
| NVR-14 | Set Alpha value | 1. Enter 14 after program startup2. Enter Alpha value 3. Verify transparency effect |
Enter 14 then enter Alpha value (0~ff) |
UI layer transparency changes according to set value |
| NVR-15 | GFX scaling and rotation | 1. Enter 15 after program startup2. Verify GFX operation effect |
Enter 15 |
UI file displayed to framebuffer after GFX scaling, rotation, mirror, and alpha blending |
| NVR-16 | YUV rotation and save | 1. Enter 16 after program startup2. Verify saved file |
Enter 16 |
YUV420SP data saved to file after GFX rotation |
| NVR-17 | Direct ARGB drawing | 1. Enter 17 after program startup2. Verify display effect |
Enter 17 |
UI file directly read to framebuffer for display |
| NVR-18 | SCL stretch test | 1. Enter 18 after program startup2. Verify stretch effect |
Enter 18 |
Screen displays normally after SCL stretching |
| NVR-20 | GFX fill | 1. Enter 20 after program startup2. Verify fill effect |
Enter 20 |
GFX performs quickfill to framebuffer, including drawrect and colorkey settings |
| NVR-21 | FB scaling function | 1. First set resolution to 3840x2160 via case 3 2. Modify fb_timing_width and fb_timing_height 3. Execute case 21 |
Enter 21 |
1920x1080 screen scaled up to 4K display |
| NVR-22 | Homologous/Heterologous switching | 1. Prepare two displays 2. Enter 22 after program startup3. Select switching mode |
Enter 22 then select mode |
Homologous mode: two screens display same content; Heterologous mode: two screens display different content |
| NVR-23 | Zero-channel encoding | 1. Enter 23 after program startup2. Verify encoded file |
Enter 23 |
WBC data saved to file after VENC encoding |
| NVR-24 | EPTZ function | 1. Enter 24 after program startup2. Verify EPTZ display |
Enter 24 |
1 panoramic channel + 5 EPTZ channels display simultaneously |
| NVR-25 | Set ColorKey | 1. Enter 25 after program startup2. Enter ColorKey value 3. Verify effect |
Enter 25 then enter value |
Color key control performed according to set ColorKey value |
| NVR-26 | Dual-layer UI blending | 1. Modify board-side config.json 2. Set fbUiMix to 1 3. Enter 26 after program startup |
Enter 26 |
Two UI layers overlay display, supports alpha blending |
5. Runtime Results
5.1 Normal Running Status
After the program starts, it will display the test case list in the terminal and wait for user input. At the same time, the configured video screens will be displayed on the screen.
5.2 Functional Scenario Results
5.2.1 Multi-channel Video Decoding and Display
- Multiple videos are decoded simultaneously and displayed on the screen
- Screen layout is automatically allocated according to the
chnNumparameter in the configuration file
5.2.2 Screen Switching Function
- Manual screen switching (case 1): Switch screen layout according to user input
- Automatic screen switching (case 2): Automatically switch screen layout randomly every 5 seconds
5.2.3 Resolution Switching Function
- Manual switching (case 3): User selects resolution for switching
- Automatic switching (case 4): Automatically switch resolution randomly every 5 seconds
5.2.4 PIP Function (case 5)
- Full-screen PIP display effect
- Data flow: vdec_0_0_0->scl_1_0_0->disp_0_64_0
5.2.5 ZOOM Function (case 6)
- Supports screen scaling display
- Can zoom in to view screen details
5.2.6 Capture Function (case 7)
- Supports real-time capture and saving
- Optional scaling processing
5.2.7 EPTZ Function (case 24)
- 1 panoramic channel + 5 EPTZ channels displayed simultaneously
- Supports electronic PTZ control
5.3 Common Issues
5.3.1 Compression Function Notes
- When compression is enabled, the downstream can only connect to
disp, anddispsupports LSYD - When port0 enables LSYC function, port1/port2 must disable LSYC function
- When port0 disables LSYC function, port1/port2 can each enable or disable LSYC function
- LSYC function does not support H265 streams using multi-Tile division (tiles_enabled_flag in PPS syntax is 1). If such streams are decoded, LSYC function will be forcibly disabled
5.3.2 Special Case Notes
FB Scaling Function (case 21):
- Ensure resolution is 3840x2160, can be set through case 3
- Modify fb_timing_width and fb_timing_height to 3840 and 2160
- u16Xpos and u16Ypos must be (0,0)
Homologous/Heterologous Switching (case 22):
- Need to prepare two screens, supports hdmi&vga/hdmi&ttl/hdmi&mipi/hdmi&bt1120 switching test
- If using bt1120, need to prepare bt1120 to hdmi adapter board
- Execute adapter board driver program:
./LT8618SX_BT1120_to_HDMI_Reg_setting_U2_U3_20210127 1 12 - Ensure current resolution and frame rate are 4K30
- On the D3 development board, only the heterogeneous hdmi&mipi combination is supported.
Dual-layer UI Blending (case 26):
- Need to modify
mi_fbcontent in board-side/misc/config.jsonfile to specific configuration, restart after modification - Use command
ls /dev/fb*to check iffb2device node exists - Need to set
fbUiMixvalue in program running configuration fileconfig_nvr.jsonto1