GFX Demo User Guide
1. Feature Overview
1.1 Program Overview
This example demonstrates how to use the GFX (Graphic Engine) module for graphics processing and display graphics on screen through Framebuffer. The demo supports TTL, MIPI, and HDMI display interfaces with automatic adaptation to different resolution display areas.
1.2 Key Features
- Multi-Display Interface Support: Compatible with TTL, MIPI, and HDMI display interfaces, automatic detection and display area adjustment
- Double Buffer Support: Supports single and double buffer modes, double buffer mode prevents screen tearing
- Hardware Acceleration: Utilizes GFX hardware acceleration for graphics drawing with superior performance
- Rotation Demo: Supports 0°, 90°, 180°, 270° rotation, demonstrating hardware rotation capability
- Pattern Drawing: Uses gradient color line drawing to demonstrate MI_GFX_DrawLine API
- DISP Integration: DISP module continuously outputs YUV420 data as background
- Display Area Auto-Adaptation:
- HDMI (1920×1080): Uses ¼ screen (480×540) to reduce GFX hardware load
- MIPI/TTL (small resolution): Uses ½ screen for optimal display
1.3 Demo Scenarios
| Scenario | Command Index | Function Description | Input File |
|---|---|---|---|
| Scenario 1 | 0 | GFX rotation function demo | 480x800.rgb (BGRA8888) |
| Scenario 2 | 1 | GFX pattern drawing demo | None (program generates gradient pattern) |
2. Build Environment
2.1 Build Environment Setup
Set up the arm64 compilation environment in the project root directory:
export PATH=/tools/toolchain/aarch64-unknown-linux-gcc-12.4.0-glibc-2.37-gnu/bin:$PATH
export CROSS_COMPILE=aarch64-unknown-linux-gnu-12.4.0-
export ARCH=arm64
cd project
make linux-comake_mhera.emmc.glibc-12.4.0-arm64-ext4.d3.4096.fccsp16_lpddr4x_defconfig
If using 2GB DDR, the defconfig can use linux-comake_mhera.emmc.glibc-12.4.0-arm64-ext4.d3.2048.fccsp16_lpddr4x_defconfig
2.2 Build Commands
# Compile entire project
cd project
make clean;make image -j16

# Compile GFX demo
cd sdk/verify/sample_code
make source/<chip>/gfx/gfx_demo
2.3 Build Artifacts
sgs_demo_gfxexecutable is located in thesample_code/out/arm64/appdirectory
3. Runtime Environment
3.1 Hardware Requirements
- Display screen connected (TTL, MIPI, or HDMI)
- Framebuffer driver loaded
- For HDMI, ensure hardware supports 1080P@60Hz output
Note! Comake PI D3 does not support TTL
See the diagram below for the specific connections.
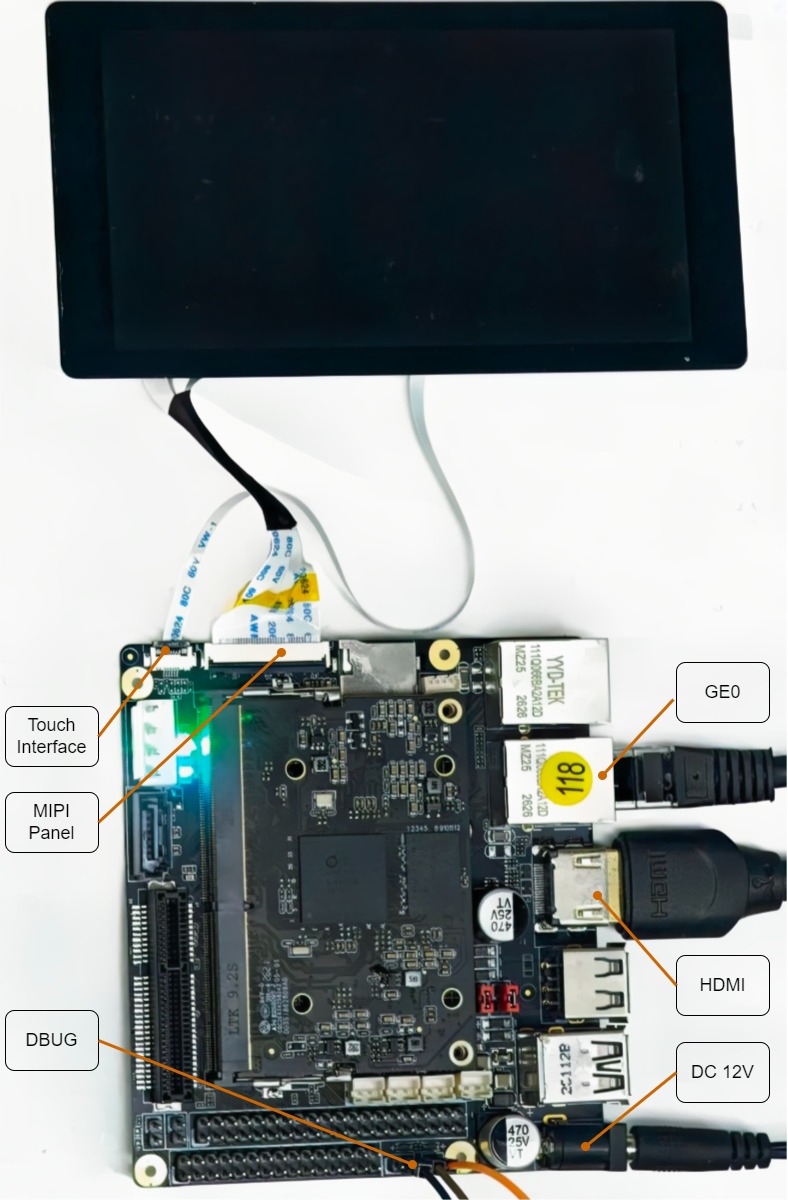
Note: When connecting the PANEL and MIPI cable to the board, the metal surface faces upward and the blue side faces downward.
3.2 Software Requirements
- Framebuffer device
/dev/fb0exists - DISP module driver loaded
- GFX module driver loaded
- Framebuffer memory sufficient to support double buffering (if using double buffer mode)
Double Buffer Memory Requirements:
- Single buffer:
xres_virtual * yres * bytes_per_pixel -
Double buffer:
xres_virtual * yres * 2 * bytes_per_pixelIf
Vinfo.yres_virtual / Vinfo.yres < 2, the double buffer refresh thread will report an error.
3.3 Network Environment
This demo does not require network environment.
3.4 Resource Files
Resource files are required during runtime and need to be placed in the following directory structure:
sgs_demo_gfx            # On-board executable file
resource                # Common root directory for resource files
    input/           # Input file directory
        ├── 480x800.rgb         # 480x800 BGRA8888 format image
        └── YUV420SP_320_240.yuv # 320x240 NV12 format image (DISP background)
Resource File Description:
480x800.rgb: 480×800 resolution BGRA8888 format image for rotation demoYUV420SP_320_240.yuv: 320×240 resolution NV12 format image for DISP background display
Note: Ensure all resource files are complete and in correct format, otherwise read failure or display abnormalities may occur.
3.5 Screen Parameter Configuration
Modify the disp_path parameter in the corresponding board model configuration file (e.g., project/board/<chip>/<board_model>/config/config_fb.json) to match the screen parameter configuration in use
4. Running Instructions
4.1 Program Deployment
Copy the generated executable file sgs_demo_gfx to the board or NFS/CIFS mount directory, and modify permissions to 777.
Copy resource files to the same directory as sgs_demo_gfx, as follows:
sgs_demo_gfx                # gfx demo executable file
resource                    # Resource file directory
    input/                  # Input file directory
        ├── 480x800.rgb         # 480x800 BGRA8888 format image
        └── YUV420SP_320_240.yuv # 320x240 NV12 format image (DISP background)
4.2 Running Demo
4.3 Command Line Parameter Description
| Parameter | Description | Value Range |
|---|---|---|
| cmd_index | Demo scenario selection | 0=rotation demo, 1=pattern drawing |
| disp_type | Display screen type | 0=TTL, 1=MIPI, 2=HDMI |
| buffer_mode | Framebuffer mode | 0=single buffer, 1=double buffer |
Detailed Parameter Description:
-
cmd_index:
- 0: Execute GFX rotation function demo. Read 480x800.rgb file, perform 0°, 90°, 180°, 270° rotation display sequentially
- 1: Execute GFX pattern drawing demo. Draw green-blue-red gradient pattern
-
disp_type: Select based on actual connected screen type
- 0: TTL parallel interface screen (small resolution, e.g., 480×800)
- 1: MIPI DSI serial interface screen (small resolution, e.g., 480×800 or 720×1280)
- 2: HDMI interface (** 1920×1080@60Hz**, large resolution)
-
buffer_mode:
- 0: Single buffer mode, draw directly in display buffer
- 1: Double buffer mode, draw in back buffer then switch display (recommended)
5. Runtime Results Description
5.1 Normal Running Status
After the program starts, it will display initialization information in the terminal, including Framebuffer information, DISP initialization information, display interface type and configuration information. At the same time, corresponding graphics content will be displayed on the screen.
5.2 Functional Scenario Results
5.2.1 Scenario 1: GFX Rotation Function Demo
Running Command:
Normal Running Behavior:
- Console outputs Framebuffer information
- Console outputs DISP initialization information
- Console outputs display interface type and configuration information
- Screen displays 480x800 image
- Image rotates every 2 seconds (0° -> 90° -> 180° -> 270° -> 0°...)
Display Effect:
- HDMI mode: Image displays in top-left ¼ area (480×540), maintaining aspect ratio adaptation
- MIPI/TTL mode: Image displays centered on left half of screen (½ screen)
- Display position adjusts automatically during rotation to maintain centering
- Supports scaling to adapt to screen size
HDMI Mode (1920×1080) Output Example:
[Display Interface] HDMI mode (1080P@60Hz standard timing)
[Display Configuration] Interface=2 (TTL=0, MIPI=1, HDMI=2), SyncMode=16 (USER=0, 1080P60=16)
Framebuffer info:
...
[Rotate] Display mode: HDMI (high resolution detected)
[Rotate] Target area: 1/4 screen (480x540) to reduce GFX hardware load
[Rotate] Framebuffer resolution: 1920x1080, Virtual: 1920x4320
[Rotate] Source image: 480x800 BGRA8888, Target crop area: 480x540
[Rotate] Successfully loaded RGB file: resource/input/480x800.rgb (480x800, stride=1920)
[Rotate] Attempting rotation 0: src(480x800) -> dst(1920x1080), dstRect(0,135,480x540)
...
DISP init success
GFX init success
Rotation demo started, press Ctrl+C to quit
Displaying rotation 0 degrees...
Displaying rotation 90 degrees...
Displaying rotation 180 degrees...
Displaying rotation 270 degrees...
...
5.2.2 Scenario 2: GFX Pattern Drawing Demo
Running Command:
Normal Running Behavior:
- Console outputs Framebuffer information
- Console outputs DISP initialization information
- Console outputs display interface type and configuration information
- Screen displays green-blue-red gradient pattern
- Pattern draws column by column from left to right
Display Effect:
- Upper half of screen shows green to blue gradient
- Lower half of screen shows blue to red gradient
- After drawing completes, screen clears and drawing restarts
Framebuffer Information Output Example:
Fixed screen info:
        id: FB0
        smem_start: 0x597b8000
        smem_len: 33177600
        ...
Variable screen info:
        xres: 1920
        yres: 1080
        xres_virtual: 1920
        yres_virtual: 4320
        yoffset: 1080
        bits_per_pixel: 32
        ...
MIPI Mode (720×1280) Output Example:
[Display Interface] MIPI mode (user-defined timing)
[Display Configuration] Interface=1 (TTL=0, MIPI=1, HDMI=2), SyncMode=0 (USER=0, 1080P60=16)
Framebuffer info:
...
[Rotate] Display mode: MIPI/TTL (standard resolution)
[Rotate] Target area: 1/2 screen (360x1280) for optimal display
...
5.3 Common Issues
5.3.1 Failed to Open Framebuffer
Error Message: Error: cannot open framebuffer device
Possible Causes:
- Framebuffer driver not loaded
- /dev/fb0 device does not exist
Solutions:
- Check if kernel configuration enables Framebuffer
- Check if screen parameter configuration is correct
5.3.2 Double Buffer Unavailable
Error Message: double buffer cannot be used because of insufficient memory!!
Possible Causes:
- Insufficient Framebuffer memory
- Incorrect
yres_virtualconfiguration
Solutions:
- Run with single buffer mode
- Check Framebuffer size settings in screen parameter configuration
Notes: Double buffer mode requires at least 2x Framebuffer memory of single buffer. If yres_virtual < yres * 2, the double buffer refresh thread will report an error.
5.3.3 Failed to Read Resource File
Error Message: read ./resource/input/480x800.rgb fail
Possible Causes:
- Resource file does not exist
- Incorrect path
- Insufficient file permissions
Solutions:
- Ensure resource directory structure is correct
- Check file permissions
- Use
chmodcommand to modify file permissions
Notes:
- Resource files must be in
./resource/input/under running directory - 480x800.rgb must be BGRA8888 format
- YUV420SP_320_240.yuv must be NV12 format
5.3.4 MI_GFX_DrawLine Failed
Error Message: MI_GFX_DrawLine fail!
Possible Causes:
- GFX device not properly initialized
- Memory allocation failed
- Incorrect parameter settings
Solutions:
- Check MI_SYS and MI_GFX initialization return values
- Confirm sufficient memory resources
- Verify parameter settings
5.3.5 Rotation Display Abnormal
Possible Causes:
- Incorrect target rectangle calculation
- Incorrect clip rectangle settings
- Coordinates out of bounds
Solutions:
- Check display area calculation logic
- Confirm clip rectangle is within target area
- Verify coordinate values
5.3.6 Screen Parameter Configuration Notes
- Before running, must configure correct screen parameters in the corresponding board model configuration file
- Ensure
disp_pathparameter matches actual screen type used - Select correct disp_type parameter based on actual connected screen type (0=TTL, 1=MIPI, 2=HDMI)
- HDMI output requires hardware support for 1080P@60Hz
- Display area automatically adapts for different interfaces, no manual code adjustment needed
5.3.7 Performance Notes
- Double buffer mode can avoid screen tearing
- Rotation operations use hardware acceleration with high performance
- Pattern drawing uses column-by-column drawing with slower speed
- HDMI mode uses smaller display area to reduce GFX hardware load
- Rotation is implemented via GFX hardware acceleration; HDMI mode may have slight performance impact during 90°/270° rotation (optimized by reducing display area)
5.3.8 GFX and DISP Synchronization Notes
- DISP input port continuously receives YUV data for background display
- GFX drawn content overlays on GOP layer above DISP video layer
5.3.9 Program Exit
Press Ctrl+C key to exit the demo. The program will:
- Set draw thread exit flag
- Wait for draw thread to finish
- Wait for refresh thread to finish (double buffer mode)
- Deinitialize DISP module
- Close GFX device
- Exit system