WeSpeaker
1 Overview
1.1 Background Introduction
The open-source voiceprint recognition algorithm is sourced from the Wespeaker released by the Wenet community, featuring high quality, lightweight design, and product-oriented characteristics. For more details, please refer to the official Wespeaker link:
https://github.com/wenet-e2e/wespeaker
The model we are using is based on the CNCeleb trained ResNet34 Checkpoint Model, and the download address is:
https://huggingface.co/Wespeaker/wespeaker-cnceleb-resnet34/tree/main
1.2 Usage Instructions
The Linux SDK-alkaid comes with pre-converted offline models and board-side examples by default. The relevant file paths are as follows:
-
Board-side example program path
Linux_SDK/sdk/verify/opendla/source/speaker -
Board-side offline model path
Linux_SDK/project/board/${chip}/dla_file/ipu_open_models/asr/speaker_sim.img -
Board-side test audio path
Linux_SDK/sdk/verify/opendla/source/resource/gallery/examples_BAC009S0913W0133.wav
Linux_SDK/sdk/verify/opendla/source/resource/query/examples_BAC009S0764W0228.wav
Linux_SDK/sdk/verify/opendla/source/resource/query/examples_BAC009S0764W0328.wav
Linux_SDK/sdk/verify/opendla/source/resource/query/examples_BAC009S0913W0133.wav
Linux_SDK/sdk/verify/opendla/source/resource/query/examples_BAC009S0913W0282.wav
Linux_SDK/sdk/verify/opendla/source/resource/query/spk_0.wav
Linux_SDK/sdk/verify/opendla/source/resource/query/spk_1.wav
Linux_SDK/sdk/verify/opendla/source/resource/query/spk_2.wav
If the user does not need to convert the model, they can directly skip to section 3.
2 Model Conversion
2.1 onnx Model Conversion
-
Setting up the Python environment
$conda create -n wespeaker python=3.10
$conda activate wespeaker
$git clone https://github.com/wenet-e2e/wespeaker.git
$conda install pytorch=1.12.1 torchaudio=0.12.1 cudatoolkit=11.3 -c pytorch -c conda-forge
$cd wespeaker
$pip install -r requirements.txt -i https://pypi.tuna.tsinghua.edu.cn/simple
$pre-commit install  # for clean and tidy code
Note: The Python environment setup provided here is only for reference; please refer to the official source code running tutorial for specific setup processes:
https://github.com/wenet-e2e/wespeaker/blob/master/README.md -
Model testing
-
Write the model testing script
predict.pyimport wespeaker model = wespeaker.load_model('chinese') embedding = model.extract_embedding('audio.wav') utt_names, embeddings = model.extract_embedding_list('wav.scp') similarity = model.compute_similarity('audio1.wav', 'audio2.wav') diar_result = model.diarize('audio.wav') -
Run the model testing script to ensure the wespeaker environment is configured correctly.
$python predict.py
-
-
Model export
- Run the model conversion script, which will generate the
speaker_sim.onnxmodel in the current directorypython wespeaker/bin/export_onnx.py \\ --config model_cnresnet34/config.yaml \\ --checkpoint model_cnresnet34/avg_model.pt \\ --output_model model_cnresnet34/speaker_sim.onnx
- Run the model conversion script, which will generate the
2.2 Offline Model Conversion
2.2.1 Pre & Post Processing Instructions
-
Preprocessing
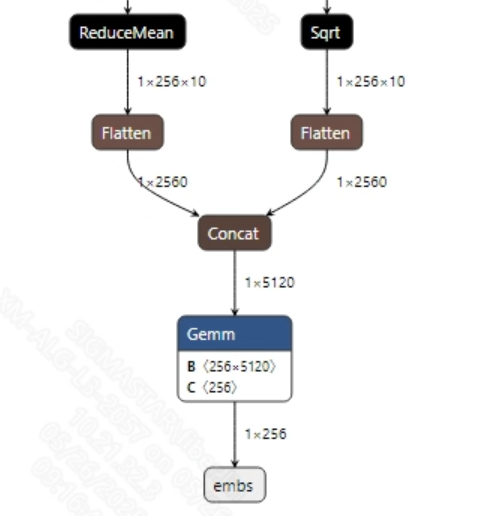
Before inputting speech into the model, the audio WAV needs to be converted into fbank. The input information for the successfully converted
speaker_sim.onnxmodel is shown in the image below, with the required fbank length of (1, 200, 80). Here, 200 is the time series length, and 80 is the number of channels.

-
Postprocessing
The voiceprint recognition model has no postprocessing operations; after extracting audio features, the main purpose is to compare the similarity between different audio inputs. The output information for the model is shown below:
2.2.2 Offline Model Conversion Process
Note: 1) OpenDLAModel corresponds to the smodel files extracted from the compressed package image-dev_model_convert.tar. 2) The conversion command needs to be run in the Docker environment; please load the SGS Docker environment according to the Docker development environment tutorial first.
-
Copy the ONNX model to the conversion code directory
$cp model_cnresnet34/speaker_sim.onnx OpenDLAModel/speaker/resnet/onnx -
Conversion command
$cd IPU_SDK_Release/docker $bash run_docker.sh # Enter the OpenDLAModel directory in the docker environment $cd /work/SGS_XXX/OpenDLAModel $bash convert.sh -a speaker/resnet -c config/speaker_resnet.cfg -p SGS_IPU_Toolchain (absolute path) -s false -
Final generated model addresses
output/${chip}_${time}/speaker_sim.img
output/${chip}_${time}/speaker_sim_fixed.sim
output/${chip}_${time}/speaker_sim_float.sim
2.2.3 Key Script Parameter Analysis
-   input_config.ini
        [INPUT_CONFIG]
        inputs=feats;                       # ONNX input node name, separate with commas if there are multiple;
        input_formats=RAWDATA_F32_NHWC;     # Board input format, can choose based on the ONNX input format, e.g., float: RAWDATA_F32_NHWC, int32: RAWDATA_S16_NHWC;
        quantizations=TRUE;                 # Enable input quantization, no need to change;
        [OUTPUT_CONFIG]
        outputs=embs;                       # ONNX output node name, separate with commas if there are multiple;
        dequantizations=FALSE;              # Whether to enable dequantization, fill according to actual needs, recommended to be TRUE. Set to False, output will be int16; set to True, output will be float32;
        [CONV_CONFIG]
        #input_format="ALL_INT16";
-   speaker_resnet.cfg
        [SPEAKER]
        CHIP_LIST=pcupid                    # Platform name, must match board platform, otherwise the model will not run
        Model_LIST=speaker_sim              # Input ONNX model name
        INPUT_SIZE_LIST=0                   # Model input resolution
        INPUT_INI_LIST=input_config.ini     # Configuration file
        CLASS_NUM_LIST=0                    # Just fill in 0
        SAVE_NAME_LIST=speaker_sim.img      # Output model name
        QUANT_DATA_PATH=image_lists         # Quantization data path
2.3 Model Simulation
- Get float/fixed/offline model output
$bash convert.sh -a speaker/resnet -c config/speaker_resnet.cfg -p SGS_IPU_Toolchain (absolute path) -s true
After executing the above command, the tensor output of the
floatmodel will be saved by default to a txt file in thespeaker/resnet/log/outputpath. Additionally, thespeaker/resnet/convert.shscript also provides simulation examples forfixedandoffline; users can uncomment the code blocks to obtainfixedandofflinemodel outputs during runtime. - Model Accuracy Comparison
Under the condition that the input is the same as the above model, enter the environment built in section 2.1. In the
wespeaker/predict.pyfile, add a print statement after line 5: print(embedding) This will allow you to obtain the output tensor corresponding to the Pytorch model node, and compare it with the float, fixed, and offline models. Additionally, it is important to note that the output format of the original model isNCHW, while the output formats of the float/fixed/offline models areNHWC.
3 Board-Side Deployment
3.1 Program Compilation
Before compiling the example program, you need to first select the deconfig for SDK full-package compilation based on the board (nand/nor/emmc, DDR model, etc.), which can be referenced in the alkaid SDK sigdoc document titled "Development Environment Setup."
- Compile the board-side speaker example. $cd sdk/verify/opendla $make clean && make source/speaker -j8
- Final generated executable file address sdk/verify/opendla/out/${AARCH}/app/prog_speaker
3.2 Running Files
When running the program, the following files need to be copied to the board: - prog_speaker - gallery/.wav - query/.wav - speaker_sim.img
3.3 Running Instructions
- Usage:
./prog_speaker gallery/ query/ model(execution file usage command) -
Required Input:
- gallery: candidate audio file folder
- query: query audio file folder
- model: offline model path
-
Typical Output:
./prog_speaker gallery/ query/ models/speaker_sim.img

    client [815] connected, module:ipu
    gallery index: 0
    query match
    scores: 0.560817
    query match scores: 0.571763
    query match scores: 0.576536
    query match scores: 0.954973
    query match scores: 0.821015
    query match scores: 0.555230
    query match scores: 0.579051
    query match scores: 0.570105
    ------shutdown IPU0------
    client [815] disconnected, module:ipu