3. Model Inference
1. Simulator PC Simulation
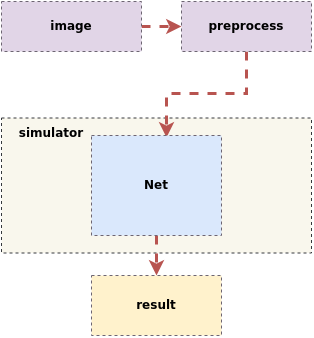
The inference process for the SGS floating point network model is as follows:
Input an image ——> First undergo preprocessing operations such as resizing and normalization
               ——> Send to the predefined Net in the tool for inference
                   ——> Obtain the final result
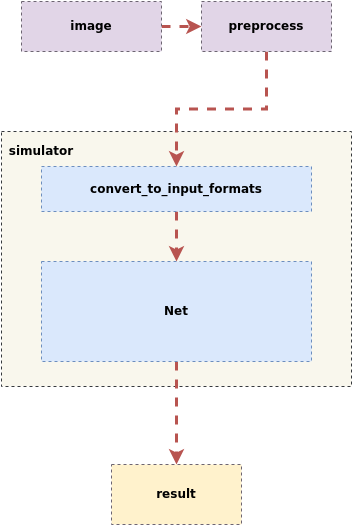
The inference process for the SGS fixed point network model and the edge offline model is as follows:
Input an image ——> First undergo preprocessing to resize
                ——> Send to the predefined Net in the tool for inference, where the Simulator will first perform convert_to_input_formats operations,
                   ——> Then send it to the model for inference
                       ——> Obtain the final result
1.1 Example of Using the Simulator Tool
Navigate to the tool directory, usage example of the tool:
(1) Test dataset:
python3 SGS_IPU_Toolchain/Scripts/calibrator/simulator.py \
-i ~/SGS_Models/resource/classify/ilsvrc2012_val_set100/ \
-m ~/SGS_Models/tensorflow/mobilenet_v2/mobilenet_v2_float.sim \
-c Classification \
-n mobilenet_v2.py \
--num_process 20 \
--soc_version CHIP
Or you can use the form of passing in the specified image path list file:
python3 SGS_IPU_Toolchain/Scripts/calibrator/simulator.py \
-i ~/SGS_Models/resource/classify/ilsvrc2012_val_set100/file.list \
-m ~/SGS_Models/tensorflow/mobilenet_v2/mobilenet_v2_float.sim \
-c Classification \
-n mobilenet_v2.py \
--num_process 20 \
--soc_version CHIP
(2) Test a single image, draw the detection results on the image, and save it to the ./results/ folder:
python3 SGS_IPU_Toolchain/Scripts/calibrator/simulator.py \
-i ~/SGS_Models/resource/detection/coco2017_val_set100/000000567877.jpg \
-m ~/SGS_Models/tensorflow/ssd_mobilenet_v1/ssd_mobilenet_v1_float.sim \
-c Detection \
-n ssd_mobilenet_v1.py \
--draw_result ./results \
--soc_version CHIP
-c is configured for Detection, which requires a post-processing model.
Use TFLite_Detection_NMS as the model output.
For details, see Chapter 5 Building Post-Processing Models with sgs_chalk.
1.2 Simulator Tool Usage Parameter Description
(1) Required Parameters
- ①
-i,--image: Path to image file / image folder / specified image path list file.
Usage
- When the
-i/--imageparameter is passed in the form of specified image path list file: Createinput_list.txtwith the following contents:- When the network model has a single input: /path/to/image_test/2007000364.jpg
- When the network model has multiple inputs: /path/to/image_test/2007000364.jpg,/path/to/image_test/ILSVRC2012_test_00000002.bmp
Multiple data sets can be written in the next line, and each line is considered as one input for the model when reading. After completing
input_list.txt, the-iparameter should be: /path/to/input_list.txt
- When the
-i/--imageparameter is the path to a single image, the simulator will only process that image; - When the
-i/--imageparameter is the path to an image folder, the simulator will process all images in the folder. At this time, adding the optional parameter--num_process(parameter > 1) can enable multi-process execution.
-
②
-m,--model: Path to the network model file. -
③
-n,--preprocess: Path to the pre-processing Python file. For details, see Chapter 2 on preprocessing methods.
Usage
- For multi-input models, multiple preprocessing parameters must use multiple preprocessing methods. The number and order of pre-processing must match the number and order of model inputs. For example: -n preprocess1.py,preprocess2.py or --preprocess preprocess1.py,preprocess2.py
- Please use the same image preprocessing method as used during training, and each input preprocessing method must be written in a separate Python file.
- ④
--soc_version: IPU Toolchain chip
Usage
- Execute
python3 SGS_IPU_Toolchain/DumpDebug/show_sdk_info.pyto view the specific chips and version information supported by the IPU Toolchain.
(2) Optional Parameters
- ①
-c,--category: The category of the model, mainly Classification / Detection / Unknown. (Default is Unknown)
Usage
-
Classification: The model has 1 output and will output the top 5 scores sorted from highest to lowest based on the output. -
Detection: The model usesTFLite_Detection_NMSas the model output. For details, see Chapter 5 Building Post-Processing Models with sgs_chalk. Please use Unknown for other post-processing. -
Unknown: Model output does not belong to the above two types and will output all Tensor values.
-
②
--dump_rawdata: Save the model input binary data with the filename being the image name + .bin, stored in the current path. -
③
--num_process: Number of processes, the number of processes running simultaneously. (Default is 1)
Usage
- If this parameter is not added, it defaults to a single process.
- ④
--draw_result: Draw the target detection network's bounding box results.
Usage
-
This parameter is only supported when
-c/--categoryis set to Detection. -
The parameter is the path to save the results (the folder will be created automatically if it does not exist) and the threshold for drawing boxes, separated by a comma (,).
-
Input a threshold to draw detection results greater than the threshold. If no threshold is input, all detection results will be drawn.
-
⑤
--continue_run: Continue running from the remaining part of the last dataset. -
⑥
--skip_garbage: Skip useless data in Fixed and Offline model output results. (Deprecated) -
⑦
-l,--label: Path to the dataset label file / label for image text descriptions. (Deprecated) -
⑧
-t,--type: Type of the model. (Deprecated;simulator.pycan automatically determine the model type based on the passed model) -
⑨
--tool: Path tosgs_simulator. (Deprecated)
2. Remote Inference of Simulator to Development Board
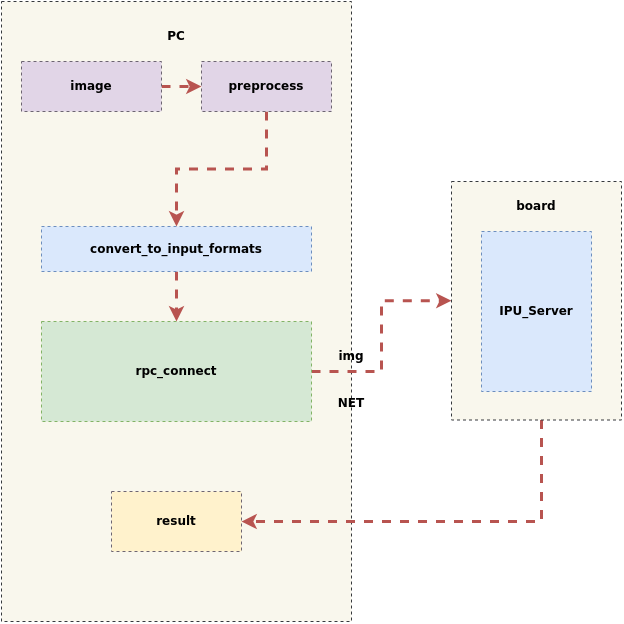
The simulator also provides a remote simulation tool. By enabling the RPC service on the board side, offline model inference results from the board side can be obtained with one click on the PC simulation side. This makes it simple and efficient for users to compare and verify the consistency of offline model inference results on the board side and the PC side, thus enhancing model portability efficiency.
After processing the images on the PC, the RPC service is started, and both the input data and model are sent to the board for inference. After the inference is completed, the results from the board are returned to the PC, as shown in the figure below:
2.1 Introduction to Using Simulator for Remote Inference to Development Board
The Linux SDK-alkaid has provided the app located at sdk/verify/release_feature/source/dla/ipu_server.
The usage process is as follows:
(1) First, run ipu_server on the board to enable the RPC service (PORT is the designated port number)
./prog_dla_ipu_server -p PORT
(2) Next, run simulator.py on the PC
python3 SGS_IPU_Toolchain/Scripts/calibrator/simulator.py \
-i /path/to/input_data \
-m /path/to/offline.img \
-n /path/to/preprocess.py \
--host <board_ip_address> \
--port PORT \
--soc_version CHIP
-i: Inference image
-m: Offline model
-n: Preprocessing file
--host: Board IP address
--port: Designated port number
--soc_version: IPU Toolchain chip
(4) The results are saved in ./log/output. Please compare these with the results of running the offline model via simulator.py.
(5) If the comparison results are inconsistent, please provide the original model to FAE for analysis.
Note
- The process number
--num_processcan only be set to 1 during remote inference to the development board using the simulator.
- Remote inference to the development board requires ensuring network connectivity between the PC and the board; otherwise, the following error may occur:
Network connectivity can be tested using the
RuntimeError: std::future_error: Broken promisencnetwork tool, as follows:
On the board, enter (PORT is the designated port number)On the PC, enternc -l -p PORTThen type characters in the PC terminal. If they appear on the board, connectivity is confirmed; otherwise, please check the network connection between the PC and the board.nc <board_ip_address> PORT
- The default timeout set during remote inference to the development board is 60 seconds. If the following error occurs:
It may be due to a large file size. You can increase the timeout in
TimeoutError: Timeout for ipu_create_modelsimulator.py(unit: seconds), for example:--timeout 100
-
The memory space on the board is limited. If there are issues with running out of memory due to large model files causing network transmission issues, you can take the following actions:
Copy the model file to a path accessible on the board, and set the path insimulator.py:--model_onboard_path <model_path_on_board>When configuring
--model_onboard_path, only the string for the model's path on the board will be transmitted over the network, thereby reducing the memory usage on the board.
3. Overview of Custom Simulator
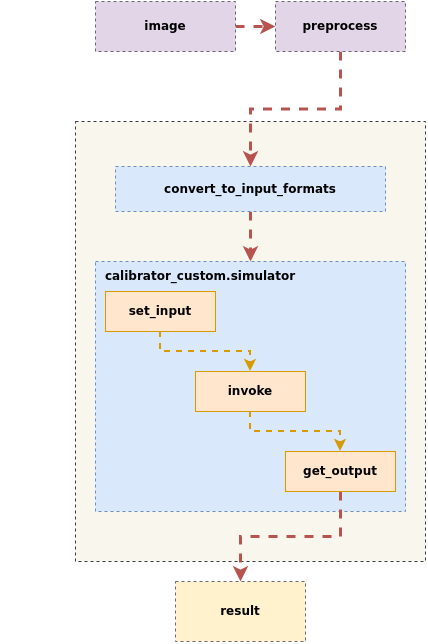
To facilitate more flexible quantization and conversion of multi-input, multi-segment networks, users can also customize the simulator process.
The custom simulator process involves inputting inference images, performing preprocessing, creating an instance of calibrator_custom.simulator, calling set_input to pass input data to the model, invoking invoke for inference, and calling get_output to obtain outputs, as illustrated in the figure below:
3.1 Description and Introduction of calibrator_custom.simulator
- The
calibrator_custom.simulatorinterface can parse models at various stages (float/fixed/offline) to simulate model results on a PC.
import calibrator_custom
calibrator_custom.set_soc_version('CHIP')
model_path = './mobilenet_v2_float.sim'
simulator = calibrator_custom.simulator(model_path)
Usage
calibrator_custom.set_soc_versioncan only be called once to set the chip information for inference.- Execute
python3 SGS_IPU_Toolchain/DumpDebug/show_sdk_info.pyto see the specific chips and version information supported by the IPU Toolchain. - When using
calibrator_custom.simulator, a model path must be provided to create an instance of the simulator. If the parameter is incorrect, the simulator instance cannot be successfully created, and a ValueError will be returned.
- The
calibrator_custom.rpc_simulatorinterface can only parse offline models, connects to the board'sipu_server, and returns results after inference on the board.
import calibrator_custom
calibrator_custom.set_soc_version('CHIP')
model_path = './mobilenet_v2_offline.img'
calibrator_custom.rpc_connect('host', port)
simulator = calibrator_custom.rpc_simulator(model_path)
Usage
calibrator_custom.set_soc_versioncan only be called once to set the chip information for inference.- Execute
python3 SGS_IPU_Toolchain/DumpDebug/show_sdk_info.pyto see the specific chips and version information supported by the IPU Toolchain. - When using
calibrator_custom.simulator, a model path must be provided to create an instance of the simulator. If the parameter is incorrect, the simulator instance cannot be successfully created, and a ValueError will be returned. calibrator_custom.rpc_connectcan only be called once to connect to the board's IP and port.
Below are the methods in calibrator_custom.simulator / calibrator_custom.rpc_simulator
- (1)
get_input_details: Returns the input information of the network model as a list
The returned list contains the following dict information based on the number of model inputs:
index: Input Tensor index
name: Input Tensor name
shape: Input Tensor shape
dtype: Input Tensor data type
input_formats: Image input formats when the network model is actually running
training_input_formats: Image input formats during the training of the network model
For Float models, it returns as follows:
 input_details = model.get_input_details()
 print(input_details)
 [
  {
    'name': 'sub_7',
    'shape': array([  1, 513, 513, 3], dtype=int32),
    'dtype': <class 'numpy.float32'>,
    'index': 0
  }
]
>>> input_details = model.get_input_details()
>>> print(input_details)
[
  {
    'index': 0,
    'shape': array([  1, 513, 513, 3]),
    'dtype': <class 'numpy.uint8'>,
    'name': 'sub_7' ,
    'input_formats': 'RGB',
    'training_input_formats': 'RGB'
  }
]
- (2)
get_output_detail: Returns the output information of the network model as a list
The returned list contains the following dict information based on the number of model inputs:
index: Output Tensor index
name: Output Tensor name
shape: Output Tensor shape
dtype: Output Tensor data type
input_formats: Image output formats when the network model is actually running
training_input_formats: Image output formats during the training of the network model
quantization: Scale and zero_point of the output Tensor (the output Tensor must be multiplied by scale to obtain a floating-point number).
If dequantizations in input_config.ini is set to TRUE, the generated model corresponding output will have an additional Fix2Float operator, and the output data type will be float32, in which case get_output_details will no longer return quantization.
For Float models, it returns as follows:
>>> output_details = model.get_output_details()
>>> print(output_details)
[
  {
    'name': 'MobilenetV2/Conv/Conv2D',
    'shape': array([  1, 257, 257,  30], dtype=int32),
    'dtype': <class 'numpy.float32'>,
    'index': 0
  }
]
② For Fixed and Offline models, it returns as follows:
When dequantizations in input_config.ini is set to FALSE
 >>> output_details = model.get_output_details()
 >>> print(output_details)

[
  {
    'index': 0,
    'shape': array([  1, 257, 257,  30]),
    'name': 'MobilenetV2/Conv/Conv2D',
    'dtype': <class 'numpy.int16'>,
    'quantization': (0.00013832777040079236, 0)
  }
]
When dequantizations in input_config.ini is set to TRUE
 >>> output_details = model.get_output_details()
 >>> print(output_details)
[
  {
    'index': 0,
    'shape': array([  1, 257, 257,  30]),
    'name': 'MobilenetV2/Conv/Conv2D',
    'dtype': <class 'numpy.float32'>,
  }
]
Usage
- When configuring
dequantizationsin the[OUTPUT_CONFIG]section ofinput_config.inito TRUE, a Fix2Float operator will be added during the conversion of Fixed models. This operator converts fixed-point data to floating-point data, and thereforemodel.get_output_details()will no longer contain thequantizationinformation.
- (3)
set_input: Set the input data for the network model
>>> model.set_input(0, img_data)
Usage
0is the index of the input Tensor, which can be obtained from the return value ofget_input_details();img_datais a numpy.ndarray format data that matches the model's input shape and dtype. Incorrect shape or dtype will causeset_inputto return ValueError;- If the model has multiple inputs, you can call
set_inputmultiple times, using the index obtained from the return value ofget_input_details()to set the corresponding Tensor's input data.
- (4)
invoke: Run the model once
>>> model.invoke()
Usage
- Please call
set_inputto set input data before callinginvoke, otherwise the model results may not meet expectations.
- (5)
get_output: Get the output data of the network model
>>> result = model.get_output(0)
Usage
0is the index of the output Tensor, which can be obtained from the return value ofget_output_details();- If the model has multiple outputs, you can call
get_outputmultiple times, using the index obtained from the return value ofget_output_details()to get the corresponding Tensor's output data.
- (6)
get_tensor_details: Return information for each Tensor in the network model (list).calibrator_custom.rpc_simulatordoes not provide this interface.
For Float models, it returns as follows:
The returned list contains the following dict information based on the number of model Tensors:
name: Tensor name
shape: Tensor shape
dtype: Tensor data type
qtype: Potential data type of this Tensor for fixed-point models (quantization type)
 >>> tensor_details = model.get_tensor_details()
 >>> print(tensor_details)
[
  {
    'name': 'MobilenetV2/Conv/Conv2D',
    'shape': array([  1, 257, 257,  30], dtype=int32),
    'dtype': 'FLOAT32',
    'qtype': 'INT16'
  },
  {
    'name': 'MobilenetV2/Conv/Conv2D_bias',
    'shape': array( [ 2, 30], dtype=int32),
    'dtype': 'FLOAT32',
    'qtype': 'INT16'
  },
  {
    'name': 'MobilenetV2/Conv/weights/read',
    'shape': array( [30,  3,  3,  3], dtype=int32),
    'dtype': 'FLOAT32',
    'qtype':  'INT8'
  },
  {
    'name': 'sub_7',
    'shape': array([  1, 513, 513, 3], dtype=int32),
    'dtype': 'FLOAT32',
    'qtype': 'UINT8'
  }
]
② The Tensor information for Fixed models includes quantization information, which returns as follows:
The returned list contains the following dict information based on the number of model Tensors:
name: Tensor name
shape: Tensor shape
dtype: Tensor data type
quantization: The scale and zero_point of the Tensor
min: Minimum value of the Tensor (may be included)
max: Maximum value of the Tensor (may be included)
>>> tensor_details = model.get_tensor_details()
>>> print(tensor_details)
[
    {
      'shape': array([  1, 257, 257,  30]),
      'quantization': [(0.00013832777040079236, 0)],
      'min': [-4.230099201202393],
      'max': [4.532586097717285],
      'name': 'MobilenetV2/Conv/Conv2D',
      'dtype': 'INT16'
    },
    {
      'shape':  array([ 2, 30]),
      'quantization': [],
      'min': [0.0],
      'max ': [1.0],
      'name': 'MobilenetV2/Conv/Conv2D_bias',
      'dtype':'INT16'
    },
    {
      'shape': array([30,  3,  3,  3]),
      'quantization': [(0.004813921172171831, 0)],
      'min': [-0.5498989820480347],
      'max': [0.6113680005073547],
      'name': 'MobilenetV2/Conv/weights/read',
      'dtype': 'INT8'
    },
    {
      'shape': array([  1, 513, 513, 3 ]),
      'quantization': [(0.007843137718737125, 128)],
      'min': [-1 .0],
      'max': [1.0],
      'name': 'sub_7',
      'dtype': 'UINT8'
    }
]
③ The Offline model cannot return information for each Tensor of the model.
3.2 calibrator_custom.SIM_Simulator
(1) Overview of calibrator_custom.SIM_Simulator
For simultaneously converting multi-input, multi-segment networks, calibrator_custom.SIM_Simulator is provided for easy definition and unified execution. calibrator_custom.SIM_Simulator is a pre-implemented class, where only the forward method is not implemented. When using it, you only need to implement this method to complete the inference.
(2) How to Use calibrator_custom.SIM_Simulator
The following is an example using SGS_IPU_Toolchain/Scripts/examples/sim_simulator.py to illustrate the usage of calibrator_custom.SIM_Simulator:
① Define the forward method:
import calibrator_custom
class Net(calibrator_custom.SIM_Simulator):
    def __init__(self):
        super().__init__()
        self.model = calibrator_custom.simulator(model_path)
    def forward(self, x):
        out_details = self.model.get_output_details()
        self.model.set_input(0, x)
        self.model.invoke()
        result_list = []
        for idx in range(len(out_details)):
            result = self.model.get_output(idx)
            # dequantize to float
            if out_details[idx]['dtype'] == np.int16:
                scale, _ = out_details[idx]['quantization']
                result = np.multiply(result, scale)
            result_list.append(result)
        return result_list
Usage
- The parameter of
forwardis the model input; if there are multiple inputs, additional parameters can be added toforward.
② Create an instance of calibrator_custom.SIM_Simulator
net = Net()
calibrator_custom.SIM_Simulator instance
result = net(img_gen, num_process=4)
Usage
-
When calling the
calibrator_custom.SIM_Simulatorinstance, a numpy.ndarray of input images or an image generastor must be provided. -
When
num_processis greater than 1,img_genmust be an image generator.-
Image generator (
img_gen): To facilitate the conversion of multi-input, multi-segment models inference, the generator organizes a sequence of input images easily. If the model has multiple inputs, the generator should return a list of multiple numpy.ndarray in the order defined when creating theforwardfunction. -
calibrator_custom.utils.image_preprocess_funcuses a predefined preprocessing method to obtainimg_gen.
preprocess_func = calibrator_custom.utils.image_preprocess_func(model_name) def image_generator(folder_path, preprocess_func, norm): images = [os.path.join(folder_path, img) for img in os.listdir(folder_path)] for image in images: img = preprocess_func(image, norm) yield [img] img_gen = image_generator('./images', preprocess_func, False) -