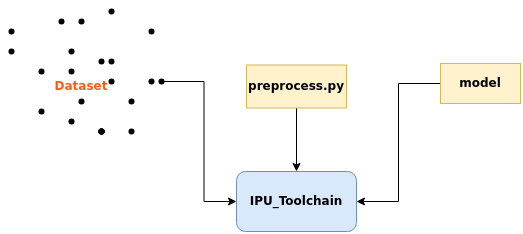
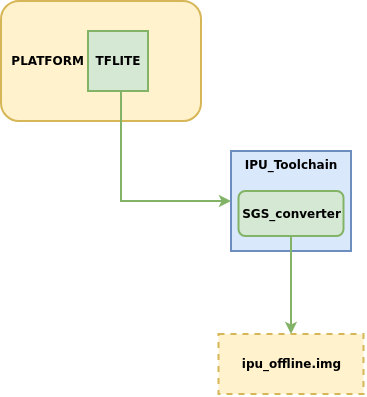
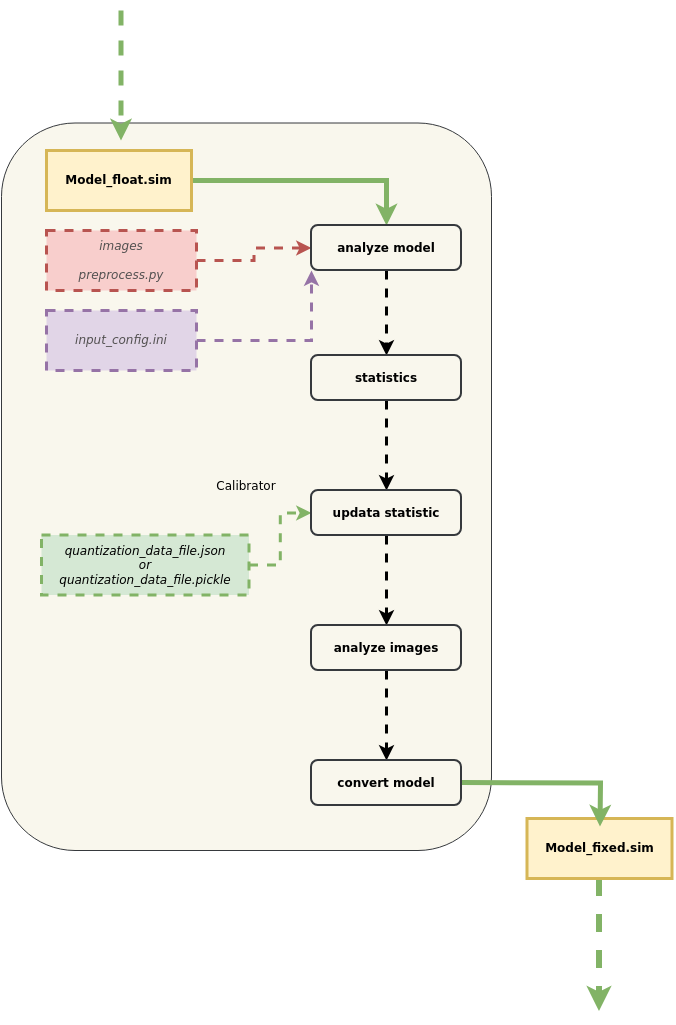
2. Model Conversion
This chapter mainly introduces how to convert network models from different platforms into offline IPU network models that can be run on development boards, model conversion diagram:
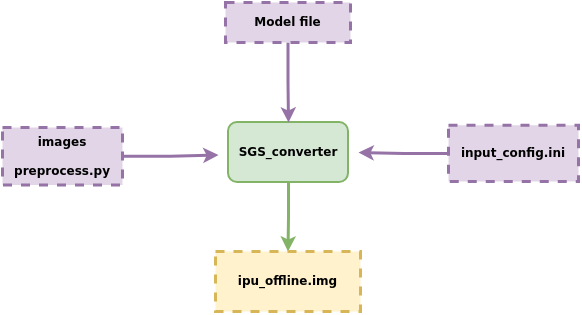
Model conversion process description:
① Model file
② Configuration file input_config.ini
③ Data images required for model conversion, preprocessing script preprocess.py
Input these into the model conversion tool SGS_converter, and you will obtain the IPU offline network model img file that can be run on the development board.
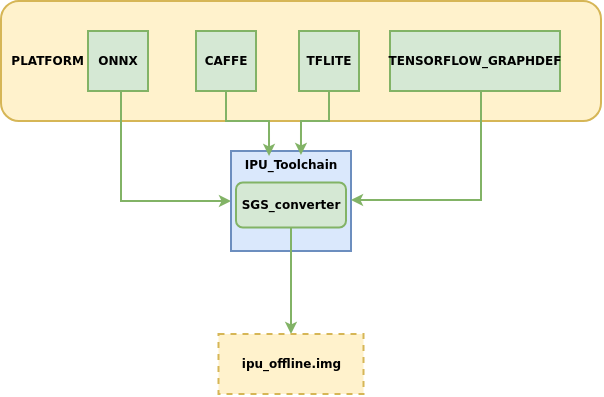
The IPU toolchain currently supports converting models from the following platforms to offline networks:
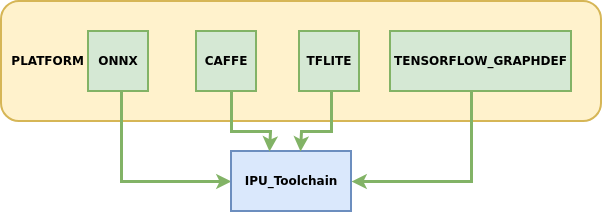
Among them, ONNX is the main model framework supported by the IPU toolchain, which can provide relatively complete functionality iteration and technical service support. Models from other frameworks are in maintenance support status. It is recommended to prioritize converting models under the ONNX framework to obtain the best experience.
The following will detail how to use the IPU Toolchain to generate offline models.
1. Model Conversion Configuration File — Guide to Using input_config.ini
In the instructions for converting models from each platform to IPU offline network models, the required parameter --input_config must be used to specify the path of the input tensor configuration file input_config.ini. This section mainly describes how to configure the input_config.ini file required during the model conversion process.
1.1 Overview of input config.ini Contents
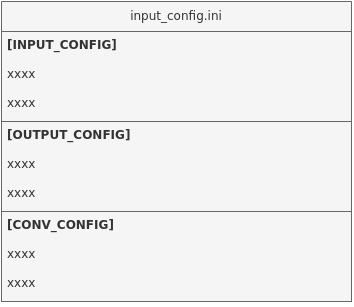
This file is mainly divided into three parts for information configuration:
[INPUT_CONFIG]   # Configure the normalization information for image preprocessing of the network model

[OUTPUT_CONFIG]  # Configure the quantization processing information for network model inputs and outputs

[CONV_CONFIG]     # optional, configure the quantization information for convolution in the network model
1.2 Basic Usage of input config.ini
Configuration example and explanation:
[INPUT_CONFIG]
inputs= data;                   # Input node name, multiple inputs should be separated by ","
training_input_formats=RGB;     # Input format during model training, the number and order should match the configuration of `inputs`
input_formats=BGR;              # Input format on the board side, the number and order should match the configuration of `inputs`
quantizations=TRUE;             # Whether to enable input quantization, options are TRUE or FALSE, the number and order should match the configuration of `inputs`
mean=127.5:127.5:127.5;         # Mean value, order is RGB, multiple inputs should be separated by ","
std_value = 255;                # Standard deviation, multiple inputs should be separated by ",", if each channel has a corresponding `std_value`, separate with a colon ( : ), order is RGB
[OUTPUT_CONFIG]
outputs= prob;                  # Output node name, multiple inputs should be separated by ","
dequantizations=TRUE;           # Whether to enable dequantization, fill in according to actual needs, recommended to be TRUE, the number and order should match the configuration of `outputs`
[CONV_CONFIG]                   #  optional
tensor_arrays=conv1-1,conv2-1;  # Specify the quantization method for convolution in certain layers of the network, configure when higher accuracy is needed.
1.3 Advanced Usage of input config.ini
The following will explain the configurable parameters for [INPUT_CONFIG], [OUTPUT_CONFIG], and [CONV_CONFIG]:
1.3.1 Detailed Explanation of Configurable Information in [INPUT_CONFIG]
1. Configurable Parameter Explanations
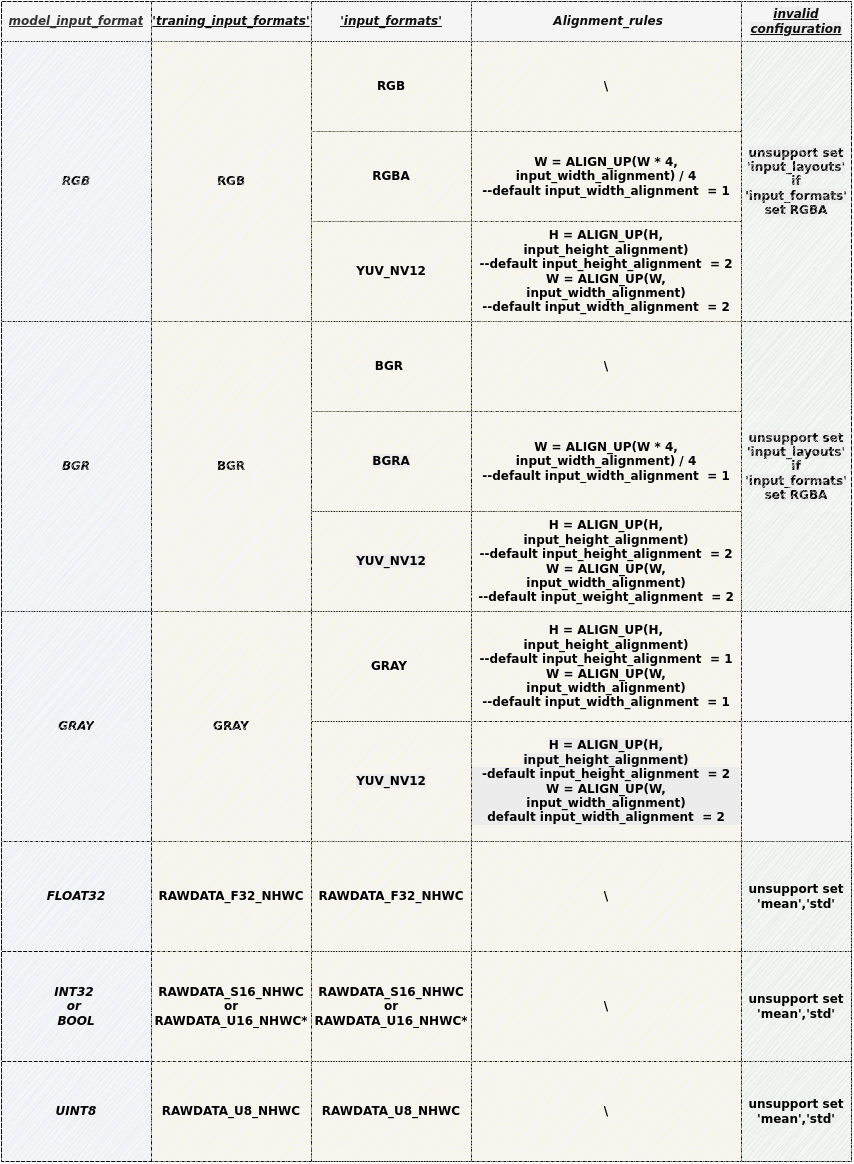
Currently supported parameters include: inputs, training_input_formats, input_formats, quantizations, mean, std_value, input_width_alignment (optional), input_height_alignment (optional), input_layouts (optional).
(1) inputs: Name of the input Tensor for the network.
Usage
- Multiple input Tensors should be separated by a comma ( , ). The number and order of model input Tensor must match the configuration of
inputs. - The length of all input names must not exceed 2048 characters.
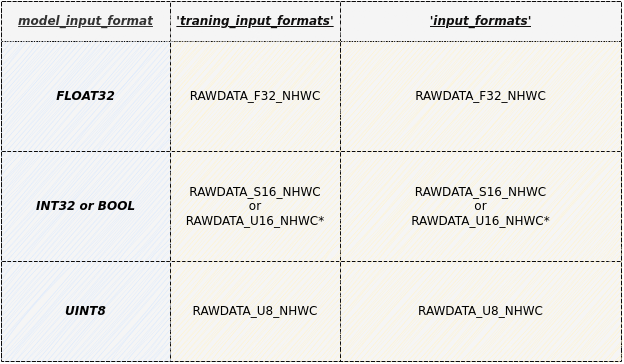
(2) training_input_formats: Image format during network training.
Usage
-
Multiple input Tensors should be separated by a comma ( , ). The number and order of model input Tensor must match the configuration of
inputs. -
Optional formats include:
- RGB
- BGR
- GRAY
- RAWDATA_U8_NHWC
- RAWDATA_S16_NHWC
- RAWDATA_F32_NHWC
- Recommended configuration values for each model can be found in the next section's table
(3) input_formats: Image input format when the network model runs on the IPU chip.
Usage
-
Multiple input Tensors should be separated by a comma ( , ). The number and order of model input Tensor must match the configuration of
inputs. -
Optional formats include:
- RGB
- BGR
- RGBA
- BGRA
- YUV_NV12
- GRAY
- RAWDATA_U8_NHWC
- RAWDATA_S16_NHWC
- RAWDATA_F32_NHWC
- Recommended configuration values for each model can be found in the next section's table
(4) quantizations: Used to indicate whether the data of all input Tensors needs to be quantized, TRUE or FALSE.
Usage
- Multiple input Tensors should be separated by a comma ( , ). The number and order of model input Tensors must match the configuration of
inputs.
(5) mean: Used for preprocessing images during network training.
The formula for normalizing images is as follows: $$ \text{normalized_image} = \frac{\text{original_image} - (\text{mean_R}, \text{mean_G}, \text{mean_B})}{\text{std_value}} $$
Usage
-
The order is RGB, representing the mean value for the respective channels.
-
The number equals that of the inputs, and multiple input Tensors should be separated by a comma ( , ) without spaces in between.
-
For RAWDATA format data, please do not configure mean; for other formats that have not undergone normalization, set this value to 0.
(6) std_value: Used for preprocessing images during network training.
Usage
-
The number equals that of the inputs, and multiple input Tensors should be separated by a comma ( , ) without spaces in between.
-
If each channel has a corresponding
std_value, separate them with a colon ( : ), in RGB order. -
For RAWDATA format data, please do not configure mean; for other formats that have not undergone normalization, set this value to 0.
(7) input_width_alignment (optional): Used to indicate the alignment quantity in the Width direction when data is input into the network.
Usage
- If there are multiple input Tensors, separate them with a comma ( , ) without spaces in between.
- Recommended configuration values for each model can be found in the 'Alignment_rules' column of the next section's table.
(8) input_height_alignment (optional): Used to indicate the alignment quantity in the Height direction when data is input into the network.
Usage
- If there are multiple input Tensors, separate them with a comma ( , ) without spaces in between.
- Recommended configuration values for each model can be found in the 'Alignment_rules' column of the next section's table.
(9) input_layouts (optional): Used to indicate the layout format of the model input Tensors.
Usage
-
Default is NHWC.
-
Optional data layout formats include:
-
NCHW: Only applicable for 4D input Tensors
-- 4D Tensor processing: When specified as NCHW, it is enforced to be laid out in NCHW.
-- Non-4D Tensor processing: The dimensional input remains unchanged, but NHWC placeholder must be used in input_layouts.
-
NHWC: Only applicable for 4D input Tensors
-- 4D Tensor processing: When specified as NHWC, it is enforced to be laid out in NHWC.
-- Non-4D Tensor processing: The dimensional input remains unchanged, but NHWC placeholder must be used in input_layouts.
-
-
The quantity equals that of the inputs, and the order of the model input Tensors must match the configuration order of
input_layouts, with multiple input Tensors separated by a comma (,) without spaces in between. -
Note: When the
input_layoutsfor 4D inputs is set toNCHW, ensure that the corresponding preprocessing script (introduced in the next section) returns data laid out in NCHW, and that the input data layout when running the offline model on the board side is also in NCHW. -
Note: When the input_formats are set to YUV_NV12 and the
input_layoutsis set toNCHW, ensure that the corresponding preprocessing script (introduced in the next section) returns data laid out in NCHW, while the input data on the board side is normally laid out in YUV_NV12. -
Note: When input_formats are set to RGBA or BGRA, specifying corresponding
input_layoutsis not supported.
2. Model Parameter Configuration Constraints and Selection Combinations
Usage
- RAWDATA_U16_NHWC: Only applicable when the input is directly connected to the embedding layer, for example: the embedding layer of the CLIP Text model can be configured as RAWDATA_U16_NHWC when the index of its embedding layer satisfies the condition 32727 < index < 65535.
Usage
-
Gray Model Conversion Notes:
-
When
input_formatsis GRAY:The actual data provided to Fixed or Offline models is gray images, at which point the corresponding[INPUT_CONFIG] ...... training_input_formats=GRAY; input_formats=GRAY; ......input_width_alignmentandinput_height_alignmentdefault to 1. Ifinput_width_alignmentandinput_height_alignmentare not set, the actual input will match the model input shape. -
When
input_formatsis YUV_NV12:The actual data provided to Fixed or Offline models is YUV_NV12 data, at which point the corresponding[INPUT_CONFIG] ...... training_input_formats=GRAY; input_formats=YUV_NV12; ......input_width_alignmentandinput_height_alignmentdefault to 2. -
The input_config.ini file only needs to set the mean value for a single channel:
[INPUT_CONFIG]
......
mean=33.318;
std_value=1.0;
-
3. Considerations for Configuring Multi-Input Models:
(1) When the model has multiple inputs and mixed data formats, if rawdata format input is included, please note:
Usage
-
1) Configuration of mean/std normalization parameters for rawdata format inputs is prohibited;
-
2) In the ini configuration file, rawdata inputs must be arranged at the end.
For example: input_list = [input0,input1,input2], where input0 and input2 are RGB format and input1 is RAWDATA format, please configure the inputs in the ini as [input0,input2,input1]:
[INPUT_CONFIG]
inputs=input0,input2,input1;        # Adjust input order, placing RAWDATA format tensor at the end.
input_formats=RGB,RGB,RAWDATA_F32_NHWC;
quantizations=TRUE,TRUE,TRUE;
mean=127.5:127.5:127.5,0:0:0;       # Only configure two sets, input1 prohibits normalization parameter
std_value = 255,255;                # Only configure two sets, input1 prohibits normalization parameter
(2) When the model has multiple inputs and mixed data dimensions, if input_layouts need to be configured, please note:
Usage
- 1) Non-4D Tensors must be represented using NHWC in input_layouts.
For example: input_list = [input0,input1,input2], where input0 is a 3D tensor and input1 and input2 are 4D tensors, specify input1 to be arranged according to NCHW:
[INPUT_CONFIG]
inputs=input0,input1,input2;
…
input_layouts=NHWC,NCHW,NHWC;       # input0 is a non-4D tensor, need to configure a placeholder
1.3.2 Detailed Explanation of Configurable Information in [OUTPUT_CONFIG]
Currently supported parameters include: outputs, dequantizations, output_layouts (optional), output_formats (optional).
(1) outputs: Name of the network output node.
Usage
-
Multiple output Tensors should be separated by a comma ( , ), maintaining the same order as the model.
-
The length of all output names must not exceed 2048 characters.
-
When converting networks with post-processing, the outputs of the Backbone network have different names from the full network outputs; the other settings should be completely consistent.
(2) dequantizations: Used to indicate whether the data of all output Tensors needs to be dequantized, TRUE or FALSE.
Usage
-
Only effective when running on the board, the quantity equals the number of outputs, and the output Tensors should be separated by commas ( , ) without spaces in between.
-
If
dequantizationsis configured as TRUE, a Fix2Float operator will be added to the model output, and the output data type will be float32. -
If
dequantizationsis configured as FALSE, the output data type when running on the board will be int16.
(3) output_layouts (optional): Used to indicate the data layout format of the output Tensors.
Usage
-
If this item is not set, the default data layout format will be
NHWC. -
Optional data layout formats include:
-
NCHW:
NCHWindicates that the corresponding 4D output Tensors are laid out in NCHW format. -
NHWC:
NHWCindicates that the corresponding 4D output Tensors are laid out in NHWC format.
-
-
The quantity equals the number of outputs, and the order of the model output Tensors must match the configuration order of
output_layouts, with multiple input Tensors separated by a comma (,) without spaces in between.
(4) output_formats (optional): Indicates the data format of the output Tensors.
Usage
-
If this item is not set, the default data format will be based on the configuration of
dequantizations: whendequantizationsis TRUE, the output is RAWDATA_F32_NHWC; whendequantizationsis FALSE, the output is RAWDATA_S16_NHWC and will not be dequantized. -
Optional data formats include:
-
RAWDATA_F32_NHWC: Model outputs float32 type data.
dequantizationscan only be configured as TRUE. -
RAWDATA_S16_NHWC: Model outputs int16 type data. When
dequantizationsis TRUE, the output int16 will be dequantized back to actual values; whendequantizationsis FALSE, the output int16 will not be dequantized. -
RAWDATA_U8_NHWC: Model inputs uint8 type data. When
dequantizationsis TRUE, the output uint8 will be dequantized back to actual values; whendequantizationsis FALSE, the output uint8 will not be dequantized.
-
-
If there are multiple output Tensors, they should be separated by a comma (,) without spaces in between. The quantity equals the number of outputs, and the order of the model output Tensors must match the configuration order of
output_formats.
1.3.3 Detailed Explanation of Configurable Information in [CONV_CONFIG] (optional)
This section includes parameters that are not required, currently supported parameters include: input_format (optional), input_format (optional).
(1) input_format (optional): Specify the quantization method for all convolutions in the network.
Usage
-
The conversion tool defaults to the quantization method recommended by the IPU Toolchain, and you can also specify quantization by configuring input_format. Optional options include:
-
ALL_UINT8: Specify that all convolutions use UINT8 quantization. -
ALL_INT16: Specify that all convolutions use INT16 quantization. -
CONV2D_INT16: Specify that only all normal convolutions use INT16 quantization. -
DEPTHWISE_INT16: Specify that only all Depthwise convolutions use INT16 quantization.
-
-
In
ALL_UINT8 mode, the bandwidth occupied by convolution operations is small and the running speed is fast; inALL_INT16 mode, accuracy can be greatly improved but running speed may be affected. -
After configuring
input_format, the recommended quantization strategies usingcalibrator/torch_calibratorwill become ineffective. If you want to use the quantization strategies recommended bycalibrator/torch_calibrator, you need to delete input_format and convert the model again.
(2) tensor_arrays (optional): Specify the quantization method for certain convolution layers in the network.
Usage
-
The conversion tool defaults to the quantization method recommended by the IPU Toolchain; if certain convolution layers require higher precision, you can configure 'tensor_arrays' to specify the quantization method for specific convolution layers.
-
Fill in the input tensor name of the first input for the convolution layer. If you need to configure multiple convolution layers for higher precision, separate the input tensor names with commas ( , ).
-
The first convolution layer in the network does not take effect when specifying quantization.
2. Model Conversion Configuration File - Preprocessing Script Writing Guide
When converting models for different platforms to IPU offline network models, it is necessary to use the required parameter -n to specify the path to the preprocessing script. This section mainly introduces how to configure the preprocessing files required during the model conversion process.
2.1 Preprocessing File Writing Example
Taking the onnx_yolov8s network as an example, this section explains how to write the image preprocessing file, with a demo presentation:
import cv2
import numpy as np

def letterbox(im, new_shape=(640, 640), color=(114, 114, 114), auto=False, scaleFill=False, scaleup=True, stride=32):
    # Resize and pad image while meeting stride-multiple constraints
    shape = im.shape[:2]  # current shape [height, width]
    if isinstance(new_shape, int):
        new_shape = (new_shape, new_shape)

    # Scale ratio (new / old)
    r = min(new_shape[0] / shape[0], new_shape[1] / shape[1])
    if not scaleup:  # only scale down, do not scale up (for better val mAP)
        r = min(r, 1.0)

    # Compute padding
    ratio = r, r  # width, height ratios
    new_unpad = int(round(shape[1] * r)), int(round(shape[0] * r))
    dw, dh = new_shape[1] - new_unpad[0], new_shape[0] - new_unpad[1]  # wh padding
    if auto:  # minimum rectangle
        dw, dh = np.mod(dw, stride), np.mod(dh, stride)  # wh padding
    elif scaleFill:  # stretch
        dw, dh = 0.0, 0.0
        new_unpad = (new_shape[1], new_shape[0])
        ratio = new_shape[1] / shape[1], new_shape[0] / shape[0]  # width, height ratios

    dw /= 2  # divide padding into 2 sides
    dh /= 2

    if shape[::-1] != new_unpad:  # resize
        im = cv2.resize(im, new_unpad, interpolation=cv2.INTER_LINEAR)
    top, bottom = int(round(dh - 0.1)), int(round(dh + 0.1))
    left, right = int(round(dw - 0.1)), int(round(dw + 0.1))
    im = cv2.copyMakeBorder(im, top, bottom, left, right, cv2.BORDER_CONSTANT, value=color)  # add border
    return im, ratio, (dw, dh)


def image_preprocess(image_file, norm=True, new_shape=(640, 640)):
    im = cv2.imread(image_file)

    im, ratio, (dw, dh) = letterbox(im, new_shape)

    im = im[:, :, ::-1]  # BGR to RGB
    im = np.expand_dims(im, 0)
    im = np.ascontiguousarray(im)
    if norm:
        return im.astype(np.float32) / 255
    else:
        return im
Usage
-
The function prototype
image_preprocess(img_path, norm=True)needs to be declared for calling, and the function should return a numpy.ndarray data type. -
When the model's training_input_formats are RGB / BGR / GRAY, the
image_preprocess(img_path, norm=True)function must include the following 2 parameters:-
Image path
-
Normalization flag (norm=True) The normalization flag is used to distinguish whether the network model is a floating-point model. In the floating-point network model stage, the normalization of the images needs to be handled before being sent to the network. However, the fixed-point network model and offline network model already contain the setup information from the input_config.ini file, allowing the image data to be normalized automatically, so the data sent to the network model does not need normalization, which is the same as how it is processed on the IPU hardware.
-
-
The preprocessing file's handling of input data must remain consistent with the model training, and the preprocessing script processes the data files into the format of the model's
training_input_formats.
2.2 Instructions for Writing Preprocessing Files
The preprocessing for different data formats varies slightly, and examples will be provided below:
① Image Input Model Preprocessing Instructions
Applicable to models where training_input_formats are RGB / BGR / GRAY.
Users primarily focus on processing data files into the model's training_input_formats format in the image input model preprocessing script.
Using the preprocessing script of torchvision's resnet18 as an example:
from PIL import Image
import numpy as np
from torchvision.transforms import transforms

def sim_standard_preprocess(image_file, input_size=224, norm=True):
    ori_image = Image.open(image_file).convert('RGB')
    if input_size == 299:
        scaled_size = input_size
    else:
        scaled_size = 256
    image = transforms.Resize(scaled_size)(ori_image)
    image = transforms.CenterCrop(input_size)(image)
    if norm:
        image = transforms.Compose(
            [
                transforms.ToTensor(),
                transforms.Normalize(mean=[0.485, 0.456, 0.406], std=[0.229, 0.224, 0.225])
            ]
        )(image)
        image = image.numpy()
        image = np.expand_dims(image, 0).astype(np.float32)
        image = np.transpose(image, axes=(0, 2, 3, 1)).copy()
    else:
        image = image.numpy()
        image = np.expand_dims(image, 0).astype(np.uint8)
    return image


def image_preprocess(image_file, input_size=224, norm=True):
    sim_processed = sim_standard_preprocess(image_file, input_size, norm=norm)
    return sim_processed
Usage
- The formula for normalizing images, along with the aforementioned mean/std information converted to input_config.ini, is as follows:
[INPUT_CONFIG] mean=123.675:116.28:103.53; std_value=58.395:57.12:57.375; - It is essential to ensure that the mean and std parameters in the preprocessing script align with the information configured in input_config.ini.
Using the preprocessing script example for a GRAY input model of caffe's caffe_lenet:
import cv2
import numpy as np

def get_image(img_path, resizeH=28, resizeW=28, norm=True, mean=33.318, std=1.0):
    img = cv2.imread(img_path)
    if img is None:
        raise FileNotFoundError('No such image: {}'.format(img_path))

    img = cv2.cvtColor(img, cv2.COLOR_BGR2GRAY)
    img_norm = cv2.resize(img, (resizeW, resizeH), interpolation=cv2.INTER_LINEAR)

    if norm:
        img_norm = (img_norm - mean) / std
        img_norm = np.expand_dims(img_norm, axis=2)
        img_norm = img_norm.astype('float32')
    else:
        img_norm = np.expand_dims(img_norm, axis=2)

    return np.expand_dims(img_norm, 0)

def image_preprocess(img_path, norm=True):
    return get_image(img_path, norm=norm)
② Non-Image Input Model Preprocessing Example
The example input data is stored in an npy file. Please replace it with the actual processing logic for real use.
Users of non-image input models need to consider the input data formats for float / fixed / offline models. When norm is True, it returns the format required for the float model; when norm is False, it returns the format required for the fixed / offline models.
The float model generally matches the original data format of the model's input.
1) Applicable to models where both training_input_formats and input_formats are RAWDATA_F32_NHWC.
Preprocessing script example:
import numpy as np

def image_preprocess(img_path, norm=True):
    data = np.load(img_path)    # img_path is npy file, contains float32 dtype ndarray
    data = data.astype(np.float32)
    return data

def image_preprocess(img_path, norm=True):
    return get_image(img_path, norm=norm)
2) Applicable to models where both training_input_formats and input_formats are RAWDATA_S16_NHWC.
Preprocessing script example:
import numpy as np

def image_preprocess(img_path, norm=True):
    data = np.load(img_path)    # img_path is npy file, contains int32 or bool dtype ndarray
    if norm:
        data = data.astype(np.int32)    # or astype(np.bool_) / astype(np.float32) ……
    else:
        data = data.astype(np.int16)
    return data


def image_preprocess(img_path, norm=True):
    return get_image(img_path, norm=norm)
3) Applicable to models where both training_input_formats and input_formats are RAWDATA_U16_NHWC.
Usage
- RAWDATA_U16_NHWC: Only applicable when the input is directly connected to the embedding layer, for example: the embedding layer of the CLIP Text model can be configured as RAWDATA_U16_NHWC when the index of its embedding layer satisfies the condition 32727 < index < 65535.
Preprocessing script example:
import numpy as np

def image_preprocess(img_path, norm=True):
    data = np.load(img_path)    # img_path is npy file, contains int32 dtype ndarray
    if norm:
        data = data.astype(np.int32)
    else:
        data = data.astype(np.uint16)
    return data


def image_preprocess(img_path, norm=True):
    return get_image(img_path, norm=norm)
4) Applicable to models where both training_input_formats and input_formats are RAWDATA_U8_NHWC.
Preprocessing script example:
import numpy as np

def image_preprocess(img_path, norm=True):
    data = np.load(img_path)    # img_path is npy file, contains uint8 dtype ndarray
    if norm:
        data = data.astype(np.uint8)
    else:
        data = data.astype(np.uint8)
    return data

def image_preprocess(img_path, norm=True):
    return get_image(img_path, norm=norm)
3. Guide to Converting Original Models to Edge Models
The SGS_converter tool in the IPU Toolchain supports one-click generation of IPU offline network models for development boards.
3.1. Introduction to the SGS_converter Tool
1. Tool Location: SGS_IPU_Toolchain/Scripts/ConvertTool/SGS_converter.py.
2. Tool Function: Converts models into SGS offline network models with a single click.
3. Usage Example::Taking the conversion of an ONNX framework model to an offline network as an example:
python3 ~/SGS_IPU_Toolchain/Scripts/ConvertTool/SGS_converter.py onnx
--model_file  ~/SGS_Models/onnx/onnx_yolov8s/onnx_yolov8s.onnx \
--input_config ~/SGS_Models/onnx/onnx_yolov8s/input_config.ini \
-i ~/SGS_Models/resource/classify/ILSVRC2012_test_00000002.bmp \
-n ~/SGS_Models/onnx/onnx_yolov8s/onnx_yolov8s.py \
--output_file ./onnx_yolov8s_offline.img \
--soc_version CHIP
The required parameter information for converting models from different platforms to SGS offline network models varies slightly. If you want to further understand the parameters needed for conversion on each platform (specific instructions on the use of parameters will be provided in the following sections), you can execute
python3 SGS_converter.py {platform} –h
To view the execution parameters of the CAFFE framework:
python3 SGS_converter.py caffe –h
3.2 Detailed Use of the SGS_converter Tool
This section mainly introduces how to configure parameters when using the SGS_converter tool to convert models from various platforms.
3.2.1 Converting ONNX Models
- Example of tool usage:
python3 ~/SGS_IPU_Toolchain/Scripts/ConvertTool/SGS_converter.py onnx
--model_file  ~/SGS_Models/onnx/onnx_yolov8s/onnx_yolov8s.onnx \
--input_config ~/SGS_Models/onnx/onnx_yolov8s/input_config.ini \
-i ~/SGS_Models/resource/classify/ILSVRC2012_test_00000002.bmp
-n ~/SGS_Models/onnx/onnx_yolov8s/onnx_yolov8s.py \
--output_file ./onnx_yolov8s_offline.img \
--export_models \
--soc_version CHIP
(1) Required Parameters:
-
--model_file: Specify the path to the ONNX model file to be converted. -
--input_config: Path to the input_config.ini file. -
-i: Input file / Input folder path / Specify input path list file.
Usage
-
When the
-iparameter is passed in the form of Specify input path list file:Create a new input_list.txt with the following content:
-
For a single input network model:
/path/to/image_test/2007000364.jpg /path/to/image_test/2007000365.jpg /path/to/image_test/2007000366.jpg -
For a multiple input network model, separate each input path with a comma (
,):/path/to/image_test/2007000364.jpg,/path/to/image_test/ILSVRC2012_test_00000002.bmp /path/to/image_test/2007000365.jpg,/path/to/image_test/ILSVRC2012_test_00000003.bmp /path/to/image_test/2007000366.jpg,/path/to/image_test/ILSVRC2012_test_00000004.bmp
Multiple sets of data can be written on the next line, and each line is considered a single input for the model. After completing input_list.txt the -i parameter should be: /path/to/input_list.txt
-
-
When the
-i/--imageparameter is the path of a single image, the model must be a single input model. -
When the
-i/--imageparameter is the path of an image folder, the model can only be a single input model and will read all data within the folder.
-n: Path to the preprocessing Python file.
Usage
-
For a multiple input model, the preprocessing parameters need to use multiple preprocessing methods; the number and order of the preprocessing Python file paths must remain consistent with the number and order of the model inputs. For example:
-n /path/to/preprocess1.py,/path/to/preprocess2.py or --preprocess /path/to/preprocess1.py,/path/to/preprocess2.py
-
Please use the same image preprocessing method as during training; each input's preprocessing method should be written in an independent Python file.
-
--output_file: Specify the name of the generated img file. -
--soc_version: IPU Toolchain chip
Usage
- Execute python3 SGS_IPU_Toolchain/DumpDebug/show_sdk_info.py to view which chips and version information IPU Toolchain specifically supports.
(2) Optional Parameters:
-
--export_models: Specify the model file that generates intermediate results. If not configured, only the offline file will be generated. -
-q: When using torch_calibrator to quantize a float model, this parameter must be specified. -
--quant_config: When setting the-qparameter, this parameter must be used to pass the quant_config.yaml quantization parameter file.
Usage
If the onnx model contains post-processing operators, please remove them first. Currently, only conversion of the backbone network is supported. If the onnx model is generated by another framework, be sure to disable the option for generating post-processing during model conversion.
3.2.2 Converting CAFFE Models

- Example of tool usage:
python3 ~/SGS_IPU_Toolchain/Scripts/ConvertTool/SGS_converter.py onnx
--model_file  ~/SGS_Models/caffe/caffe_mobilenet_v2/caffe_mobilenet_v2.prototxt \
--weight_file ~/SGS_Models/caffe/caffe_mobilenet_v2/caffe_mobilenet_v2.caffemodel \
--input_config ~/SGS_Models/caffe/caffe_mobilenet_v2/input_config.ini \
-i ~/SGS_Models/resource/classify/ILSVRC2012_test_00000002.bmp \
-n ~/SGS_Models/caffe/caffe_mobilenet_v2/caffe_mobilenet_v2.py \
--output_file ./caffe_mobilenet_v2.img \
--export_models \
--soc_version CHIP
(1) Required Parameters:
-
--model_file: Specify the path to the CAFFE model file to be converted. -
--weight_file: Specify the path to the CAFFE weight file to be converted. -
--input_config: Path to the input_config.ini file. -
-i: Input file / Input folder path / Specify input path list file.
Usage
-
When the
-iparameter is passed in the form of Specify input path list file:Create a new input_list.txt with the following content:
-
For a single input network model:
/path/to/image_test/2007000364.jpg /path/to/image_test/2007000365.jpg /path/to/image_test/2007000366.jpg -
For a multiple input network model, separate each input path with a comma (
,):/path/to/image_test/2007000364.jpg,/path/to/image_test/ILSVRC2012_test_00000002.bmp /path/to/image_test/2007000365.jpg,/path/to/image_test/ILSVRC2012_test_00000003.bmp /path/to/image_test/2007000366.jpg,/path/to/image_test/ILSVRC2012_test_00000004.bmp
Multiple sets of data can be written on the next line, and each line is considered a single input for the model. After completing input_list.txt the -i parameter should be: /path/to/input_list.txt
-
-
When the
-i/--imageparameter is the path of a single image, the model must be a single input model. -
When the
-i/--imageparameter is the path of an image folder, the model can only be a single input model and will read all data within the folder.
-n: Path to the preprocessing Python file.
Usage
-
For a multiple input model, the preprocessing parameters need to use multiple preprocessing methods; the number and order of the preprocessing Python file paths must remain consistent with the number and order of the model inputs. For example:
-n /path/to/preprocess1.py,/path/to/preprocess2.py or --preprocess /path/to/preprocess1.py,/path/to/preprocess2.py
-
Please use the same image preprocessing method as during training; each input's preprocessing method should be written in an independent Python file.
-
--output_file: Specify the name of the generated img file. -
--soc_version: IPU Toolchain chip
Usage
- Execute python3 SGS_IPU_Toolchain/DumpDebug/show_sdk_info.py to view which chips and version information IPU Toolchain specifically supports.
(2) Optional Parameters:
-
--export_models: Specify the model file that generates intermediate results. If not configured, only the offline file will be generated. -
-q: When using torch_calibrator to quantize a float model, this parameter must be specified. -
--quant_config: When setting the-qparameter, this parameter must be used to pass the quant_config.yaml quantization parameter file.
3.2.3 Converting TFLITE Models
- Example of tool usage:
python3 SGS_converter.py tflite \
--model_file Debug_save_model_float.tflite \
--input_config input_config.ini \
-i file.list \
-n preprocess.py \
--output_file save_model.img \
--soc_version CHIP
(1) Required Parameters:
-
--model_file: Specify the path to the TFLITE model file to be converted. -
--input_config: Path to the input_config.ini file. -
-i: Input file / Input folder path / Specify input path list file.
Usage
-
When the
-iparameter is passed in the form of Specify input path list file:Create a new input_list.txt with the following content:
-
For a single input network model:
/path/to/image_test/2007000364.jpg /path/to/image_test/2007000365.jpg /path/to/image_test/2007000366.jpg -
For a multiple input network model, separate each input path with a comma (
,):/path/to/image_test/2007000364.jpg,/path/to/image_test/ILSVRC2012_test_00000002.bmp /path/to/image_test/2007000365.jpg,/path/to/image_test/ILSVRC2012_test_00000003.bmp /path/to/image_test/2007000366.jpg,/path/to/image_test/ILSVRC2012_test_00000004.bmp
Multiple sets of data can be written on the next line, and each line is considered a single input for the model. After completing input_list.txt the -i parameter should be: /path/to/input_list.txt
-
-
When the
-i/--imageparameter is the path of a single image, the model must be a single input model. -
When the
-i/--imageparameter is the path of an image folder, the model can only be a single input model and will read all data within the folder.
-n: Path to the preprocessing Python file.
Usage
-
For a multiple input model, the preprocessing parameters need to use multiple preprocessing methods; the number and order of the preprocessing Python file paths must remain consistent with the number and order of the model inputs. For example:
-n /path/to/preprocess1.py,/path/to/preprocess2.py or --preprocess /path/to/preprocess1.py,/path/to/preprocess2.py
-
Please use the same image preprocessing method as during training; each input's preprocessing method should be written in an independent Python file.
-
--output_file: Specify the name of the generated img file. -
--soc_version: IPU Toolchain chip
Usage
- Execute python3 SGS_IPU_Toolchain/DumpDebug/show_sdk_info.py to view which chips and version information IPU Toolchain specifically supports.
(2) Optional Parameters:
-
--export_models: Specify the model file that generates intermediate results. If not configured, only the offline file will be generated. -
-q: When using torch_calibrator to quantize a float model, this parameter must be specified. -
--quant_config: When setting the-qparameter, this parameter must be used to pass the quant_config.yaml quantization parameter file.
3.2.4 Converting TENSORFLOW_GRAPHDEF Models

- Example of tool usage:
python3 SGS_converter.py tensorflow_graphdef \
--graph_def_file yolo_v3_7/yolo_v3_7.pb \
--input_config input_config.ini \
--input_shapes 1,299,299,3 \
-i file.list \
-n yolo_v3_7.py \
--output_file yolo_v3_7.img \
--soc_version CHIP
(1) Required Parameters:
-
--graph_def_file: Specify the path to the model file to be converted. -
--input_config: Path to the input_config.ini file. -
--input_shapes: Specify the shape of the network input Tensor; the number of shapes corresponds to the number of inputs and multiple shapes are separated by colons (:). -
-i: Input file / Input folder path / Specify input path list file.
Usage
-
When the
-iparameter is passed in the form of Specify input path list file:Create a new input_list.txt with the following content:
-
For a single input network model:
/path/to/image_test/2007000364.jpg /path/to/image_test/2007000365.jpg /path/to/image_test/2007000366.jpg -
For a multiple input network model, separate each input path with a comma (
,):/path/to/image_test/2007000364.jpg,/path/to/image_test/ILSVRC2012_test_00000002.bmp /path/to/image_test/2007000365.jpg,/path/to/image_test/ILSVRC2012_test_00000003.bmp /path/to/image_test/2007000366.jpg,/path/to/image_test/ILSVRC2012_test_00000004.bmp
Multiple sets of data can be written on the next line, and each line is considered a single input for the model. After completing input_list.txt the -i parameter should be: /path/to/input_list.txt
-
-
When the
-i/--imageparameter is the path of a single image, the model must be a single input model. -
When the
-i/--imageparameter is the path of an image folder, the model can only be a single input model and will read all data within the folder.
-n: Path to the preprocessing Python file.
Usage
-
For a multiple input model, the preprocessing parameters need to use multiple preprocessing methods; the number and order of the preprocessing Python file paths must remain consistent with the number and order of the model inputs. For example:
-n /path/to/preprocess1.py,/path/to/preprocess2.py or --preprocess /path/to/preprocess1.py,/path/to/preprocess2.py
-
Please use the same image preprocessing method as during training; each input's preprocessing method should be written in an independent Python file.
-
--output_file: Specify the name of the generated img file. -
--soc_version: IPU Toolchain chip
Usage
- Execute python3 SGS_IPU_Toolchain/DumpDebug/show_sdk_info.py to view which chips and version information IPU Toolchain specifically supports.
(2) Optional Parameters:
-
--export_models: Specify the model file that generates intermediate results. If not configured, only the offline file will be generated. -
-q: When using torch_calibrator to quantize a float model, this parameter must be specified. -
--quant_config: When setting the-qparameter, this parameter must be used to pass the quant_config.yaml quantization parameter file.
4. Advanced Guide to Model Conversion: Stage-Wise Generation of Edge Models
The SGS_converter tool is used for one-click generation of edge models. This section mainly introduces the step-by-step generation of edge models. The process is illustrated as follows:
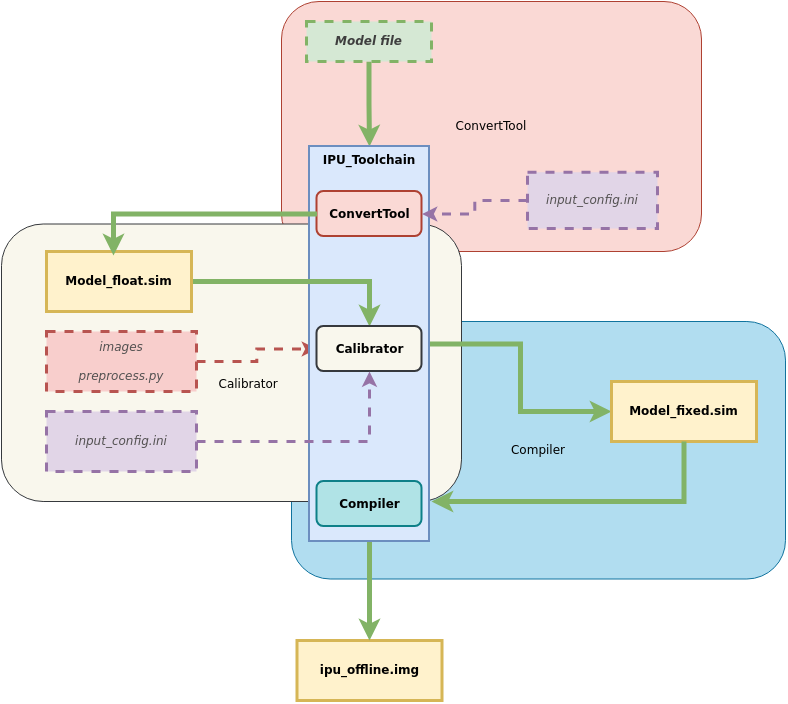
It is mainly divided into three stages:
Model ——> ConvertTool tool ——> Floating Point Network Model
            ——> Calibrator tool ——> Fixed Point Network Model
                ——> Compiler tool ——> Offline Network Model (Edge Model)
The usage methods of the network generation tools for each stage will be introduced below.
4.1. Stage One: Using the ConvertTool to Generate Floating Point Network Models
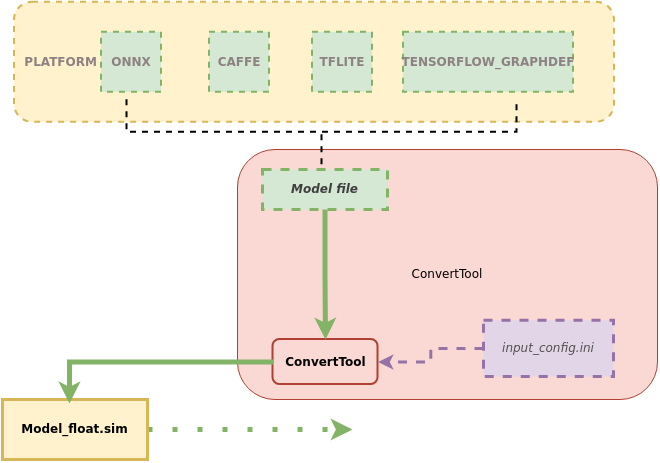
This section introduces how to use the ConvertTool to convert the original model to an SGS floating point network model.
1. Tool location: SGS_IPU_Toolchain/Scripts/ConvertTool/ConvertTool.py.
2. Tool function: Converts models to SGS floating point network models.
3. Example of usage:
Taking the conversion of an ONNX framework model to a floating point network as an example:
python3 ~/SGS_IPU_Toolchain/Scripts/ConvertTool/ConvertTool.py onnx
--model_file  ~/SGS_Models/onnx/onnx_yolov8s/onnx_yolov8s.onnx \
--input_config ~/SGS_Models/onnx/onnx_yolov8s/input_config.ini \
--output_file ./onnx_yolov8s_float.sim \
--soc_version CHIP
The required parameter information for converting models from different platforms to SGS floating point network models varies slightly. If you want to further understand the parameter information required for conversion from each platform (usage instructions for the parameters will be provided below), you can execute
python3 ConvertTool.py {platform} –h
python3 ConvertTool.py caffe –h
4.1.1 Converting ONNX Models
- Example of tool usage:
python3 ~/SGS_IPU_Toolchain/Scripts/ConvertTool/ConvertTool.py onnx
--model_file  ~/SGS_Models/onnx/onnx_yolov8s/onnx_yolov8s.onnx \
--input_config ~/SGS_Models/onnx/onnx_yolov8s/input_config.ini \
--output_file ./onnx_yolov8s_float.sim \
--soc_version CHIP
(1) Required Parameters:
-
--model_file: Specify the path to the Onnx model file to be converted. -
--input_config: Path to the input_config.ini file. -
--output_file: Output path of the converted model. -
--soc_version: IPU Toolchain chip
Usage
- Execute python3 SGS_IPU_Toolchain/DumpDebug/show_sdk_info.py to view which chips and version information IPU Toolchain specifically supports.
(2) Optional Parameters:
-
--input_shapes: Onnx model input shape.Dimensions are separated by commas (
,), the number of shapes corresponds to the number of inputs, and multiple shapes are separated by colons (:).
By default, it reads from the model information; if the input has a dynamic resolution, specific shapes must be specified. -
--skip_simplify: Skip optimizing the model using onnxsim; optimization is recommended.By default, it uses onnxsim to optimize the model; if this option is configured, it will skip optimization.
Usage
-
If the onnx model contains post-processing operators, please remove them first. Currently, only conversion of the backbone network is supported.
-
If the onnx model is generated by another framework, be sure to disable the option for generating post-processing during model conversion.
-
Onnx model clipping command:
onnx.utils.extract_model(input_path, output_path, input_names, output_names, check_model=True)
onnx.utils.extract_model parameters description:
input_path (str | os.PathLike): Path to the original ONNX model.
output_path (str | os.PathLike): Path to save the clipped ONNX model.
input_names (list of string): Names of the input tensors for the clipped model.
output_names (list of string): Names of the output tensors for the clipped model.
check_model (bool): Whether to run a model check on the clipped model (default is True).
4.1.2 Converting CAFFE Models
- Example of tool usage:
python3 ~/SGS_IPU_Toolchain/Scripts/ConvertTool/ConvertTool.py caffe \
--model_file ~/SGS_Models/caffe/caffe_resnet50_conv/caffe_resnet50_conv.prototxt \
--weight_file ~/SGS_Models/caffe/caffe_resnet50_conv/caffe_resnet50_conv.caffemodel \
--input_config ~/SGS_Models/caffe/caffe_resnet50_conv/input_config.ini \
--output_file ./resnet50_float.sim \
--soc_version CHIP
(1) Required Parameters:
-
--model_file: Specify the path to the CAFFE model file to be converted. -
--weight_file: Specify the path to the CAFFE weight file to be converted. -
--input_config: Path to the input_config.ini file, which contains the configuration information for input config. -
--output_file: Output path of the converted model. -
--soc_version: IPU Toolchain chip
Usage
- Execute python3 SGS_IPU_Toolchain/DumpDebug/show_sdk_info.py to view which chips and version information IPU Toolchain specifically supports.
(2) Optional Parameters: None.
4.1.3 Converting TFLITE Models
- Example of tool usage:
python3 SGS_converter.py tflite \
--model_file Debug_save_model_float.tflite \
--input_config input_config.ini \
--output_file save_model.img \
--soc_version CHIP
(1) Required Parameters:
--model_file: Specify the path to the model file to be converted.
The input model must be in tflite format (must be a non-quantized model).
-
--output_file: Specify the output model file.Flatbuffer format, should have a .sim suffix.
-
--input_config: Path to the input_config.ini file.
This file contains the configuration information for the input tensor.
--soc_version: IPU Toolchain chip
Usage
- Execute python3 SGS_IPU_Toolchain/DumpDebug/show_sdk_info.py to view which chips and version information IPU Toolchain specifically supports.
(2) Optional Parameters: * None.
4.1.4 Converting TENSORFLOW_GRAPHDEF Models
-
Example of tool usage:
(1) Required Parameters:python3 ConvertTool.py tensorflow_graphdef \ --graph_def_file ~/SGS_Models/tensorflow/resnet_v2_50/resnet_v2_50.pb \ --output_file ./resnet_v2_float.sim \ --input_shapes 1,299,299,3 \ --input_config ~/SGS_Models/tensorflow/resnet_v2_50/input_config.ini\ --soc_version CHIP -
--graph_def_file: Specify the path to the input model to be converted.This is the path to the TensorFlow frozen graphdef in pb format.
-
--output_file: Specify the name of the generated floating point network model file.Flatbuffer format, should have a .sim suffix.
-
--input_shapes: Specify the shape of the network input Tensor.
The format is NHWC, with dimensions separated by commas (
,); note that the number of shapes must correspond to the number of inputs and multiple shapes are separated by colons (:).
--input_config: Path to the input_config.ini file.
This file contains the configuration information for the input tensor.
--soc_version: IPU Toolchain chip
Usage
- Execute python3 SGS_IPU_Toolchain/DumpDebug/show_sdk_info.py to view which chips and version information IPU Toolchain specifically supports.
(2) Optional Parameters:
- None.
4.2. Stage Two: Using the Calibrator Tool to Generate Fixed Point Network Models
4.2.1 Detailed Explanation of the Calibrator Tool
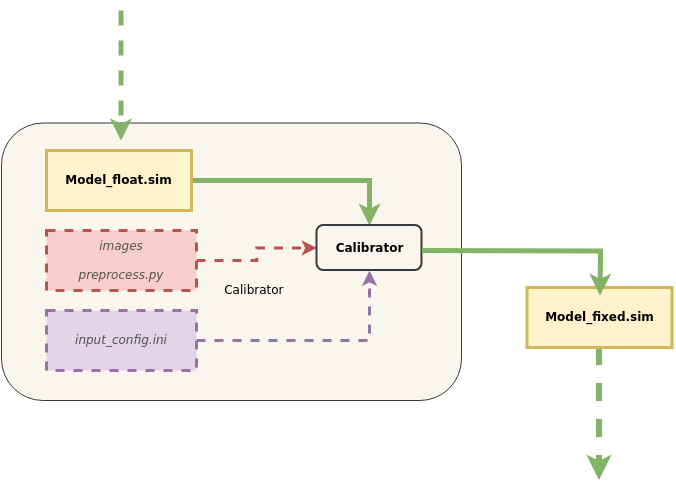
This section introduces how to use the Calibrator tool to convert SGS floating point network models to SGS fixed point network models.
1. Tool Location: SGS_IPU_Toolchain/Scripts/calibrator/calibrator.py.
2. Tool Function: Converts models to SGS fixed point network models.
3. Example of Usage:
Taking the ONNX floating point model converted in the previous section as an example:
python3 ~/SGS_IPU_Toolchain/Scripts/calibrator/calibrator.py
--model_file  ~/SGS_Models/onnx/onnx_yolov8s/onnx_yolov8s_float.sim \
--input_config ~/SGS_Models/onnx/onnx_yolov8s/input_config.ini \
-i ~/SGS_Models/resource/classify/ILSVRC2012_test_00000002.bmp \
-n ~/SGS_Models/onnx/onnx_yolov8s/onnx_yolov8s.py \
--soc_version CHIP
4. Explanation of Calibrator Parameters
(1) Required Parameters
-
-mor--model: Specify the path to the floating point network model file output by the ConvertTool. -
--input_config: Specify the path to the input_config.ini file. -
-ior--image: Specify input file / input folder path / Specify input path list file.
Usage
-
When the
-iparameter is passed in the form of Specify input path list file:Create a new input_list.txt with the following content:
-
For a single input network model:
/path/to/image_test/2007000364.jpg /path/to/image_test/2007000365.jpg /path/to/image_test/2007000366.jpg -
For a multiple input network model, separate each input path with a comma (
,):Multiple sets of data can be written on the next line, and each line is considered a single input for the model. After completing input_list.txt the -i parameter should be: /path/to/input_list.txt/path/to/image_test/2007000364.jpg,/path/to/image_test/ILSVRC2012_test_00000002.bmp /path/to/image_test/2007000365.jpg,/path/to/image_test/ILSVRC2012_test_00000003.bmp /path/to/image_test/2007000366.jpg,/path/to/image_test/ILSVRC2012_test_00000004.bmp
-
-
When the
-i/--imageparameter is the path of a single image, the model must be a single input model. -
When the
-i/--imageparameter is the path of an image folder, the model can only be a single input model and will read all data within the folder.
-nor--preprocess: Specify the path to the preprocessing Python file.
Usage
-
For a multiple input model, the preprocessing parameters need to use multiple preprocessing methods; the number and order of the preprocessing Python file paths must remain consistent with the number and order of the model inputs. For example:
-n /path/to/preprocess1.py,/path/to/preprocess2.py or --preprocess /path/to/preprocess1.py,/path/to/preprocess2.py
-
Please use the same image preprocessing method as during training; each input's preprocessing method should be written in an independent Python file.
--soc_version: IPU Toolchain chip
Usage
- Execute python3 SGS_IPU_Toolchain/DumpDebug/show_sdk_info.py to view which chips and version information IPU Toolchain specifically supports.
(2) Optional Parameters
-
-oor--output: Specify the output path for the fixed point network model. -
--num_process: Specify the number of processes to run simultaneously (default is 10 processes). -
--memory_saving: Use memory-saving methods to gather statistics. -
--quant_level: Choose the quantization level.
Usage
-
Optional modes include:
-
L1: Quickly quantizes data using max-min comparison, faster speed.
-
L2: Quickly quantizes weight data using comparison.
-
L3: Further analyzes statistics, approximating the original data distribution.
-
L4: Approximates the weight data distribution, suggesting upgrading certain convolutions to 16-bit quantization.
-
L5: Uses high precision data analysis methods to maximize fitting of the original data distribution and suggest upgrading certain convolutions to 16-bit quantization.
-
The default is L5 quantization level; the higher the level, the higher the quantization accuracy, but the quantization speed will correspondingly slow down.
-
-
Choosing L3, L4, or L5 will automatically configure the quantization method for the convolutions based on the statistics. If a specific convolution quantization needs to be enforced, it can be configured in the input_config.ini file.
4.2.2 Customizing Calibrator
1. Tool Names: calibrator_custom.calibrator and calibrator_custom.SIM_Calibrator
2. Tool Function: Provides a more convenient and flexible way to convert and quantize multi-input, multi-segment networks.
3. Detailed Usage of the calibrator_custom.calibrator Tool:
The current calibrator_custom.calibrator tool provides a complete set of API interfaces. Developers can directly call these standardized interfaces, flexibly choose different modules based on actual needs, and quickly build custom conversion models. Detailed instructions on the specific interface calling methods are as follows: First, create an instance of calibrator using the calibrator_custom.calibrator tool:
import calibrator_custom
calibrator_custom.set_soc_version('CHIP')                                # Set the CHIP for this conversion
model_path = './onnx_yolov8s_float.sim'                                  # Floating point model path
input_config_path = './input_config.ini'                                 # INI file path
calibrator = calibrator_custom.calibrator(model_path, input_config_path) # Create instance
Usage
-
calibrator_custom.set_soc_versioncan only be called once to set the chip information for the conversion. -
Execute python3 SGS_IPU_Toolchain/DumpDebug/show_sdk_info.py to view which chips and version information IPU Toolchain specifically supports.
After instantiation, you can call the supported API interfaces of the calibrator_custom.calibrator tool. The available API interfaces include:
-
(1)
get_input_detailsFunctionality: Gets detailed information about the network model and returns it in a list format.
Example:
input_details = calibrator.get_input_details() >>> print(input_details) [{'index': 0, 'shape': array([ 1, 513, 513, 3], dtype=int32), 'name': 'sub_7', 'dtype': <class 'numpy.float32'>}] -
(2)
get_output_detailsFunctionality: Gets detailed information about the network model and returns it in a list format.
Example:
output_details = calibrator.get_output_details() >>> print(output_details) [{'index': 0, 'shape': array([ 1, 257, 257, 30], dtype=int32), 'name': 'MobilenetV2/Conv/Conv2D', 'dtype': <class 'numpy.float32'>}] -
(3)
set_inputFunctionality: Sets the input data for the network model.
Example:
The data comes from the return value of get_input_details(), in numpy.ndarray format. Multiple calls to set_input are needed for multi-input models.calibrator.set_input(0, img_data) # args: index, data -
(4)
invokeFunctionality: Runs the model once.
Example:
You need to set the input data using set_input before calling invoke.calibrator.invoke() -
(5)
get_outputFunctionality: Retrieves the output data from the model.
Example:
Multiple calls to get_output are needed for multi-output models.result = calibrator.get_output(0) # args: index -
(6)
get_tensor_detailsFunctionality: Returns information about each tensor in the network model in a list format.
Example:
tensor_details = calibrator.get_tensor_details()
>>> print(tensor_details)
[{'dtype': 'FLOAT32', 'name': 'MobilenetV2/Conv/Conv2D', 'qtype': 'INT16', 'shape': array([ 1, 257, 257, 30], dtype=int32)},
{'dtype': 'FLOAT32', 'name': 'MobilenetV2/Conv/Conv2D_bias', 'qtype': 'INT16', 'shape': array([ 2, 30], dtype=int32)},
{'dtype': 'FLOAT32', 'name': 'MobilenetV2/Conv/weights/read', 'qtype': 'INT8', 'shape': array([30, 3, 3, 3], dtype=int32)},
{'dtype': 'FLOAT32', 'name': 'sub_7', 'qtype': 'UINT8', 'shape': array([ 1, 513, 513, 3], dtype=int32)}]
4. Rules for Importing Quantization Parameters with calibrator_custom.calibrator:

Compared to the regular calibrator, it requires additionally importing a quantization parameter file in JSON or Pickle format. A more detailed flowchart for importing quantization data is shown below:
Usage
① In order to maintain compatibility with the existing quantization process, the strategies used for previous quantizations are still applied.
② To obtain Float model tensor information: After converting the original model to an SGS_Float model, some operators may be merged and optimized, resulting in a significant difference in the computation graph compared to the original framework model. The content of the provided quantization file needs to be specifically adjusted based on the converted SGS_Float model, such as updating tensor names. To facilitate the modification of merged and optimized layers, you can use the get_tensor_details method of calibrator_custom.calibrator to obtain the basic information of each tensor, including name, shape, dtype, and qtype information.
③ To obtain Fixed model tensor information: The converted fixed model can use the get_tensor_details method of calibrator_custom.fixed_simulator to obtain basic tensor information, including the name, shape, min, max, quantization, and dtype information for each tensor.
④ After updating the original model's quantization file based on the tensor information, you can import the quantization data file.
⑤ After parsing the quantization file, existing quantization information will be matched with the imported quantization information. The imported quantization information will be prioritized, but it may be disregarded if found unreasonable during merging.
-
(1) Quantization Model Parameter Export Tool Introduction
The position of the quantization model parameter export tool is SGS_IPU_Toolchain/Scripts/examples/save_quant_param.py
Usage example:
python3 save_quant_param.py \
-m fixed.sim \
--output_mode {JSON,Pickle}
Usage
- The
--output_modeparameter supports exporting quantization parameter data in JSON or Pickle format.
- The
-
(2) Explanation of Quantization Parameter Contents
-
Tensor Name (name) [str]
-
Operator Type providing corresponding min, max values. [list]
-
Quantization Bit Depth. [int]
-
Constant Tensor Data (data) (optional) [numpy.ndarray]
[
    {
        "name": "FeatureExtractor/MobilenetV2/Conv2d_0/weights",
        "min": [-4.555312, -2.876907, -1.234419],
        "max": [7.364561, 3.960804, 6.0],
        "bit": 8
    },
    {...},
    ...
]
-
(3) Explanation of Quantization Rules
-
Quantization Method for Conv2D
① Conv2D quantization includes Inputs, Weights, and Outputs, currently supporting both 8-bit and 16-bit quantization.
② For 8-bit quantization, the input for Conv2D is UINT8 (equivalent to INT9's representation capability), while Weights are INT8; for 16-bit quantization, both the input and Weights for Conv2D are INT16.
③ The number of min and max values for Weights is determined by the number of kernels, while the number of min and max values for Inputs and Outputs is determined by the C dimension of the inputs and outputs.
④ Based on the statistics obtained for Inputs, Weights, and Outputs, Weights are first quantized to fixed data stored internally in the fixed network, and then input and output data are dynamically quantized during network operation.
-
Quantization Method for DepthwiseConv2D
① DepthwiseConv2D quantization includes Inputs, Weights, and Outputs, currently supporting both 8-bit and 16-bit quantization.
② For 8-bit quantization, the input for DepthwiseConv2D is UINT8 (equivalent to INT9's representation capability), while Weights are INT8; for 16-bit quantization, both the input and Weights for DepthwiseConv2D are INT16.
③ The number of min and max values for Weights, Inputs, and Outputs is determined by the C dimension of the corresponding tensor.
④ Based on the statistics obtained for Inputs, Weights, and Outputs, Weights are first quantized to fixed data stored internally in the fixed network, and then input and output data are dynamically quantized during network operation.
-
Quantization Method for Other Operators
① The min and max values for quantization of other operators in the network are based on the C dimension count and only support 16-bit quantization.
② You can determine the data type of the Tensor during fixed-point modeling from the qtype by calling the get_tensor_details method of the calibrator_custom.calibrator.
-
4. Detailed Usage of calibrator_custom.SIM_Calibrator Tool:
For simultaneous conversion of multi-input, multi-segment networks, the calibrator_custom.SIM_Calibrator is provided to facilitate uniform transformations after simple definitions. The calibrator_custom.
SIM_Calibrator is a pre-implemented class with only the forward method not implemented, and you simply need to implement this method to complete the conversion.
Here is an example using SGS_IPU_Toolchain/Scripts/examples/sim_calibrator.py to illustrate how to use the calibrator_custom.SIM_Calibrator:
-
① Define the forward method:
import calibrator_custom
class Net(calibrator_custom.SIM_Calibrator):
    def __init__(self):
        super().__init__()
        self.model = calibrator_custom.calibrator(model_path, input_config)
    def forward(self, x):
        out_details = self.model.get_output_details()
        self.model.set_input(0, x)
        self.model.invoke()
        result_list = []
        for idx in range(len(out_details)):
            result = self.model.get_output(idx)
            result_list.append(result)
        return result_list
Usage
- The parameter for forward is the model input; you can add parameters to forward if there are multiple inputs.
-
② Create an instance of calibrator_custom.SIM_Calibrator:
net = Net() -
③ Use the predefined preprocessing method from calibrator_custom.utils.image_preprocess_func to obtain img_gen:
preprocess_func = calibrator_custom.utils.image_preprocess_func(model_name) def image_generator(folder_path, preprocess_func): images = [os.path.join(folder_path, img) for img in os.listdir(folder_path)] for image in images: img = preprocess_func(image) yield [img] img_gen = image_generator('./images', preprocess_func) -
④ Call the convert method of calibrator_custom.SIM_Calibrator:
net.convert(img_gen, fix_model=[out_model_path])Usage
-
- Image generator (img_gen): Generated in step ③, it conveniently organizes the sequence of input images for multi-input and multi-segment network conversion models. If the model has multiple inputs, the generator should return a list of multiple numpy.ndarray according to the defined input order in the forward method.
The convert method requires two parameters: the image generator and a list of save paths for the fixed.sim model.
- Fixed.sim model save path list: If you define multiple models in init, the save path list for fixed models should be named according to the order of models defined in init.
-
Other optional parameters for the convert method:
-
num_process: Number of processes, specifying the number of CPUs to run simultaneously.
-
quant_level: Choose the quantization level: [L1, L2, L3, L4, L5], with the default being L5 quantization level.
-
quant_param: Import quantization parameters. If there are existing quantization parameters for the corresponding model, you can import them during model conversion.
-
-
4.2.2.1 Custom Calibrator - Example of Segmenting Network Conversion
If the network contains unsupported layers, you can split the complete network into segments:
After running the first segment of the network, the output is fed into a custom implementation layer,
and then the output of the custom layer is used as the input for the second segment of the network.
Taking the Faster_RCNN network as an example:
The Proposal Layer in the Faster_RCNN network is unsupported, so the network needs to be split at this layer.
- 1) Network Splitting
Network splitting diagram:
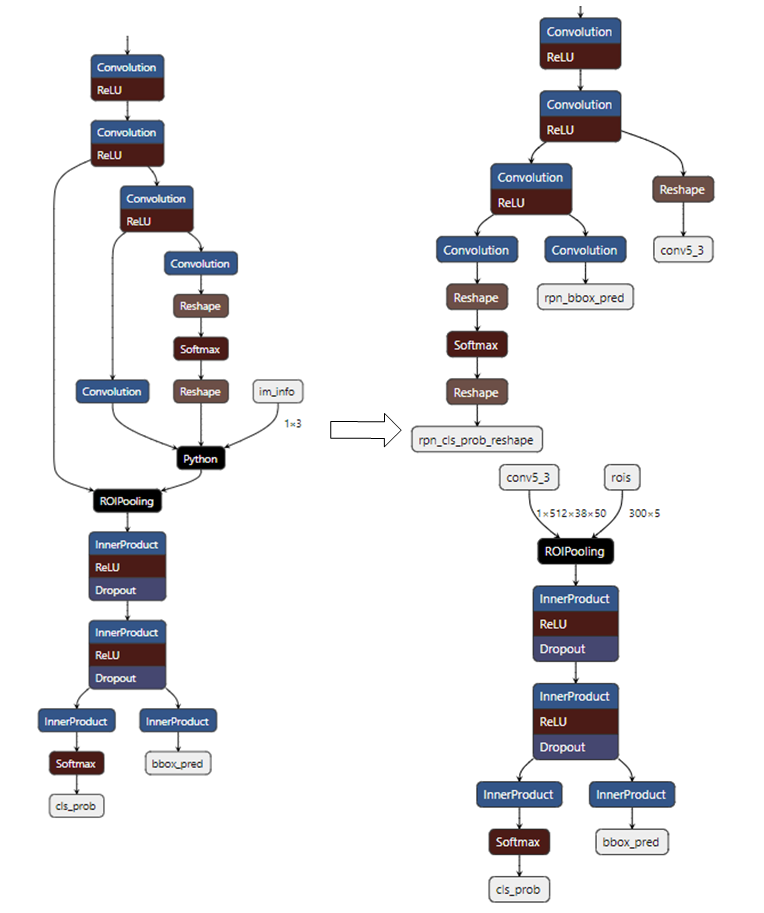
(1) The Python Layer in the diagram represents the Proposal Layer. Modify the prototxt file to split the network at the Proposal Layer.
(2) The first segment of the network will have 3 outputs, where rpn_cls_prob_reshape and rpn_bbox_pred outputs will serve as inputs to the Proposal Layer, while conv5_3 and the output of the Proposal Layer will serve as inputs to the second segment of the network.
(3) The input of the first segment of the network is image data.
(4) The input for the second segment of the network is not image data; both inputs can be configured to use RAWDATA_S16_NHWC format. Once configured, convert the two networks into float.sim model files using ConvertTool.py.
Specific
- First Segment Network:
python3 ~/SGS_IPU_Toolchain/Scripts/ConvertTool/ConvertTool.py caffe \ --model_file test_stageone.prototxt \ --weight_file VGG16_faster_rcnn_final.caffemodel \ --input_arrays data \ --output_arrays rpn_cls_prob_reshape,rpn_bbox_pred,conv5_3 \ --input_config input_config.ini \ --output_file faster_rcnn_main_float.simThe dequantization for the output conv5_3 is set to FALSE since this output is directly input to the second segment of the network, which means there is no need to convert it to float during board operation; it can be directly fed into the second segment of the network.[INPUT_CONFIG] inputs=data; input_formats=BGR; quantizations=TRUE; mean=122.7717:115.9465:102.9801; std_value=1; [OUTPUT_CONFIG] outputs=rpn_cls_prob_reshape,rpn_bbox_pred,conv5_3; dequantizations=TRUE,TRUE,FALSE; - Second Segment Network:
The rois input dimension for ROIPooling is (N×5). When the later network consists entirely of InnerProduct, N can be set to 300 (as shown in the diagram above). If there are convolutional layers in the later network, N can only be set to 1, and the second segment must be executed N times in a loop.
python3 ~/SGS_IPU_Toolchain/Scripts/ConvertTool/ConvertTool.py caffe \
--model_file second_stage.prototxt \
--weight_file VGG16_faster_rcnn_final.caffemodel \
--input_arrays conv5_3,rois \
--output_arrays cls_prob,bbox_pred \
--input_config input_config_stage2.ini \
--output_file faster_rcnn_stage2_float.sim
[INPUT_CONFIG] inputs=conv5_3,rois input_formats=RAWDATA_F32_NHWC,RAWDATA_F32_NHWC; quantizations=TRUE,TRUE; [OUTPUT_CONFIG] outputs=cls_prob,bbox_pred; dequantizations=TRUE,TRUE;
- 2) Converting the Networks
The path SGS_IPU_Toolchain/Scripts/examples/caffe_faster_rcnn/faster_rcnn_calibrator.py contains a demo tool for converting the Faster_RCNN network; simply run this to convert both segments into fixed models.
(1) Command
python3 ~/SGS_IPU_Toolchain/Scripts/examples/caffe_faster_rcnn/faster_rcnn_calibrator.py \
-i ~/SGS_Models/resource/detection/voc_calibration_set32/ \
-m0 faster_rcnn_main_float.sim \
-m1 faster_rcnn_stage2_float.sim \
--input_config0 input_config.ini \
--input_config1 input_config_stage2.ini
- First, define the two segments of the network, and organize the execution of both network segments within the forward method:
class Net(calibrator_custom.SIM_Calibrator):
    def __init__(self, main_model_path, main_input_config, second_model_path, second_input_config):
        super().__init__()
        self.main_model = calibrator_custom.calibrator(main_model_path, main_input_config)
        self.second_model = calibrator_custom.calibrator(second_model_path, second_input_config)
        self.rpn = rpn.ProposalLayer()
    def forward(self, x):
        out_details = self.main_model.get_output_details()
        input_data, im_scale = fill_inputImg2main(x)
        self.main_model.set_input(0, input_data)
        self.main_model.invoke()
        result_list = []
        for idx, _ in enumerate(out_details):
            result = self.main_model.get_output(idx)
            result_list.append(result)
        im_info = np.array([x.shape[0], x.shape[1], im_scale]).reshape(1, 3)
        bottom = [result_list[0], result_list[1], im_info]
        roi = self.rpn.forward(bottom)
        out2_details = self.second_model.get_output_details()
        self.second_model.set_input(0, result_list[2])
        self.second_model.set_input(1, roi)
        self.second_model.invoke()
        second_result = []
        for idx, _ in enumerate(out2_details):
            result = self.second_model.get_output(idx)
            second_result.append(result)
        return second_result
-
In the Faster_RCNN network, the custom rpn layer is used, so the first segment's outputs (the first and second) and the image information are used as inputs to the rpn layer, while the third output of the first segment and the output roi of the rpn layer are used as inputs to the second segment of the network.
-
Finally, invoke the convert method of Net to generate the fixed models for both segments.
net = Net()
net.convert(img_gen, num_process=num_subsets, fix_model=[out_main_model, out_second_model])
- 3) Inference Network
The path SGS_IPU_Toolchain/Scripts/examples/caffe_faster_rcnn/faster_rcnn_simulator.py contains a demo tool for running the Faster_RCNN network.
(1) Command
python3 ~/SGS_IPU_Toolchain/Scripts/examples/caffe_faster_rcnn/faster_rcnn_simulator.py \
-i ~/SGS_Models/resource/detection/004545.jpg \
-m0 faster_rcnn_main_float.sim \
-m1 faster_rcnn_stage2_float.sim \
-t Float
(2) The method to run both segments of the model is similar to that of converting the networks.
class Net(calibrator_custom.SIM_Simulator):
    def __init__(self, main_model_path, second_model_path, phase):
        super().__init__()
        if phase == 'Float':
            self.main_model = calibrator_custom.float_simulator(main_model_path)
            self.second_model = calibrator_custom.float_simulator(second_model_path)
            self.norm = True
        elif phase == 'Fixed':
            self.main_model = calibrator_custom.fixed_simulator(main_model_path)
            self.second_model = calibrator_custom.fixed_simulator(second_model_path)
            self.norm = False
        else:
            self.main_model = calibrator_custom.offline_simulator(main_model_path)
            self.second_model = calibrator_custom.offline_simulator(second_model_path)
            self.norm = False
        self.rpn = rpn.ProposalLayer()
    def forward(self, x):
        # Run main model
        out_details = self.main_model.get_output_details()
        input_data, im_scale = fill_inputImg2main(x, norm=norm)
        self.main_model.set_input(0, input_data)
        self.main_model.invoke()
        def forward(self, x):
            out_details = self.main_model.get_output_details()
            input_data, im_scale = fill_inputImg2main(x)
            self.main_model.set_input(0, input_data)
            self.main_model.invoke()
            result_list = []
            for idx, _ in enumerate(out_details):
                result = self.main_model.get_output(idx)
                result_list.append(result)
            im_info = np.array([x.shape[0], x.shape[1], im_scale]).reshape(1, 3)
            bottom = [result_list[0], result_list[1], im_info]
            roi = self.rpn.forward(bottom)
            out2_details = self.second_model.get_output_details()
            self.second_model.set_input(0, result_list[2])
            if self.norm:
                self.second_model.set_input(1, roi)
            else:
                self.second_model.set_input(1, roi)
            self.second_model.invoke()
            second_result = []
            for idx, _ in enumerate(out2_details):
                result = self.second_model.get_output(idx)
                second_result.append(result)
            return second_result
When running the network, first create an instance of Net, then call its method to execute.
net = Net()
results = net(img_gen, num_process=num_subsets)
4.2.3 Detailed Explanation of the torch_calibrator Tool
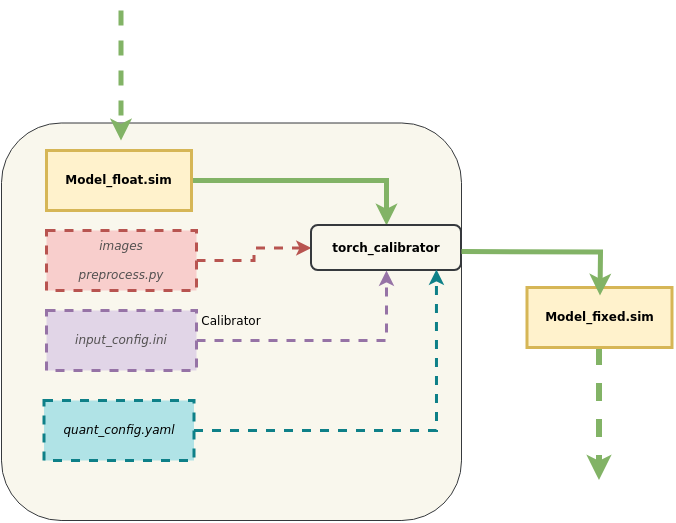
1. Tool Location: SGS_IPU_Toolchain/Scripts/calibrator/torch_calibrator.py.
2. Tool Function: Supplementary to the calibrator tool. Suitable for the following scenarios:
-
When the model parameters are relatively small, and the calibrator tool does not achieve satisfactory accuracy.
-
When the model parameters are large, with expectations of using 4-bit quantization to reduce model size.
3. Advantages of the Tool:
The torch_calibrator is a new generation quantization tool developed based on PyTorch, with the following features compared to the old toolchain:
-
Supports GPU usage; quantization speed is faster in a GPU environment for algorithms at the same level (requires the use of Nvidia® GPU Docker);
-
Supports 4/8-bit mixed quantization algorithms, which allows compressing models further under certain conditions based on 8-bit quantization, enhancing operational efficiency;
-
Supports more complex quantization calibration algorithms, leading to further improvements in quantization accuracy, particularly effective for small models (e.g., MobileNet series, ShuffleNet series, NanoDet series, etc.).
4. Usage Example:
python3 torch_calibrator.py \
-i ilsvrc2012_calibration_set100 \
-m caffe_mobilenet_v2_float.sim \
--input_config input_config.ini \
--quant_config quant_config.yaml \
-n caffe_mobilenet_v2.py \
-q Q2 \
--soc_version CHIP
5. Parameter Description:
(1) Required Parameters
-
-i,--image: Path to the calibration dataset images, typically 100 training images. -
-m,--model: Path to the floating point network model file. -
--input_config: Path to the input_config.ini file. -
--quant_config: Path to the quantization parameters (in YAML format) file; this file's configuration method and usage will be detailed later. -
-n,--preprocess: Path to the model preprocessing file. -
-q,--q_mode: Quantization option, which will be described in detail later. -
--soc_version: IPU Toolchain chip
Usage
- Execute python3 SGS_IPU_Toolchain/DumpDebug/show_sdk_info.py to view which chips and version information IPU Toolchain specifically supports.
(2) Optional Parameters
-
-o,--output: Path for model output. -
--cal_batchsize: Batch size for the calibration dataset, generally equal to the number of samples in the dataset.
Usage
- If the calibration dataset is extremely large or the model structure is unique such that inference cannot proceed with batchsize ≠ 1, you can set this parameter. The default is 100.
Detailed Explanation of the Quantization Parameter Configuration File quant_config.yaml
Compared to the calibrator tool, the torch_calibrator tool requires configuring a quantization parameters (in YAML format) file.
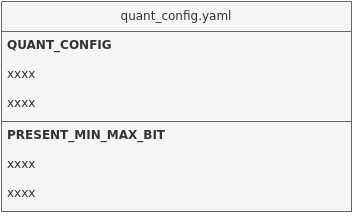
File content display:
QUANT_CONFIG:
  retrain_iter_num: 40
  device: 'cuda:0'
  mixed_precisions: [4, 8]
  use_preset_min_max_bit: 0
  mp_rate: 0.6

PRESET_MIN_MAX_BIT: # preset tensor min/max and bit
  [
    {name: "126", min: null, max: null, bit: 8},
    {name: "layer1.0.conv1.weight", min: null, max: null, bit: 8}
  ]
File Content Description
-
retrain_iter_num: Number of retraining iterations for each layer
If this item is not specified, the default is 40; some lightweight models may require more iterations.
-
device: Specify GPU/CPU
If not specified, it will automatically search for idle GPUs. If no GPU is available, it will default to using the CPU.
To specify CPU computations, simply enter 'cpu'.
-
use_preset_min_max_bit: Whether to use manually preset min/max/bit information
If this item is set to 1, it will use the manually set information below; if set to 0 or not specified, the information below will not be used.
-
mixed_precisions: Mixed quantization mode
Optional values are [4, 8] or [8, 16].
If not filled, in Q13 mode the default is [4, 8]; in Q23 mode the default is [8, 16]. -
mp_rate: Compression rate specified for mixed quantization
When
mixed_precisionsis set to [4, 8],mp_rateshould be specified within the range [0.25, 0.5) (excluding 0.5).
Whenmixed_precisionsis set to [8, 16],mp_rateshould be specified within the range [0.5, 1].
If this parameter is not specified, an automatic compression rate recommendation will be made. This parameter, in conjunction withmixed_precisions, will generate a model with 4/8 bits or 8/16 bits. It only takes effect in Q13 and Q23 modes.It is recommended to use Q13 or Q23 without initially configuring
mp_rate, allowing torch_calibrator to automatically recommend a compression rate after execution.If the automatically recommended compression rate meets accuracy requirements, you can adjust the compression rate downwards in increments of 0.05 to enhance model performance while meeting accuracy requirements.
If the automatically recommended compression rate does not meet accuracy requirements, you can adjust the compression rate upwards in increments of 0.05 to improve model quantization accuracy.
-
PRESET_MIN_MAX_BIT: Allows presetting of specific tensor min/max/bit information
Tensor names should conform to those in the float.sim model. The
use_preset_min_max_bitmust be set to 1.
Detailed Explanation of torch_calibrator Quantization Parameters -q / --q_mode
| Quantization Level | Quantization Features | Quantization Suboptions | Detailed Description |
|---|---|---|---|
| Q1 | Only performs min and max calibration, does not optimize convolution parameters, overall speed is faster; suitable for environments without a GPU, but if there is a GPU, it can accelerate calibration speed; accuracy is generally on par with the precision of calibrator quantization. | Q10 | Full 16-bit quantization, accuracy is basically consistent with the float32 model |
| Q1/Q11 | Full 8-bit fast quantization, accuracy is comparable to L2 mode | ||
| Q12 | Adaptive 8-bit and 16-bit quantization, accuracy is comparable to L5 mode | ||
| Q13 | 8/16-bit (4/8-bit can be modified according to the configuration file, default is 8/16-bit) mixed quantization, suitable for models needing further compression. | ||
| Q2 | The quantization level will optimize the model layer by layer; significant accuracy improvements at low bit levels, especially effective for lightweight models; overall accuracy surpasses that of Q1. | Q20 | Full 16-bit quantization, accuracy is basically consistent with the float32 model |
| Q21 | Full 8-bit quantization; better results observable in some small models | ||
| Q2/Q22 | Adaptive selection of quantization method, currently the best-performing quantization approach, generating fixed point models with full 8-bit quantization or close to full 8 of 8/16 mixed quantization. | ||
| Q23 | 8/16-bit (4/8-bit can be modified according to the configuration file, default is 8/16-bit) mixed quantization, can further compress the model, with both compression level and accuracy superior to Q13. |
4.3. Stage Three: Detailed Explanation of Using the Compiler Tool to Generate Offline Network Models
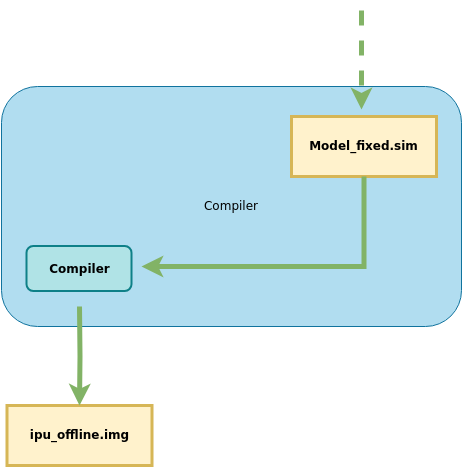
This section introduces how to use the Compiler tool to convert SGS fixed point models into SGS edge models.
1. Tool Location: SGS_IPU_Toolchain/Scripts/calibrator/compiler.py.
2. Tool Function: Converts the models to SGS edge models.
3. Example of Usage:Taking the conversion of an ONNX framework model as an example:
python3 ~/SGS_IPU_Toolchain/Scripts/calibrator/compiler.py
-m ~/SGS_Models/onnx/onnx_yolov8s/onnx_yolov8s_fixed.sim
--soc_version CHIP
4. Parameter Description:
(1) Required Parameters
- ①
-m,--model: Path to the fixed network model file. - ②
--soc_version: IPU Toolchain chip
Usage
- Execute python3 SGS_IPU_Toolchain/DumpDebug/show_sdk_info.py to view which chips and version information IPU Toolchain specifically supports.
(2) Optional Parameters:
-
①
-b,--batch: Expected number of batches, default is 1. -
②
--batch_mode: Multi-batch mode.
Usage
- Optional values include n_buf/one_buf, with the default being n_buf mode.
n_buf: Each batch has independent buffers for input and output data.- When selecting this mode, the
-b/--batchparameter specifies the expected maximum batch size; the Compiler will optimize based on this maximum batch size, and the generated offline model can run with any size less than the maximum batch size.
- When selecting this mode, the
one_buf: Multiple batches’ data must be stacked in the highest dimension and use a single buffer.- When selecting this mode, the
-b/--batchparameter allows specifying multiple batch sizes to use, separated by commas (,), with a maximum of 10. The generated offline model can only run with the specified batch sizes.
- When selecting this mode, the
- ③
-c,--category: Category of the model.
Usage
- Optional values are Classification / Detection / Unknown.
Classification: The model has 1 output and will output the top 5 scores sorted from high to low based on outputs.Detection: The model has 4 outputs and will convert outputs to bounding box (bbox) positions and categories for the input image. Only supports IPU post-processing operators [post-processing module]. Other post-processing should use Unknown.Unknown: The model output does not belong to the above two categories and will output all tensor values. The default for fixed network model conversion to offline network model is Unknown.
- ④
-o,--output: Path for model output.
Usage
- Specify the location for the offline network model output data: if a folder is specified, it will automatically name the file with the network model file prefix followed by sgsimg.img;
- If a specific path and filename are specified, the offline network model will be named accordingly;
- If this parameter is not specified, the offline network model will be stored at the network model file path.