WLAN基本功能使用说明
1. WLAN功能介绍
WiFi网络的基本构成包括无线接入点AP(Access Point)和站点STA(Station)。在WiFi网络中,AP是无线网络的创建者和协调者,负责管理和协调整个网络的数据传输,而STA代表连接到网络的终端设备,每一个终端设备如PC或手机都可以被视为STA。
AP模式: Access Point,提供无线接入服务,允许其它无线设备接入,提供数据访问,一般的无线路由/网桥工作在该模式下。AP和AP之间允许相互连接。
STA模式: Station, 类似于无线终端,sta本身并不接受无线的接入,它可以连接到AP,一般无线网卡即工作在该模式。
2. 模块介绍
D2开发板使用SSW118GE模块提供WiFi功能,相关驱动和软件已默认打包到板端,接下来介绍如何使用。
WiFi模块所使用软件的详细说明文档:SSW118GE_SSTAR_IOT_SUPPLICANT使用说明.pdf
3. 加载驱动
3.1. 命令执行
进入命令行界面,输入
cd /customer/sample_code/bin/wifi
./insmod_wifi.sh
来加载WiFi驱动,输入后会有如下的log显示:
/ # ./customer/sample_code/bin/wifi/insmod_wifi.sh
SDMMC1 >> [Hal_CARD_SetBustiming] LS mode. <<
SDMMC1 >> [Hal_CARD_SetBustiming] DEFS mode. <<
Fail to get pad(0x0) ip(0x1_8)  form padmux !
SDMMC1 >> [Hal_CARD_SetBustiming] DEFS mode. <<
SDMMC1 >> [Hal_CARD_SetBustiming] LS mode. <<
/ # SDMMC1 >> [Hal_CARD_SetBustiming] HS mode. <<
*** Welcome to use Sstar_iot_supplicant ***

VER: 2025-0415-1100.


DRIVER VER: 2025-0415-1100.
[Sstar_log]:Sstar_init_firmware
[Sstar_log]:----drvier support chip RHEA
[Sstar_log]:Probe called
[Sstar_log]:Sstar_sdio_probe:v12
[Sstar_log]:Sstar_after_load_firmware++
[Sstar_log]:Sstar_sdio_rx_thread
[Sstar_log]:set_block_size=256
[Sstar_log]:mdelay wait wsm_startup_done  !!
[Sstar_log]:firmwareCap c03d
[Sstar_log]:firmwareCap2 0
CAPABLITIES_SDIO_TX_LIST_CHECK  4
CAPABLITIES_TX_CONFIRM_NOTIFY   8
CAPABLITIES_HOST_CONFIG         16
CAPABLITIES_HOST_BA_PARAM       32
[Sstar_log]:wsm_caps.firmwareCap c03d
[Sstar_log]:apollo wifi WSM init done.
   Input buffers: 24 x 1632 bytes
   Hardware: 0.25697
   WSM firmware [=IOT=RF=Ares_AX e641e7a8 2GHZ Nov  3 2025 11:22:46], ver: 25697, build: 0, api: 59304, cap: 0xC03D Config[30004]  expection 9007094, tx prog 24
[Sstar_log]:rx timeout
[Sstar_log]:Sstar_sdio_tx_thread
[Sstar_log]:Sstar_sdio_tx_bh:cmd free(23),used(1)
[Sstar_log]:Sstar_get_mac_address.7b:91:c9:69:ea
[Sstar_log]:Sstar_sdio_tx_bh:cmd free(22),used(1)
[Sstar_log]:wifi mode:AP
[Sstar_log]:Sstar_sdio_tx_bh:cmd free(21),used(1)
[Sstar_log]:Sstar_configure_wifi_mode:aes
[Sstar_log]:Sstar_sdio_tx_bh:cmd free(20),used(1)
sync hera ba parames ok.
[Sstar_log]:[Sstar_wtd]:set wtd_probe = 1
[Sstar_log]:Sstar: mmc2 is not found.
Sstar_ioctl_open cost time: 0 ms
[Sstar_log]:Sstar_sdio_tx_bh:cmd free(19),used(1)
[WIFI_MODE] AP
[Sstar_log]:Sstar_sdio_tx_bh:cmd free(18),used(1)
[Sstar_log]:Sstar_get_mac_address.7b:91:c9:69:ea
[Sstar_log]:Sstar_sdio_tx_bh:cmd free(17),used(1)
[Sstar_log]:tcp_port_filter addcnt.2:
[Sstar_log]:Sstar_open
看到Sstar_open的字样,即是WiFi模块驱动加载成功
同时,可以输入
./Sstar_iot_cli status
来查看WiFi的连接状态,默认会如下图所示:
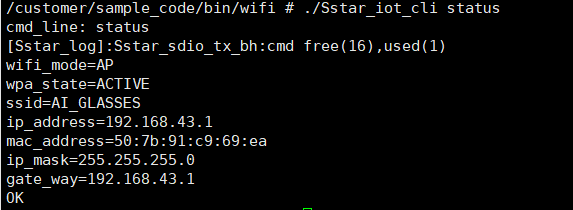
驱动加载后,WiFi默认会进入AP模式,名称为AI_GLASSES,这是为ai_glasses demo所使用的,AP模式使用介绍请看下文。
3.2. 功能介绍
驱动和加载驱动的脚本已默认打包至/customer/sample_code/bin/wifi路径下,
-
ssw118ge_wifi_sdio.ko: WiFi模块驱动
-
insmod_wifi.sh: 加载WiFi模块驱动脚本
-
rmmod_wifi.sh: 卸载WiFi模块驱动脚本

此处insmod和rmmod操作请用设定好的insmod_wifi.sh和rmmod_wifi.sh执行。
4. AP模式
4.1. 命令执行
驱动insmod后会默认运行AP模式,但是设置的名称会是ai_glasses,默认给ai_glasses demo配置使用。
如果需要重新设置AP模式的名称和密码,需要执行命令。
在/customer/sample_code/bin/wifi路径下,可以使用Sstar_iot_cli命令来配置和启动AP模式。
以下是一个简单的AP启动脚本示例,请输入以下命令执行:
/customer/sample_code/bin/wifi/Sstar_iot_cli wifi_mode AP
/customer/sample_code/bin/wifi/Sstar_iot_cli clear_ap_cfg
/customer/sample_code/bin/wifi/Sstar_iot_cli set_ap_cfg ssid sstest
/customer/sample_code/bin/wifi/Sstar_iot_cli set_ap_cfg key 12345678
/customer/sample_code/bin/wifi/Sstar_iot_cli set_ap_cfg key_mgmt WPA2
/customer/sample_code/bin/wifi/Sstar_iot_cli enable_ap_cfg
-
wifi_mode: 设置WiFi工作模式为AP模式
-
set_ap_cfg ssid: 创建的热点名称
-
set_ap_cfg key: 热点密码
会出现如下的log:
/customer/sample_code/bin/wifi # ./Sstar_iot_cli enable_ap_cfg
cmd_line: enable_ap_cfg
[Sstar_log]:Sstar_wsm_set_ap_cfg:aes
[Sstar_log]:Sstar_sdio_tx_bh:cmd free(16),used(1)
/customer/sample_code/bin/wifi # hostevent->bssid 00:00:00:00:00:00 ipaddr 12ba8c0
[WAKEUP] IO wakeup
[Sstar_log]:Sstar_sdio_tx_bh:cmd free(15),used(1)
[Sstar_log]:wifi mode:AP
[Sstar_log]:Sstar_sdio_tx_bh:cmd free(14),used(1)
[Sstar_log]:Sstar_configure_wifi_mode:aes
[Sstar_log]:Sstar_stop
AP Mode.
ip addr:192.168.43.1
[Sstar_log]:Sstar_sdio_tx_bh:cmd free(13),used(1)
[Sstar_log]:Sstar_get_mac_address.7b:91:c9:6d:c4
[Sstar_log]:Sstar_sdio_tx_bh:cmd free(12),used(1)
[Sstar_log]:tcp_port_filter addcnt.2:
[Sstar_log]:Sstar_open
OK
有Sstar_open的字样,即AP模式启动成功。
可以使用以下命令查看AP状态:
./Sstar_iot_cli status

5. STA模式
5.1. 命令执行
驱动加载完成后,可以输入
cd /customer/sample_code/bin/wifi
./sta.sh
sta模式下连接的热点名称和密码修改请见下文功能介绍部分。
会出现如下的log:
/customer/sample_code/bin/wifi # ./sta.sh
cmd_line: set_network ssid TP-LINK_C8D7
OK
cmd_line: set_network key SigmaStar30
OK
cmd_line: set_network key_mgmt WPA2
OK
cmd_line: wifi_mode STA
[Sstar_log]:Sstar_wsm_set_wifi_mode:[2][0][ef2a4c48]
[Sstar_log]:Sstar_sdio_tx_bh:cmd free(15),used(1)
OK
cmd_line: enable_network
[Sstar_log]:Sstar_sdio_tx_bh:cmd free(14),used(1)
OK
/customer/sample_code/bin/wifi # [WAKEUP] IO wakeup
CTRL-EVENT-STATE-DISCONNECTED
[Sstar_log]:Sstar_stop
CTRL-EVENT-STATE-DISCONNECTED
CTRL-EVENT-STATE-DISCONNECTED
sync hera ba parames ok.
sync hera ba parames ok.
sync hera ba parames ok.
hostevent->bssid 4c:10:d5:ae:c8:d7 ipaddr 6501a8c0
[Sstar_log]:Sstar_sta_connect_event: associated
update ba params idx=0.
ba_tid_params:action1,linkid1,tid0,ssn8.
CTRL-EVENT-STATE-CONNECTED - Connection to 4c:10:d5:ae:c8:d7 completed
ip addr:192.168.1.101
[Sstar_log]:Sstar_sdio_tx_bh:cmd free(12),used(1)
[Sstar_log]:Sstar_get_mac_address.7b:91:c9:69:ea
[Sstar_log]:Sstar_sdio_tx_bh:cmd free(11),used(1)
[Sstar_log]:tcp_port_filter addcnt.2:
[Sstar_log]:Sstar_open
有Sstar_open的字样,即连接成功。
5.2. 功能介绍
在/customer/sample_code/bin/wifi路径下,有sta.sh,其内容如下:
/customer/sample_code/bin/wifi/Sstar_iot_cli set_network ssid sstest_STA
/customer/sample_code/bin/wifi/Sstar_iot_cli set_network key 12345678
/customer/sample_code/bin/wifi/Sstar_iot_cli set_network key_mgmt WPA2
/customer/sample_code/bin/wifi/Sstar_iot_cli wifi_mode STA
/customer/sample_code/bin/wifi/Sstar_iot_cli enable_network
-
ssid: 将要连接的热点名称
-
key: 热点密码
这里也是使用Sstar_iot_cli控制WiFi。请自行修改名称和密码,可以连接手机热点测试。
其它指令不再说明,详细可见本文头部的软件详细说明文档
6. DNS配置
6.1. 命令执行
输入
cd /customer/sample_code/bin/wifi
source dns_setup.sh
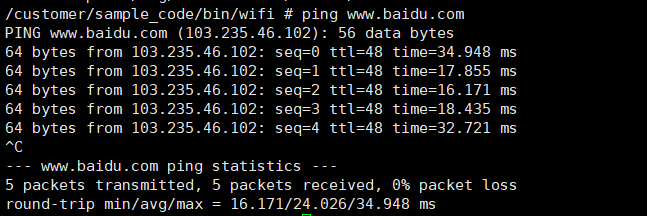
即可配置DNS服务成功(这里必须用source,因为要export需要的库)。
连接的热点可以访问外网,完成后可以ping一下百度试试,能正常ping通即可
6.2. 功能介绍
/customer/sample_code/bin/wifi路径下有dns_setup.sh,其内容如下:
export LD_LIBRARY_PATH=$$LD_LIBRARY_PATH:/customer/sample_code/bin/wifi/libdns

touch /etc/resolv.conf
echo nameserver 8.8.8.8 > /etc/resolv.conf

GATEWAY="192.168.1.1"
route add default gw $GATEWAY dev wlan0
echo "Route added with gateway: $GATEWAY"
这里GATEWAY的ip需要根据实际情况手动修改,先输入
./Sstar_iot_cli status
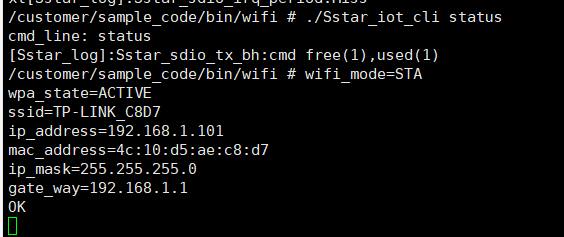
这里可以看到已经连接的热点的gate_way网关地址,把这个地址填到dns_setup.sh中的GATEWAY。