Image Classification
1 概述
1.1 背景介绍
深度学习在图像分类任务中取得了巨大的成功, 其中许多经典的神经网络架构(ResNet50、MobileNetV2、MobileOne等)被广泛应用于各种实际场景。本次开源的分类算法列表中, 选择了MobileNetV2、MobileOne、MobileVit这三种经典模型作为示例。
MobileNetV2详情可访问官方链接:
https://github.com/tensorflow/models/blob/master/research/slim/nets/mobilenet/README.md
MobileVit参考信息较少可直接参考论文:
https://arxiv.org/pdf/2110.02178mobileone
MobileOne详情可访问官方链接:
https://github.com/apple/ml-mobileone
模型下载地址为: mobilenetv2、mobilevit-s、mobileone-s
1.2 使用说明
Linux SDK-alkaid中默认带了已经预先转换好的离线模型及板端示例, 相关文件路径如下:
-
板端示例程序路径
Linux_SDK/sdk/verify/opendla/source/classification -
板端离线模型路径
Linux_SDK/project/board/${chip}/dla_file/ipu_open_models/classification/mobilenet_v2_224.img Linux_SDK/project/board/${chip}/dla_file/ipu_open_models/classification/mobilevit_s_256.img Linux_SDK/project/board/${chip}/dla_file/ipu_open_models/classification/mobileone_s1_224.img -
板端测试图像路径
Linux_SDK/sdk/verify/opendla/source/resource/apple.jpg
如果用户不需要转换模型可直接跳转至第3章节。
2 模型转换
2.1 onnx模型转换
分类算法模型转换流程相同, 以下以mobilenetv2为例展开介绍:
-
python环境搭建
$conda create -n classification python==3.10
$conda activate classification
$git clone https://github.com/WZMIAOMIAO/deep-learning-for-image-processing.git
$cd deep-learning-for-image-processing/pytorch_classification/Test6_mobilenet
注意:这里提供的python环境搭建, 仅作为参考示例, 具体搭建过程请参考官方源码运行教程:
https://github.com/WZMIAOMIAO/deep-learning-for-image-processing/tree/master -
模型测试
-
创建opendla目录并将下载好的模型放到该目录下, 编写模型测试脚本
infer.pyimport os import json import torch from PIL import Image from torchvision import transforms import matplotlib.pyplot as plt from model_v2 import MobileNetV2 def main(): device = torch.device("cuda:0" if torch.cuda.is_available() else "cpu") data_transform = transforms.Compose( [transforms.Resize(256), transforms.CenterCrop(224), transforms.ToTensor(), transforms.Normalize([0.485, 0.456, 0.406], [0.229, 0.224, 0.225])]) # load image img_path = "./apple.jpg" assert os.path.exists(img_path), "file: '{}' dose not exist.".format(img_path) img = Image.open(img_path) plt.imshow(img) # [N, C, H, W] img = data_transform(img) # expand batch dimension img = torch.unsqueeze(img, dim=0) # create model model = MobileNetV2(num_classes=5).to(device) # load model weights model_weight_path = "./opendla/mobilenet_v2-b0353104.pth" model.load_state_dict(torch.load(model_weight_path, map_location=device)) model.eval() with torch.no_grad(): # predict class output = torch.squeeze(model(img.to(device))).cpu() predict = torch.softmax(output, dim=0) predict_cla = torch.argmax(predict).numpy() print("class id", predict_cla) if __name__ == '__main__': main() -
运行模型测试脚本, 确保classification环境配置正确。
$python infer.py
-
-
模型导出
-
安装依赖包
$pip install onnx -i https://pypi.tuna.tsinghua.edu.cn/simple $pip install onnx-simplifier -i https://pypi.tuna.tsinghua.edu.cn/simple -
编写模型转换脚本
export.py:import os import json import torch from PIL import Image from torchvision import transforms import matplotlib.pyplot as plt from model_v2 import MobileNetV2 def main(): device = torch.device("cuda:0" if torch.cuda.is_available() else "cpu") data_transform = transforms.Compose( [transforms.Resize(256), transforms.CenterCrop(224), transforms.ToTensor(), transforms.Normalize([0.485, 0.456, 0.406], [0.229, 0.224, 0.225])]) # load image img_path = "./apple.jpg" assert os.path.exists(img_path), "file: '{}' dose not exist.".format(img_path) img = Image.open(img_path) plt.imshow(img) # [N, C, H, W] img = data_transform(img) # expand batch dimension img = torch.unsqueeze(img, dim=0) # create model model = MobileNetV2(num_classes=5).to(device) # load model weights model_weight_path = "./opendla/mobilenet_v2-b0353104.pth" model.load_state_dict(torch.load(model_weight_path, map_location=device)) model.eval() torch.onnx.export( model, img.to(device), "./opendla/mobilenetv2.onnx", opset_version=13, input_names=['images'], output_names=['output'], do_constant_folding=False ) if __name__ == '__main__': main() -
运行模型转换脚本, 会在opendla目录下生成mobilenetv2.onnx模型
$python export.py -
优化图结构
$python -m onnxsim opendla/mobilenetv2.onnx opendla/mobilenetv2_sim.onnx
-
2.2 离线模型转换
2.2.1 预&后处理说明
-
预处理
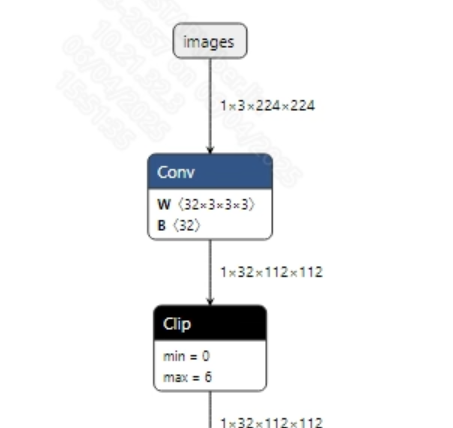
转换成功的mobilenetv2.onnx模型输入信息如下图所示, 要求输入图像的尺寸为 (1, 3, 224, 224), 此外需要将像素值归一化到 [0, 1] 范围内。
-
后处理
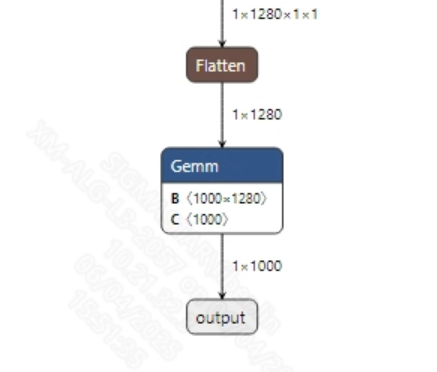
分类模型没有后处理, 获取到模型输出后通过softmax和argmax处理就可以得到最终分类结果。转换成功的mobilenetv2_sim.onnx模型输出信息如下图所示
2.2.2 offline模型转换流程
注意:1)OpenDLAModel对应的是压缩包image-dev_model_convert.tar解压之后的smodel文件。2)转换命令需要在docker环境下运行, 请先根据Docker开发环境教程, 加载SGS Docker环境。
-
拷贝onnx模型到转换代码目录
$cp opendla/mobilenetv2_sim.onnx OpenDLAModel/classification/onnx -
转换命令
$cd IPU_SDK_Release/docker $bash run_docker.sh #进入到docker环境下的OpenDLAModel目录 $cd /work/SGS_XXX/OpenDLAModel $bash convert.sh -a classification/mobilenetv2 -c config/classification.cfg -p SGS_IPU_Toolchain(绝对路径) -s false -
最终生成的模型地址
output/${chip}_${时间}/mobilenet_v2_224.img
output/${chip}_${时间}/mobilenet_v2_224_fixed.sim
output/${chip}_${时间}/mobilenet_v2_224_float.sim
2.2.3 关键脚本参数解析
-   input_config.ini

        [INPUT_CONFIG]
        inputs = images;                    #onnx 输入节点名称, 如果有多个需以“,”隔开;
        training_input_formats = RGB;       #模型训练时的输入格式, 通常都是RGB;
        input_formats = BGRA;               #板端输入格式, 可以根据情况选择BGRA或者YUV_NV12;
        quantizations = TRUE;               #打开输入量化, 不需要修改;
        mean_red = 123.68;                  #均值, 跟模型预处理相关, 根据实际情况配置;
        mean_green = 116.28;                #均值, 跟模型预处理相关, 根据实际情况配置;
        mean_blue = 103.53;                 #均值, 跟模型预处理相关, 根据实际情况配置;
        std_value = 58.395:57.12:57.375;    #方差, 跟模型预处理相关, 根据实际情况配置;

        [OUTPUT_CONFIG]
        outputs = output;                   #onnx 输出节点名称, 如果有多个需以“,”隔开;
        dequantizations = FALSE;            #是否开启反量化, 根据实际需求填写, 建议为TRUE。设为False, 输出为int16; 设为True, 输出为float32

-   classification.cfg

        [CLASSIFICATION]
        CHIP_LIST=pcupid                            #平台名称, 必须和板端平台一致, 否则模型无法运行
        Model_LIST=mobilenetv2_sim                  #输入onnx模型名称
        INPUT_SIZE_LIST=224x224                     #模型输入分辨率
        INPUT_INI_LIST=input_config.ini             #配置文件
        CLASS_NUM_LIST=0                            #填0即可
        SAVE_NAME_LIST=mobilenet_v2_224.img         #输出模型名称
        QUANT_DATA_PATH=quant_data                  #量化图片路径
2.3 模型仿真
-
获取float/fixed/offline模型输出
$bash convert.sh -a classification/mobilenetv2 -c config/classification.cfg -p SGS_IPU_Toolchain(绝对路径) -s true执行上述命令后, 会默认将
float模型的输出tensor保存到classification/mobilenetv2/log/output路径下的txt文件中。此外, 在classification/mobilenetv2/convert.sh脚本中也提供了fixed和offline的仿真示例, 用户在运行时可以通过打开注释代码块, 分别获取fixed和offline模型输出。 -
模型精度对比
在保证输入和上述模型相同的情况下, 进入2.1章节搭建好的环境,
deep-learning-for-image-processing/pytorch_classification/Test6_mobilenet/infer.py文件的第40行处添加打印:print(output)获取pytorch模型对应节点的输出tensor, 进而和float、fixed、offline模型进行对比。此外需要特别注意的是, 原始模型的输出格式是
NCHW, 而float/fixed/offline模型输出的格式是NHWC。
3 板端部署
3.1 程序编译
示例程序编译之前需要先根据板子(nand/nor/emmc, ddr型号等)选择deconfig进行sdk整包编译, 具体可以参考alkaid sdk sigdoc《开发环境搭建》文档。
-
编译板端classification示例。
$cd sdk/verify/opendla $make clean && make source/classification -j8 -
最终生成的可执行文件地址
sdk/verify/opendla/out/${AARCH}/app/prog_classification
3.2 运行文件
运行程序时, 需要先将以下几个文件拷贝到板端
- prog_classification
- apple.jpg
- mobilenet_v2_224.img
3.3 运行说明
-
Usage:
./prog_classification -i image -m model [-t threshold](执行文件使用命令) -
Required Input:
- image: 图像文件夹/单张图像路径
- model: 需要测试的offline模型路径
-
Optional Input:
- threshold: 检测阈值(0.0~1.0, 默认为0.5)
-
Typical Output:
./prog_classification -i resource/retrieval_library/000000577364.jpg -m models/mobilenet_v2_224.img

    inputs: resource/retrieval_library/000000577364.jpg
    model path: models/mobilenet_v2_224.img
    threshold: 0.500000
    client [789] connected, module:ipu
    found 1 images!
    the input image: resource/000000577364.jpg
    fillbuffer processing...
    net input width: 224, net input height: 224
    num classes: 1000

    score: 0.776115

    model invoke time: 4.095000 ms
    post process time: 0.571000 ms
    class_id: 385
    ------shutdown IPU0------
    client [789] disconnected, module:ipu