3. 模型推理
1. Simulator PC仿真
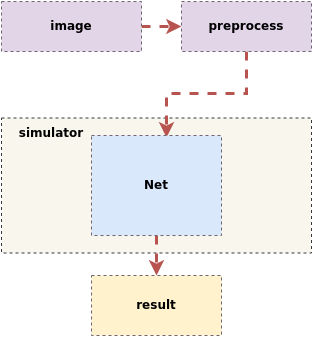
SGS浮点网络模型推理流程如下:
输入一张图片 ——> 先经过前处理进行resize以及归一化等操作

               ——> 送到工具已经定义好的Net里进行推理

                   ——> 得到最终的结果
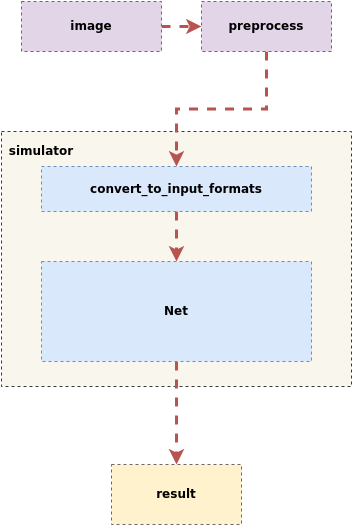
SGS定点网络模型和端侧离线模型推理流程如下:
输入一张图片 ——> 先经过前处理进行resize操作

                ——> 送到工具已经定义好的Net里进行推理,Simulator会先进行convert_to_input_formats操作,

                   ——> 再送到模型里,再进行推理

                       ——>得到最终结果
1.1 Simulator工具使用示例
进入到该工具目录,工具使用示例:
(1) 测试dataset:
python3 SGS_IPU_Toolchain/Scripts/calibrator/simulator.py \
-i ~/SGS_Models/resource/classify/ilsvrc2012_val_set100/ \
-m ~/SGS_Models/tensorflow/mobilenet_v2/mobilenet_v2_float.sim \
-c Classification \
-n mobilenet_v2.py \
--num_process 20 \
--soc_version CHIP
或者可以使用传入 指定图片路径列表文件 的形式:
python3 SGS_IPU_Toolchain/Scripts/calibrator/simulator.py \
-i ~/SGS_Models/resource/classify/ilsvrc2012_val_set100/file.list \
-m ~/SGS_Models/tensorflow/mobilenet_v2/mobilenet_v2_float.sim \
-c Classification \
-n mobilenet_v2.py \
--num_process 20 \
--soc_version CHIP
(2) 测试单张图片,并将检测结果绘制在图片上,保存到 ./results/ 文件夹下:
python3 SGS_IPU_Toolchain/Scripts/calibrator/simulator.py \
-i ~/SGS_Models/resource/detection/coco2017_val_set100/000000567877.jpg \
-m ~/SGS_Models/tensorflow/ssd_mobilenet_v1/ssd_mobilenet_v1_float.sim \
-c Detection \
-n ssd_mobilenet_v1.py \
--draw_result ./results \
--soc_version CHIP
-c配置为Detection需要接后处理模型,使用TFLite_Detection_NMS作为模型输出,具体见第5章节使用sgs_chalk构建后处理模型
1.2 Simulator工具使用参数说明
(1) 必选参数
- ①
-i,--image: 图片文件 / 图片文件夹路径 / 指定图片路径列表文件 。
使用须知
-
-i/--image参数传入 指定图片路径列表文件 的形式时:新建input_list.txt,新增内容如下:
-
网络模型为单输入时:/path/to/image_test/2007000364.jpg
-
网络模型为多输入时:/path/to/image_test/2007000364.jpg,/path/to/image_test/ILSVRC2012_test_00000002.bmp
有多组数据可以写在下一行,读取时认为每行是模型的一次输入数据。完成input_list.txt后
-i 参数为: /path/to/input_list.txt
-
-
当
-i/--image的参数为单张图片的路径时,simulator只对该图片推演; -
当
-i/--image的参数为图片文件夹的路径时,simulator会对文件夹内的图片全部推演,此时增加可选参数--num_process(参数 > 1),可以开启多进程推演。
-
②
-m,--model: 网络模型文件路径。 -
③
-n,--preprocess: 前处理Python的文件路径,详见第2章前处理方法。
使用须知
-
多输入模型的前处理参数需使用多个前处理方法,前处理的个数和顺序需与模型输入个数和顺序保持一致。例如:
-n preprocess1.py,preprocess2.py 或者 --preprocess preprocess1.py,preprocess2.py
-
请使用与训练相同的图片前处理方式,每个输入的前处理方式需独立编写python文件。
- ④
--soc_version: IPU Toolchain chip
使用须知
- 执行python3 SGS_IPU_Toolchain/DumpDebug/show_sdk_info.py 可查看IPU Toolchain具体适配那些chip及版本信息
(2) 可选参数
- ①
-c,--category: 模型的类别,主要有Classification / Detection / Unknown。(默认为Unknown)
使用须知
Classification: 模型有1个输出,会根据输出排序输出分数由高至低的前5个。Detection: 模型使用TFLite_Detection_NMS作为模型输出,具体见第5章节使用sgs_chalk构建后处理模型。其他后处理请使用Unknown。Unknown: 模型输出不属于上述两种类型,会输出全部的Tensor数值。
-
②
--dump_rawdata: 保存模型输入二进制数据,文件名为图片名 + .bin,保存在当前路径。 -
③
--num_process: 进程数,同时运行的进程数。(默认为1)
使用须知
- 不加该参数默认为单进程。
- ④
--draw_result: 绘制目标检测网络选框结果。
使用须知
-
仅支持
-c/--category为Detection时使用该参数。 -
参数为结果保存文件夹路径(文件夹不存在时会自动创建)和画框的阈值,使用逗号( , )分隔保存路径与阈值。
-
输入阈值画出大于阈值的检测结果,不输入阈值则画出全部检测结果。
-
⑤
--continue_run: 接着上次数据集剩下的部分运行。 -
⑥
--skip_garbage: Fixed和Offline模型输出结果跳过无用数据。(已弃用) -
⑦
-l,--label: 数据集的标签文件路径 / 图片文字描述的标签。(已弃用) -
⑧
-t,--type: 模型的类型。(已弃用,simulator.py可根据传入模型自动判断出模型的类型) -
⑨
--tool: sgs_simulator文件路径。(已弃用)
2. Simulator 远程到开发板推理
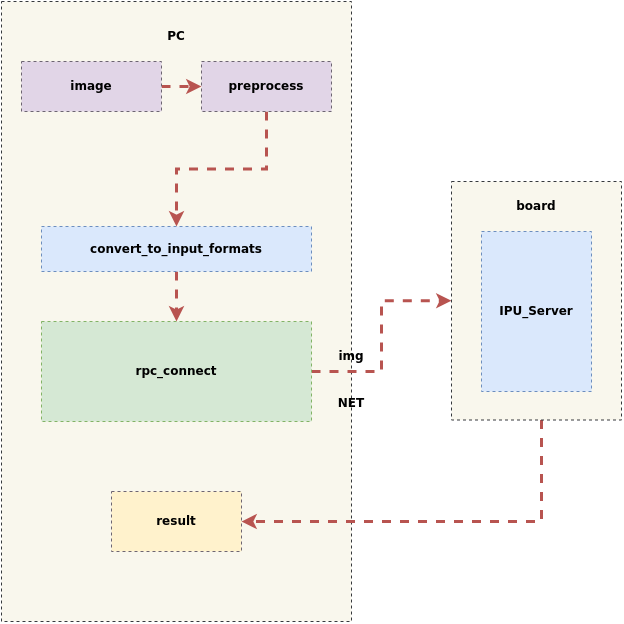
simulator也提供了远程仿真工具,通过在板端开启RPC服务,可以在PC仿真端一键获取离线模型板端推理结果;客户使用起来简单高效,用于比较和验证offline模型在板端推理结果和PC端推理结果的一致性,提升模型移植效率。
在pc上输入图片做完前处理之后,开启rpc服务,将输入数据和模型发送到板端进行推理,并在推理完成之后将板端结果返回到pc上,推理过程如下图所示:
2.1 Simulator 远程到开发板推理使用介绍
Linux SDK-alkaid已提供sdk/verify/release_feature/source/dla/ipu_server的app。
使用过程如下:
(1) 首先,板端运行ipu_server开启RPC服务(PORT为设定的port号)
./prog_dla_ipu_server -p PORT
(2) 其次,PC端运行simulator.py
python3 SGS_IPU_Toolchain/Scripts/calibrator/simulator.py \
-i /path/to/input_data \
-m /path/to/offline.img \
-n /path/to/preprocess.py \
--host 板端ip地址 \
--port PORT \
--soc_version CHIP
参数解释如下:
-i: 推理图片
-m: offline离线模型
-n: 前处理文件
--host: 板端ip地址
--port: 设定端口号
--soc_version: IPU Toolchain chip
(4) 运行结果保存在./log/output里,请和simulator.py执行offline模型的结果比较。
(5) 如果上述比较结果不一致,请提供原始模型给FAE分析。
注意
- simulator 远程到开发板推理时进程数
--num_process只能设置为1。
- simulator 远程到开发板推理需要保证PC端和板端的网络连通,否则可能出现如下报错:
网络连通测试可以用
RuntimeError: std::future_error: Broken promisenc网络工具,操作方法如下:
板子上输入(PORT为设定的port号)PC上输入nc -l -p PORT然后在PC终端输入字符,如果在板端能显示,说明可以传输,否则请检查PC端和板端的网络连接。nc 板端ip地址 PORT
- 远程到开发板推理时设定的默认timeout时间为60秒,如果出现如下报错:
可能是文件太大,可在simulator.py增加配置timeout时间(单位:秒),如:
TimeoutError: Timeout for ipu_create_model--timeout 100
- 板端内存空间有限,如遇到模型文件太大引起网络传输导致内存不足的情况,可按照如下方法操作:
拷贝模型文件到板端可以访问的路径,simulator.py增加设定模型在板端的路径配置--model_onboard_path 模型在板端的路径--model_onboard_path时,网络仅传输模型在板端路径的字符串,从而减小板端内存空间的使用。
3. 自定义simulator简介
为了更方便灵活的对多输入、多段网络进行量化和转换,用户也可以自定义simulator流程。
自定义simulator流程为输入推理图片,经过前处理之后,创建calibrator_custom.simulator实例,调用set_input将输入数据传到模型里,调用invoke进行推理,调用get_output得到输出,如下图所示:

3.1 calibrator_custom.simulator说明和介绍
- calibrator_custom.simulator接口,可以解析各个阶段(float/fixed/offline)的模型,在PC仿真模型结果。
import calibrator_custom
calibrator_custom.set_soc_version('CHIP')
model_path = './mobilenet_v2_float.sim'
simulator = calibrator_custom.simulator(model_path)
使用须知
-
calibrator_custom.set_soc_version只能调用一次,设定推理的chip信息。 -
执行python3 SGS_IPU_Toolchain/DumpDebug/show_sdk_info.py 可查看IPU Toolchain具体适配那些chip及版本信息。
-
使用calibrator_custom.simulator时,需要给定模型的路径,用于创建simulator的实例。参数给定错误,将无法成功创建simulator实例,并返回ValueError。
- calibrator_custom.rpc_simulator接口,只能解析offline模型,连接板端ipu_server,在板端推理后返回结果。
import calibrator_custom
calibrator_custom.set_soc_version('CHIP')
model_path = './mobilenet_v2_offline.img'
calibrator_custom.rpc_connect('host', port)
simulator = calibrator_custom.rpc_simulator(model_path)
使用须知
-
calibrator_custom.set_soc_version只能调用一次,设定推理的chip信息。 -
执行python3 SGS_IPU_Toolchain/DumpDebug/show_sdk_info.py 可查看IPU Toolchain具体适配那些chip及版本信息。
-
使用calibrator_custom.simulator时,需要给定模型的路径,用于创建simulator的实例。参数给定错误,将无法成功创建simulator实例,并返回ValueError。
-
calibrator_custom.rpc_connect只能调用一次,用于连接板端ip和port。
下面介绍calibrator_custom.simulator / calibrator_custom.rpc_simulator中的方法
- (1)
get_input_details: 返回网络模型输入信息,以list形式返回
返回的list中根据模型输入个数包含以下dict信息:
index: 输入Tensor序号
name: 输入Tensor名称
shape: 输入Tensor的形状
dtype: 输入Tensor的数据类型
input_formats: 网络模型实际运行时的图片输入格式
training_input_formats: 网络模型训练是的图片输入格式
① Float模型返回如下:
 input_details = model.get_input_details()
 print(input_details)
 [
  {
    'name': 'sub_7',
    'shape': array([  1, 513, 513, 3], dtype=int32),
    'dtype': <class 'numpy.float32'>,
    'index': 0
  }
]
② Fixed和Offline模型返回如下:
>>> input_details = model.get_input_details()
>>> print(input_details)
[
  {
    'index': 0,
    'shape': array([  1, 513, 513, 3]),
    'dtype': <class 'numpy.uint8'>,
    'name': 'sub_7' ,
    'input_formats': 'RGB',
    'training_input_formats': 'RGB'
  }
]
- (2)
get_output_detail: 返回网络模型输出信息,以list形式返回
返回的list中根据模型输入个数包含以下dict信息:
index: 输出Tensor序号
name: 输出Tensor名称
shape: 输出Tensor的形状
dtype: 输出Tensor的数据类型
input_formats: 网络模型实际运行时的图片输出格式
training_input_formats: 网络模型训练是的图片输出格式
quantization: 输出Tensor的scale和zero_point(需将模型输出Tensor乘scale得到浮点数)。
如果input_config.ini配置dequantizations为TRUE,生成的模型对应输出会增加Fix2Float算子,输出数据类型为float32,get_output_details不再返回quantization。
① Float模型返回如下:
>>> output_details = model.get_output_details()
>>> print(output_details)
[
  {
    'name': 'MobilenetV2/Conv/Conv2D',
    'shape': array([  1, 257, 257,  30], dtype=int32),
    'dtype': <class 'numpy.float32'>,
    'index': 0
  }
]
② Fixed和Offline模型返回如下:
input_config.ini配置dequantizations为FALSE
 >>> output_details = model.get_output_details()
 >>> print(output_details)
[
  {
    'index': 0,
    'shape': array([  1, 257, 257,  30]),
    'name': 'MobilenetV2/Conv/Conv2D',
    'dtype': <class 'numpy.int16'>,
    'quantization': (0.00013832777040079236, 0)
  }
]
dequantizations为TRUE
 >>> output_details = model.get_output_details()
 >>> print(output_details)
[
  {
    'index': 0,
    'shape': array([  1, 257, 257,  30]),
    'name': 'MobilenetV2/Conv/Conv2D',
    'dtype': <class 'numpy.float32'>,
  }
]
使用须知
- 配置input_config.ini中[OUTPUT_CONFIG]的dequantizations为TRUE时,会在转换Fixed模型时在增加Fix2float算子,该算子会转换定点数据到浮点数据,因此model.get_output_details()将不再有
quantization信息。
- (3)
set_input: 设置网络模型输入数据
>>> model.set_input(0, img_data)
使用须知
-
0为输入Tensor的index,可以在get_input_details()的返回值里拿到; -
img_data是与model输入shape和dtype相同的numpy.ndarray格式数据,错误的shape或dtype,将导致set_input返回ValueError;
-
如果模型有多个输入,可以多次调用set_input,根据get_input_details()的返回值里拿到index设置对应Tensor的输入数据。
- (4)
invoke: 模型运行一次
>>> model.invoke()
使用须知
- 调用invoke前请先使用set_input设置输入数据,否则模型结果可能与预期不符。
- (5)
get_output: 获取网络模型输出数据
>>> result = model.get_output(0)
使用须知
-
0为输出Tensor的index,可以在get_output_details()的返回值里拿到; -
如果模型有多个输出,可以多次调用get_output,根据get_output_details()的返回值里拿到index获取对应Tensor的输出数据。
- (6)
get_tensor_details: 返回网络模型每个Tensor的信息(list)。calibrator_custom.rpc_simulator不提供该接口。
① Float模型返回如下:
返回的list中根据模型Tensor个数包含以下dict信息:
name: Tensor名称
shape: Tensor的形状
dtype: Tensor的数据类型
qtype: 定点模型该Tensor可能的数据类型(quantization type)
 >>> tensor_details = model.get_tensor_details()
 >>> print(tensor_details)
[
  {
    'name': 'MobilenetV2/Conv/Conv2D',
    'shape': array([  1, 257, 257,  30], dtype=int32),
    'dtype': 'FLOAT32',
    'qtype': 'INT16'
  },
  {
    'name': 'MobilenetV2/Conv/Conv2D_bias',
    'shape': array( [ 2, 30], dtype=int32),
    'dtype': 'FLOAT32',
    'qtype': 'INT16'
  },
  {
    'name': 'MobilenetV2/Conv/weights/read',
    'shape': array( [30,  3,  3,  3], dtype=int32),
    'dtype': 'FLOAT32',
    'qtype':  'INT8'
  },
  {
    'name': 'sub_7',
    'shape': array([  1, 513, 513, 3], dtype=int32),
    'dtype': 'FLOAT32',
    'qtype': 'UINT8'
  }
]
② Fixed模型的Tensor信息中包含了量化信息,返回如下:
返回的list中根据模型Tensor个数包含以下dict信息:
name: Tensor名称
shape: Tensor的形状
dtype: Tensor的数据类型
quantization: Tensor的scale和zero_point
min: Tensor的最小值(可能包含)
max: Tensor的最大值(可能包含)
>>> tensor_details = model.get_tensor_details()
>>> print(tensor_details)
[
    {
      'shape': array([  1, 257, 257,  30]),
      'quantization': [(0.00013832777040079236, 0)],
      'min': [-4.230099201202393],
      'max': [4.532586097717285],
      'name': 'MobilenetV2/Conv/Conv2D',
      'dtype': 'INT16'
    },
    {
      'shape':  array([ 2, 30]),
      'quantization': [],
      'min': [0.0],
      'max ': [1.0],
      'name': 'MobilenetV2/Conv/Conv2D_bias',
      'dtype':'INT16'
    },
    {
      'shape': array([30,  3,  3,  3]),
      'quantization': [(0.004813921172171831, 0)],
      'min': [-0.5498989820480347],
      'max': [0.6113680005073547],
      'name': 'MobilenetV2/Conv/weights/read',
      'dtype': 'INT8'
    },
    {
      'shape': array([  1, 513, 513, 3 ]),
      'quantization': [(0.007843137718737125, 128)],
      'min': [-1 .0],
      'max': [1.0],
      'name': 'sub_7',
      'dtype': 'UINT8'
    }
]
③ Offline模型无法返回模型每个Tensor的信息。
3.2 calibrator_custom.SIM_Simulator
(1) calibrator_custom.SIM_Simulator简介
对于多输入、多段网络同时转换时,提供calibrator_custom.SIM_Simulator,方便进行简单定义后,统一运行。calibrator_custom.SIM_Simulator是已经实现好的class,当中只有forward方法未实现,使用时仅需实现该方法,即可推理完成。
(2) calibrator_custom.SIM_Simulator使用方法
下面以 SGS_IPU_Toolchain/Scripts/examples/sim_simulator.py 为例,说明calibrator_custom.SIM_Simulator的使用方法:
① 定义forward方法:
import calibrator_custom
class Net(calibrator_custom.SIM_Simulator):
    def __init__(self):
        super().__init__()
        self.model = calibrator_custom.simulator(model_path)
    def forward(self, x):
        out_details = self.model.get_output_details()
        self.model.set_input(0, x)
        self.model.invoke()
        result_list = []
        for idx in range(len(out_details)):
            result = self.model.get_output(idx)
            # dequantize to float
            if out_details[idx]['dtype'] == np.int16:
                scale, _ = out_details[idx]['quantization']
                result = np.multiply(result, scale)
            result_list.append(result)
        return result_list
使用须知
- forward的参数为模型输入,如有多个输入,可增加forward的参数。
② 创建calibrator_custom.SIM_Simulator的实例
net = Net()
③ 调用calibrator_custom.SIM_Simulator实例的方法
result = net(img_gen, num_process=4)
使用须知
-
调用calibrator_custom.SIM_Simulator实例,需要给定输入图片的numpy.ndarray或者图片生成器。
-
当num_process大于1时,img_gen必须为图片生成器。
- 图片生成器(img_gen): 为方便多输入、多段模型进行推理,通过生成器方便组织输入图片的序列。如模型有多个输入,生成器应该按照定义forward时的输入顺序,返回有多个numpy.ndarray的list。
- calibrator_custom.utils.image_preprocess_func使用预先定义好的前处理方法,获取img_gen。
preprocess_func = calibrator_custom.utils.image_preprocess_func(model_name)
def image_generator(folder_path, preprocess_func, norm):
    images = [os.path.join(folder_path, img) for img in os.listdir(folder_path)]
    for image in images:
        img = preprocess_func(image, norm)
        yield [img]
img_gen = image_generator('./images', preprocess_func, False)