YOLOv11-OBB
1 Overview
1.1 Background Introduction
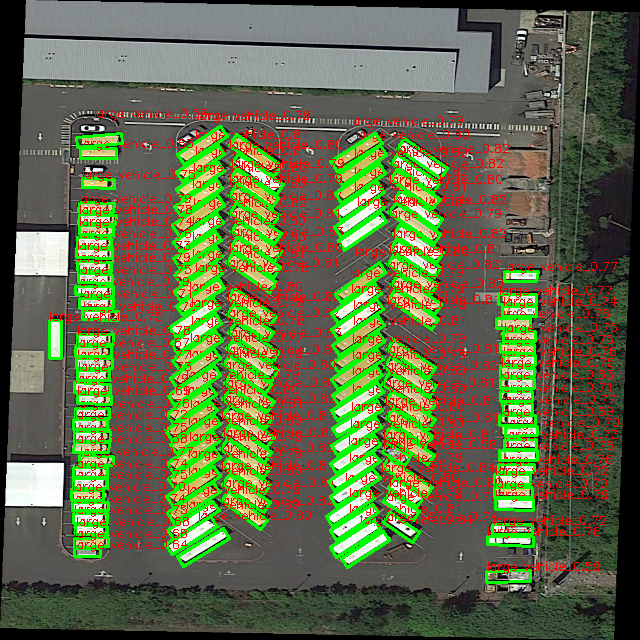
YOLOv11-obb is a real-time object detection model that supports Oriented Bounding Boxes (OBB), making it more suitable for remote sensing, aerial photography, industrial, and other scenarios with tilted targets compared to standard YOLO models. The official YOLOv11-obb provides various detection model sizes: n, s, m, l, x, and the accuracies of these open-source models are as follows:
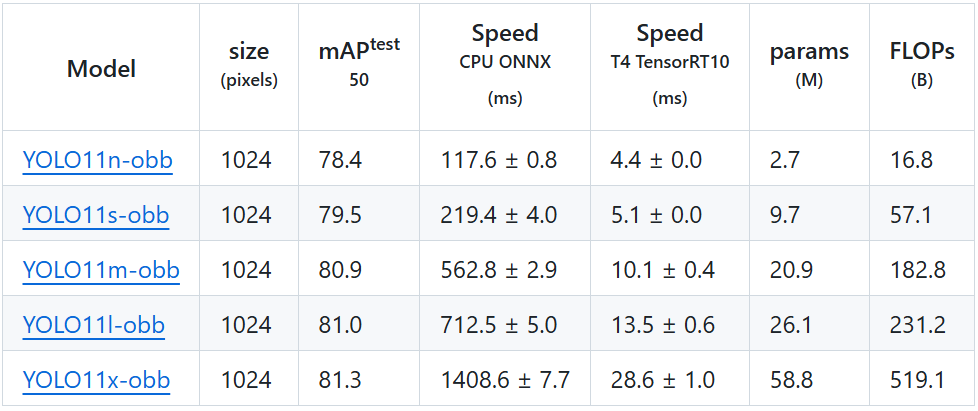
For more details, please refer to the official YOLOv11-obb documentation:
https://github.com/ultralytics/ultralytics/tree/v8.3.253
The download link for the YOLOv11-obb open-source models is as follows:
1.2 Usage Instructions
The Linux SDK-alkaid comes with pre-converted offline models and board-side examples by default. The relevant file paths are as follows:
-
Board-side example program path
Linux_SDK/sdk/verify/opendla/source/detection/yolov11_obb -
Board-side offline model path
Linux_SDK/project/board/${chip}/dla_file/ipu_open_models/detection/yolo11n_obb_640x640.img -
Board-side test image path
Linux_SDK/sdk/verify/opendla/source/resource/P0006.png
If the user does not need to convert the model, they can jump directly to section 3.
2 Model Conversion
2.1 ONNX Model Conversion
-
Setting up the Python environment
$conda create -n yolov11-obb python==3.10
$conda activate yolov11-obb
$git clone https://github.com/ultralytics/ultralytics
$cd ultralytics
$pip install -e . -i https://pypi.tuna.tsinghua.edu.cn/simple
Note: The provided Python environment setup is only a reference example; for the specific setup process, please refer to the official source running tutorial:
https://docs.ultralytics.com/quickstart/ -
Model Testing
-
Write the model testing script
predict.pyfrom ultralytics import YOLO # Load a model model = YOLO("yolo11n-obb.pt") # load an official model # Predict with the model results = model("./ultralytics/assets/bus.jpg") # predict on an image # Access the results for result in results: xywhr = result.obb.xywhr # center-x, center-y, width, height, angle (radians) xyxyxyxy = result.obb.xyxyxyxy # polygon format with 4-points names = [result.names[cls.item()] for cls in result.obb.cls.int()] # class name of each box confs = result.obb.conf # confidence score of each box -
Run the model testing script to ensure the YOLOv11-obb environment is configured correctly.
$python predict.py
For specific details, please refer to the official YOLOv11-obb testing documentation
https://docs.ultralytics.com/zh/modes/predict -
-
Model Export
-
Write the model conversion script
export.py:import os,sys sys.path.append(os.getcwd()) from ultralytics import YOLO # Load a model model = YOLO("opendla/yolo11-obb/yolo11n-obb.pt") # load an official model # Export the model model.export(format="onnx", imgsz=[640, 640], simplify=True, opset=13) -
Run the model conversion script to generate the yolov11n-obb.onnx model in the current directory $python export.py
-
2.2 Offline Model Conversion
2.2.1 Preprocessing & Postprocessing Instructions
-
Preprocessing
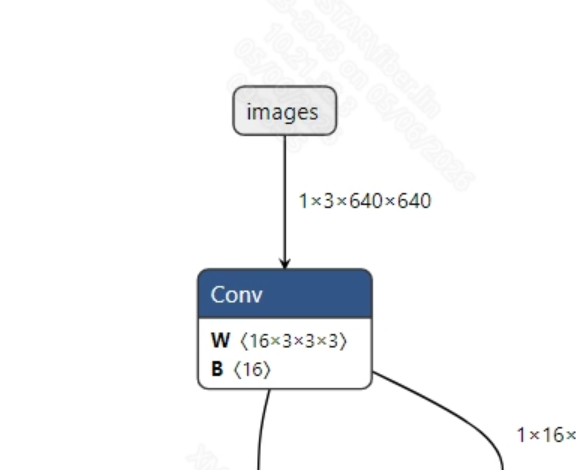
The input information for the successfully converted yolov11n-obb.onnx model is shown in the figure below, requiring the input image size to be (1, 3, 640, 640), and the pixel values must be normalized to the range [0, 1].
-
Postprocessing
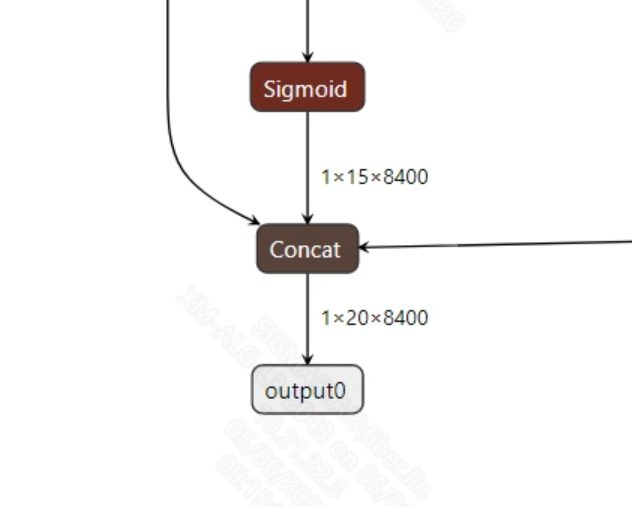
The output information for the successfully converted yolov11n-obb.onnx model is shown in the figure below. The output dimensions of the YOLOv11-obb model are typically (1, 20, 8400), where 8400 is the number of candidate boxes and 20 includes 4 bounding box coordinates, 1 confidence score, 1 angle, and 14 class probabilities. After obtaining the candidate boxes from the model output, all candidate box classes need to be judged, and NMS (Non-Maximum Suppression) must be performed to output the correct bounding boxes. Finally, the angle information is combined to rotate the bounding boxes and output the final detection results.
2.2.2 Offline Model Conversion Process
Note: 1) OpenDLAModel corresponds to the smodel file extracted from the compressed package image-dev_model_convert.tar. 2) The conversion command must be run in a Docker environment; please load the SGS Docker environment according to the Docker development environment tutorial.
-
Copy the ONNX model to the conversion code directory
$cp ultralytics/yolo11n-obb.onnx OpenDLAModel/detection/yolov11-obb/onnx -
Conversion command
$cd IPU_SDK_Release/docker $bash run_docker.sh # Enter the OpenDLAModel directory in the Docker environment $cd /work/SGS_XXX/OpenDLAModel $bash convert.sh -a detection/yolov11-obb -c config/detection_yolov11_obb.cfg -p SGS_IPU_Toolchain (absolute path) -s false -
Final generated model locations
output/${chip}_${time}/detection_yolov11_obb.img
output/${chip}_${time}/detection_yolov11_obb_fixed.sim
output/${chip}_${time}/detection_yolov11_obb_float.sim
2.2.3 Key Script Parameter Analysis
-   input_config.ini

        [INPUT_CONFIG]
        inputs = images;                # ONNX input node names, separated by commas if there are multiple;
        training_input_formats = RGB;   # Input format during model training, usually RGB;
        input_formats = BGRA;           # Board-side input format, can choose BGRA or YUV_NV12 based on the situation;
        quantizations = TRUE;           # Enable input quantization, do not modify;
        mean_red = 0;                   # Mean, related to model preprocessing, configure according to actual conditions;
        mean_green = 0;                 # Mean, related to model preprocessing, configure according to actual conditions;
        mean_blue = 0;                  # Mean, related to model preprocessing, configure according to actual conditions;
        std_value = 255;                # Variance, related to model preprocessing, configure according to actual conditions;

        [OUTPUT_CONFIG]
        outputs = output0;              # ONNX output node names, separated by commas if there are multiple;
        dequantizations = TRUE;         # Whether to enable dequantization, fill according to actual needs, recommended to be TRUE. If set to False, output will be int16; if set to True, output will be float32

-   detection.cfg

        [DETECTION]
        CHIP_LIST=pcupid                        # Platform name, must match the board platform; otherwise, the model cannot run
        Model_LIST=yolo11n-obb                  # Input ONNX model name
        INPUT_SIZE_LIST=640x640                 # Model input resolution
        INPUT_INI_LIST=input_config.ini         # Configuration file
        CLASS_NUM_LIST=0                        # Just fill in 0
        SAVE_NAME_LIST=yolo11n_obb_640x640.img  # Output model name
        QUANT_DATA_PATH=quant_data              # Path for quantization images
2.3 Model Simulation
-
Obtain float/fixed/offline model outputs
$bash convert.sh -a detection/yolov11-obb -c config/detection_yolov11_obb.cfg -p SGS_IPU_Toolchain (absolute path) -s trueAfter executing the above command, the output tensor of the
floatmodel will be saved by default in a txt file under the pathdetection/yolov11-obb/log/output. Additionally, thedetection/yolov11-obb/convert.shscript also provides simulation examples forfixedandoffline, allowing users to obtain outputs for thefixedandofflinemodels by uncommenting code blocks during execution. -
Model Accuracy Comparison
With the input being the same as the aforementioned models, enter the environment built in section 2.1, and add the following print statement at line 238 in the
ultralytics/ultralytics/nn/modules/head.pyfile:print(torch.cat([x, angle], 1))This will obtain the output tensor of the corresponding node in the PyTorch model, allowing for comparison with the float, fixed, and offline models. It should also be noted that the original model's output format is
NCHW, while the output formats of the float/fixed/offline models areNHWC.
3 Board-side Deployment
3.1 Program Compilation
Before compiling the example program, it is necessary to select the appropriate deconfig based on the board (nand/nor/emmc, ddr model, etc.) for the complete SDK compilation. For details, refer to the alkaid SDK sigdoc document "Development Environment Setup."
-
Compile the board-side YOLOv11-obb example.
$cd sdk/verify/opendla $make clean && make source/detection/yolov11_obb -j8 -
Final generated executable file location
sdk/verify/opendla/out/${AARCH}/app/prog_detection_yolov11_obb
3.2 Running Files
When running the program, you need to copy the following files to the board: - prog_detection_yolov11_obb - P0006.png - yolo11n_obb_640x640.img
3.3 Running Instructions
-
Usage:
./prog_detection_yolov11_obb -i image -m model [-t threshold](command to run the executable) -
Required Input:
- image: path to the image folder/single image
- model: path to the offline model to be tested
-
Optional Input:
- threshold: detection threshold (0.0~1.0, default is 0.5)
-
Typical output:
>./prog_detection_yolov11_obb -i resource/P0006.png -m models/yolo11n_obb_640x640.img
        inputs: resource/P0006.png
        model path: models/yolo11n_obb_640x640.img
        threshold: 0.500000
        found 1 images!
        [0] processing resource/P0006.png...
        fillbuffer processing...
        net input width: 640, net input height: 640
        model invoke time: 5.198000 ms
        Nms time: 102.053000 ms
        post process time: 114.497000 ms
        outImagePath: ./output/52382/P0006.png